
Sungaze Gaggio Classic Pro PID Kit for Review gaggia classic Buying Guide – Oemiu
Sungaze Gaggio Classic Pro PID Kit Review: A Gaggia Classic Buying Guide
The Gaggia Classic Pro, a stalwart in the espresso machine world, has long been a favorite for home baristas seeking a semi-automatic machine that offers a balance of affordability and performance. Its robust build, ease of use, and capacity for modification make it a compelling choice. However, one area where the Gaggia Classic Pro can fall short, especially for those pursuing consistent and high-quality espresso, is temperature control. This is where the Sungaze PID Kit steps in, promising to elevate your Gaggia Classic Pro espresso experience. But is it worth the investment? This in-depth review explores the Sungaze PID Kit, examining its features, installation process, performance benefits, and overall value proposition, offering a comprehensive buying guide for Gaggia Classic Pro owners.
Understanding the Gaggia Classic Pro and the Need for PID
The Gaggia Classic Pro, also sometimes sought as the Gaggia Classic Pro espresso machine, is known for its simplicity and durability. It’s a machine that allows the user to have a high degree of control over the brewing process. Unlike fully automatic machines, the Gaggia Classic Pro requires the barista to manually control the start and stop of the extraction, giving them the ability to influence the final cup. However, this manual control is only as good as the machine’s ability to provide stable and consistent brewing conditions, particularly temperature. The Gaggia Classic Pro, in its stock configuration, uses a simple thermostat to regulate boiler temperature. Thermostats are notorious for temperature swings, meaning the actual water temperature during brewing can fluctuate significantly, leading to inconsistent espresso shots. These temperature fluctuations can result in under-extracted, sour shots or over-extracted, bitter shots, frustrating even the most skilled home baristas.
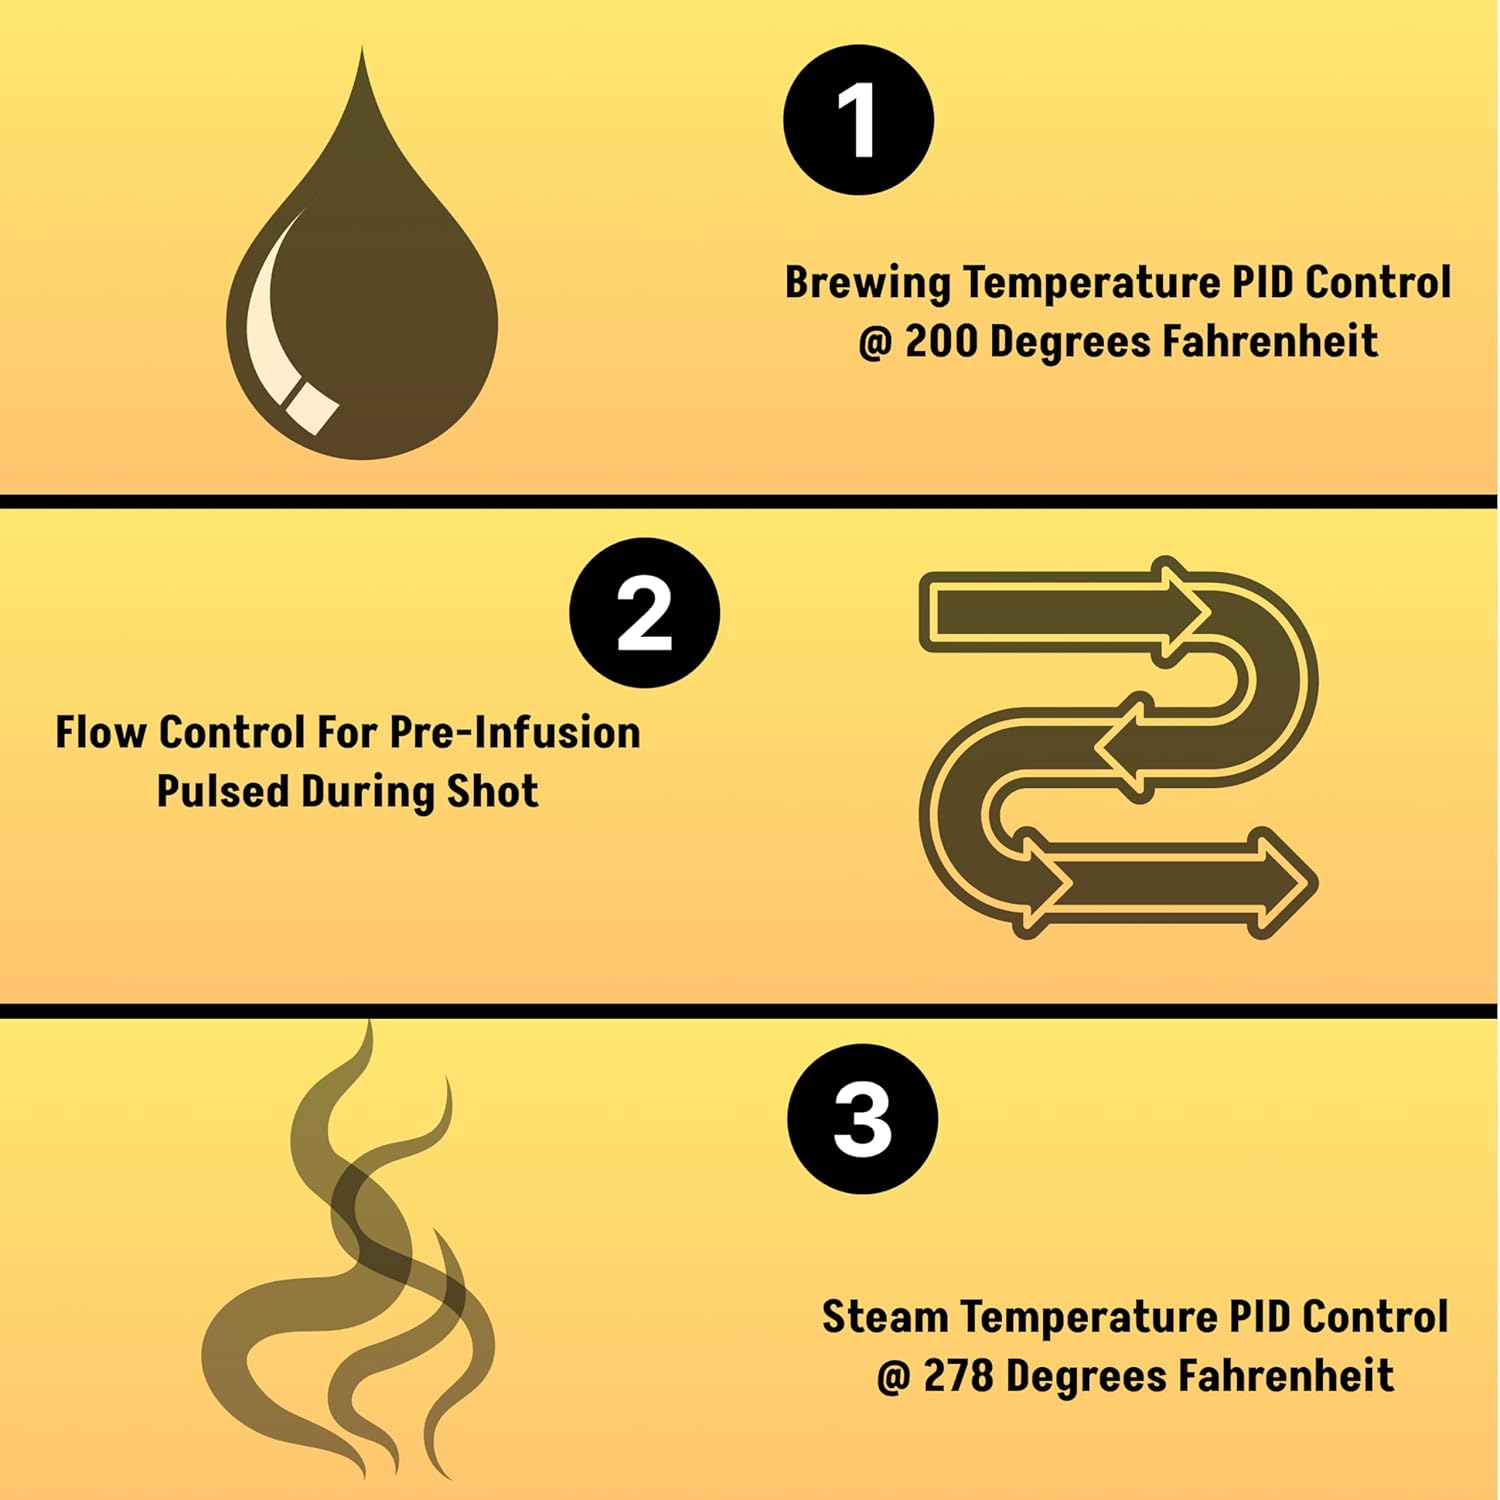
A PID (Proportional-Integral-Derivative) controller is a type of feedback controller that uses a closed-loop system to maintain a desired setpoint (in this case, the brewing temperature). It continuously monitors the actual temperature, compares it to the desired temperature, and adjusts the heating element accordingly. The “proportional” part reacts to the current error, the “integral” part corrects for past errors, and the “derivative” part anticipates future errors based on the rate of change. This sophisticated control algorithm results in significantly more stable and precise temperature control than a thermostat, leading to more consistent espresso extractions. The benefits of precise temperature control are numerous: improved shot repeatability, better flavor clarity, the ability to fine-tune extraction for different coffee beans, and a reduced likelihood of channeling and other extraction issues. For the serious home barista aiming for cafe-quality espresso, upgrading a Gaggia Classic Pro with a PID controller can be a game-changer.
Beyond temperature stability, a good PID kit often includes other features that enhance the user experience. Pre-infusion capabilities, which involve a brief, low-pressure soak of the coffee grounds before full pressure is applied, can improve extraction and reduce channeling. Shot timers provide a visual indication of extraction time, allowing for more precise control and repeatability. Improved steam power, resulting from better temperature management, can make milk frothing easier and more consistent. These additional features, combined with the core benefit of temperature stability, make a PID kit a compelling upgrade for any Gaggia Classic Pro owner who is serious about their espresso.
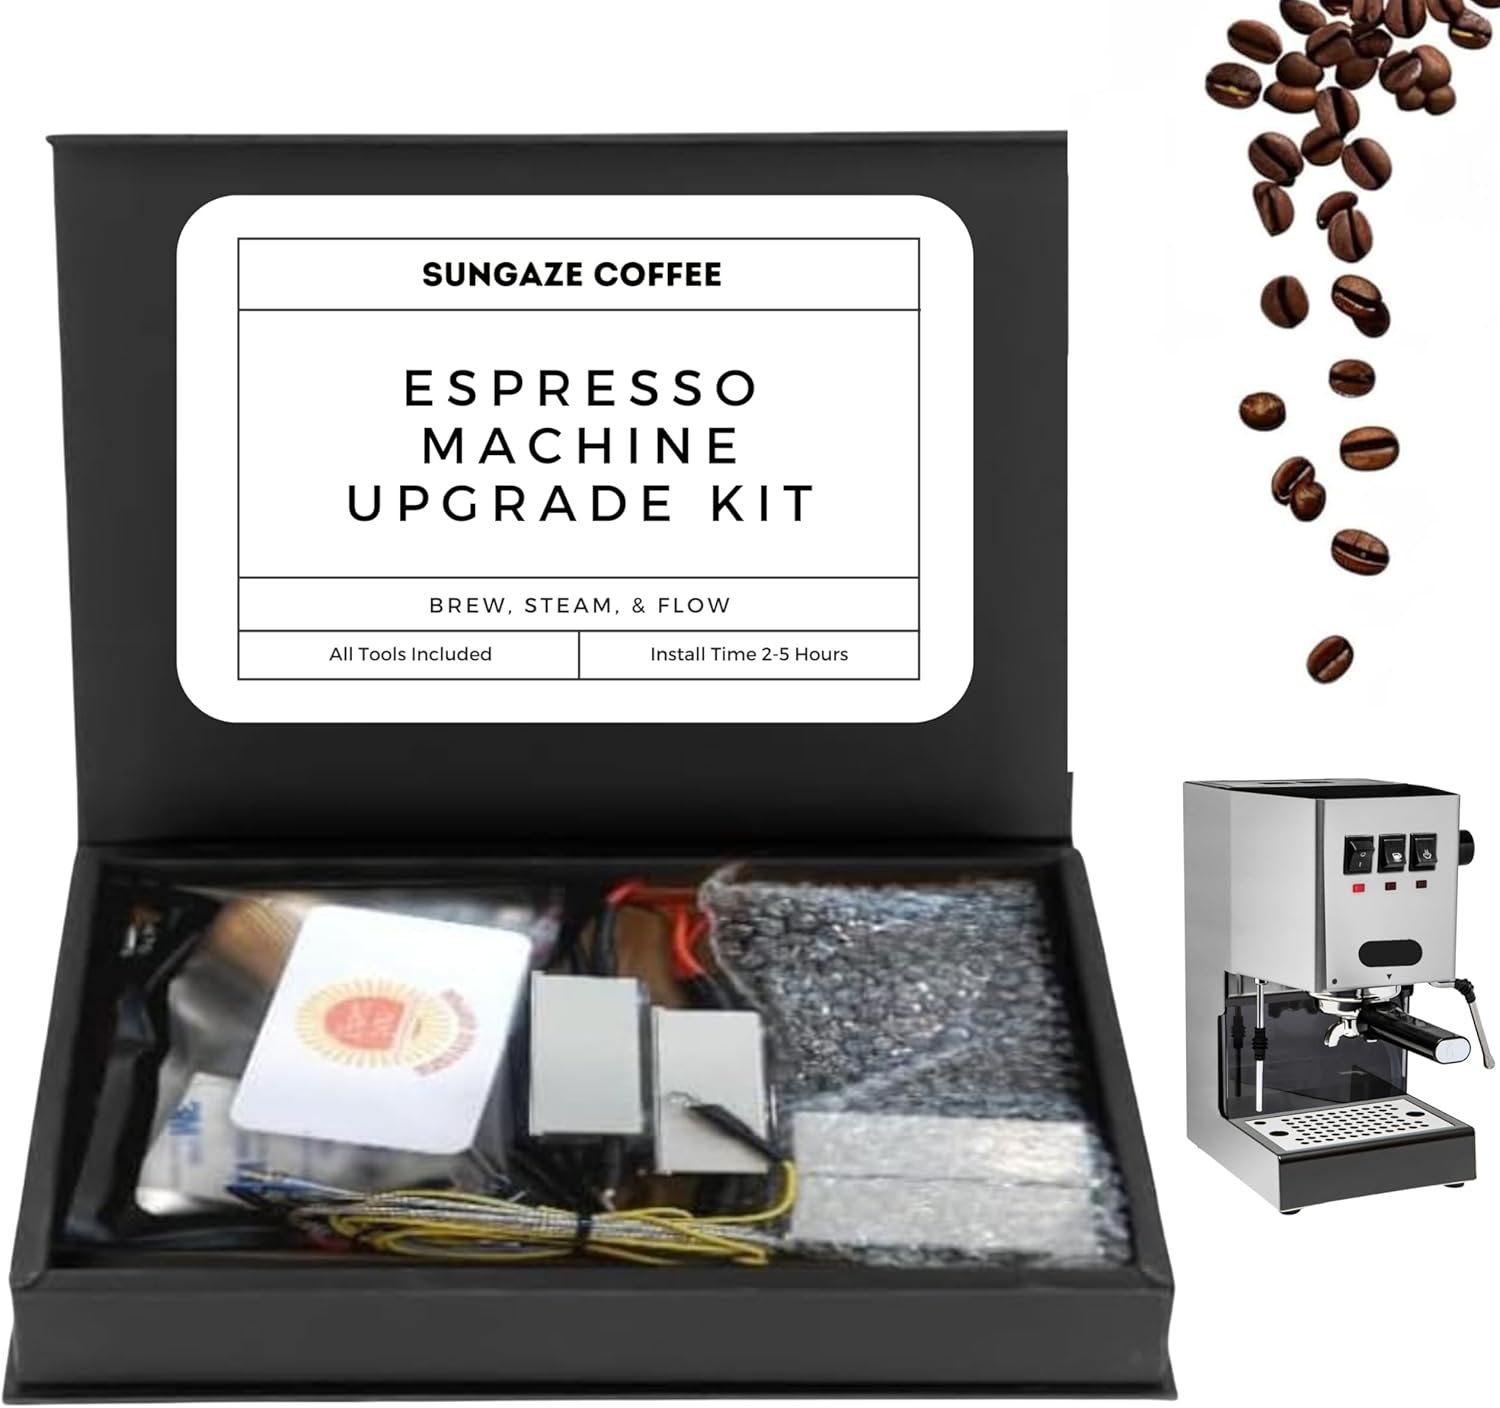
The Sungaze Gaggio Classic Pro PID Kit: Features and Components
The Sungaze Gaggio Classic Pro PID Kit aims to address the temperature control limitations of the stock machine and provide a more refined and consistent espresso brewing experience. The kit is specifically designed for the Gaggia Classic Pro and includes all the necessary components for a complete installation. The core of the kit is the PID controller itself, a compact electronic unit that monitors and regulates the boiler temperature. The kit typically includes a high-quality solid-state relay (SSR) to switch the heating element on and off, providing faster and more reliable temperature control compared to the stock mechanical thermostat. A precise temperature sensor (usually a thermocouple or RTD) is included to accurately measure the boiler temperature. The sensor is strategically placed for optimal temperature readings and fast response times.
Beyond the core components, the Sungaze PID Kit often boasts additional features that further enhance its value proposition. Pre-infusion control is a common addition, allowing users to program a brief, low-pressure soak of the coffee grounds before full pressure is applied. This can improve extraction and reduce channeling. A shot timer is another valuable feature, providing a visual indication of extraction time and aiding in repeatability. Some kits even include adjustable steam temperature settings, allowing users to fine-tune the steam power for milk frothing. The quality of the components used in the kit is also a critical factor. High-quality SSRs, temperature sensors, and wiring ensure reliable performance and longevity. The included wiring harnesses are typically pre-assembled and clearly labeled, simplifying the installation process.
The user interface of the PID controller is also an important consideration. A clear and easy-to-read display makes it simple to monitor the temperature and adjust settings. Intuitive controls allow users to quickly program pre-infusion times, shot timer durations, and steam temperature settings. The Sungaze PID Kit typically offers a user-friendly interface with clear instructions, making it accessible to both experienced and novice users. When evaluating PID kits, consider the overall package – the quality of the components, the features offered, and the user-friendliness of the interface. The Sungaze PID Kit aims to deliver a comprehensive and well-designed solution for Gaggia Classic Pro owners looking to elevate their espresso game. Upgrading your Gaggia Classic Pro machine is often the first step to pulling cafe-quality shots at home.
| Feature | Sungaze PID Kit | Stock Gaggia Classic Pro |
|---|---|---|
| Temperature Control | PID Controller with SSR | Thermostat |
| Temperature Stability | +/- 1°C | +/- 5-10°C |
| Pre-infusion | Programmable | None |
| Shot Timer | Integrated | None |
| Steam Temperature Control | Adjustable (some models) | Fixed |
Installing the Sungaze PID Kit: A Step-by-Step Guide
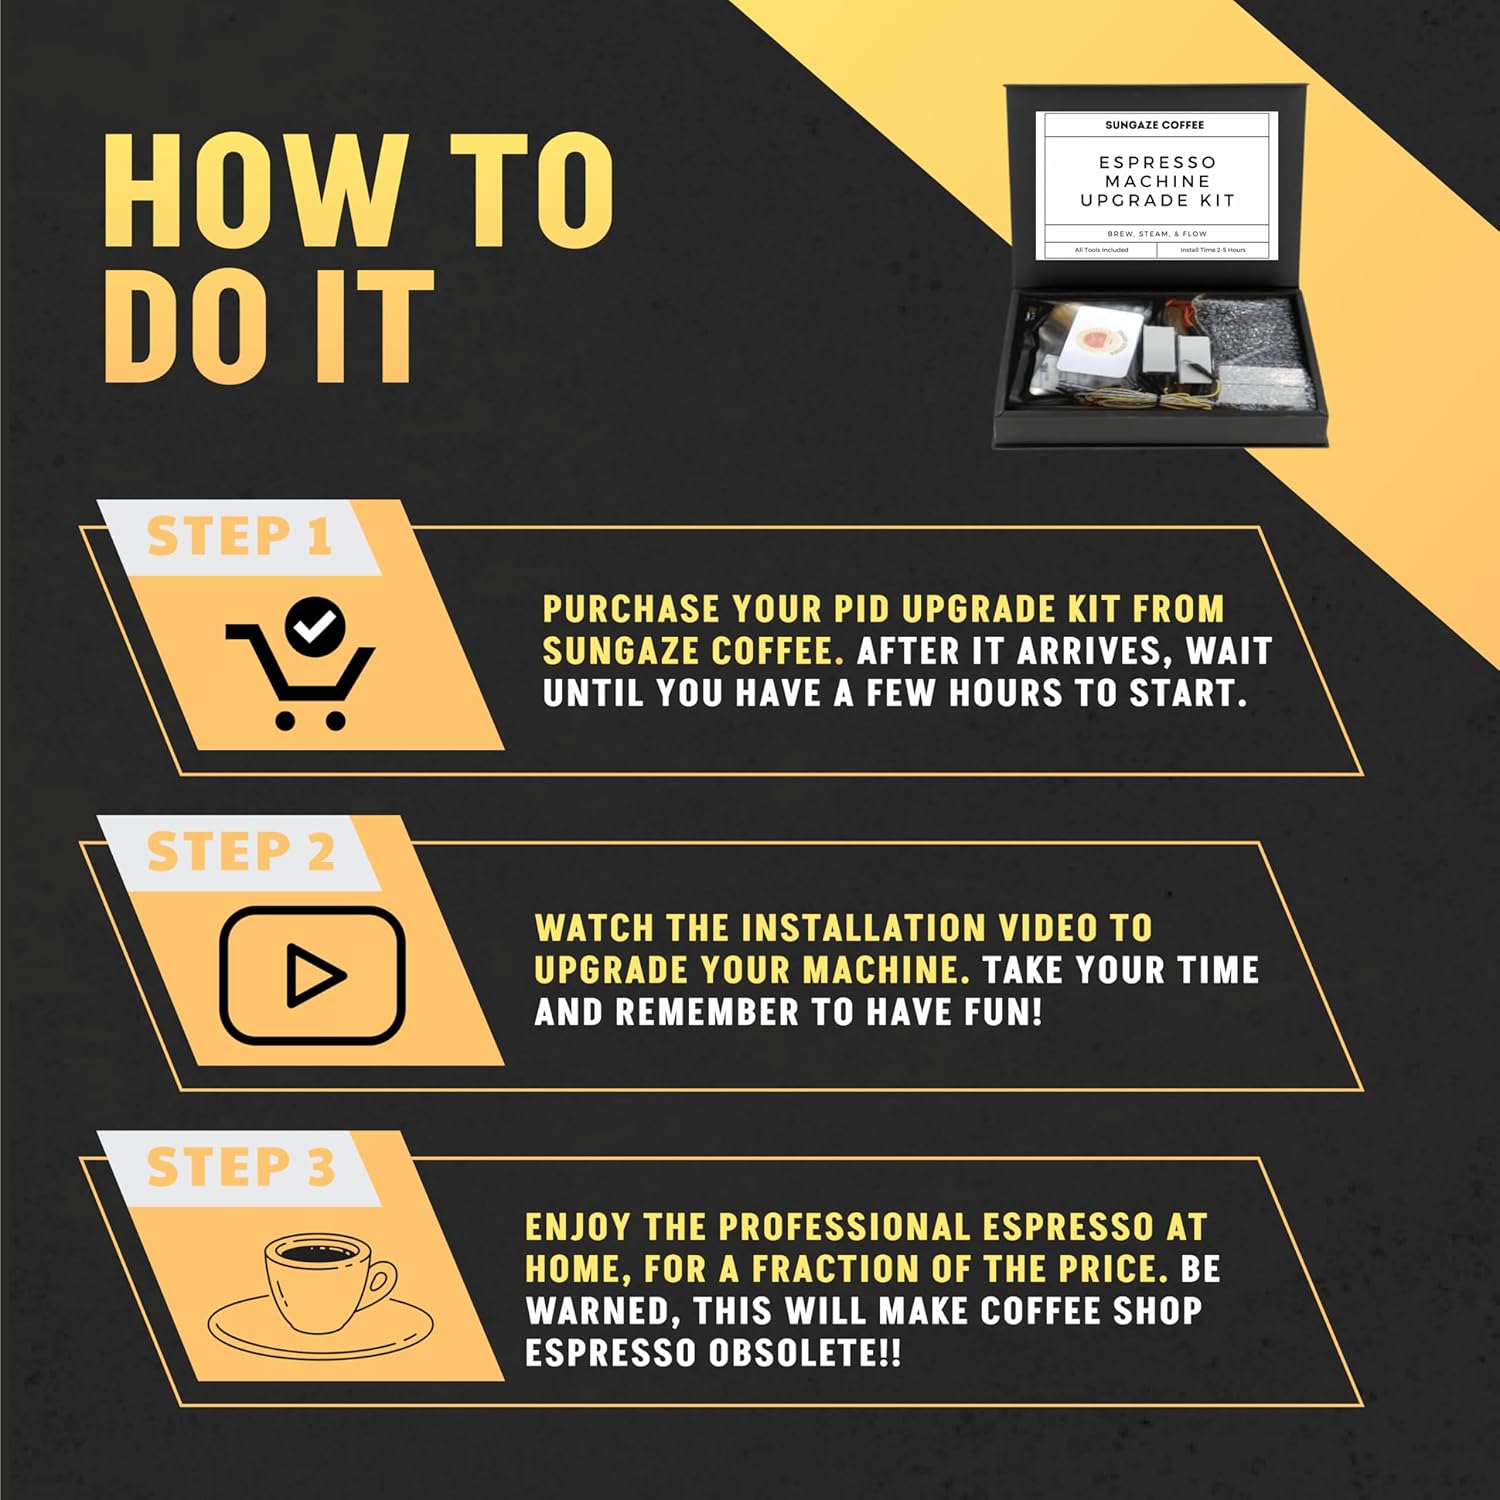
Installing a PID kit on your Gaggia Classic Pro, including finding the Gaggia Classic Pro instructions, can seem daunting at first, but with careful planning, patience, and the right tools, it’s a manageable DIY project. Before you even consider cracking open your machine, safety should be your top priority. Always unplug the Gaggia Classic Pro from the power outlet before starting any work. Allow the machine to cool down completely, as the boiler can retain heat for a significant amount of time. Gather all the necessary tools and materials, including screwdrivers (Phillips and flathead), wire strippers, wire crimpers, pliers, and a multimeter. A well-lit workspace is also essential. Carefully read the installation instructions provided with the Sungaze PID Kit. These instructions should include detailed diagrams and step-by-step guidance.
The installation process typically involves the following steps: First, carefully disassemble the Gaggia Classic Pro, removing the outer casing and accessing the internal components. Identify the existing thermostat and disconnect its wiring. Install the new temperature sensor (thermocouple or RTD) in the designated location on the boiler. Connect the sensor to the PID controller. Mount the PID controller in a suitable location on the machine’s frame. Connect the SSR to the heating element and the PID controller. Wire the power supply to the PID controller and the SSR. Carefully route and secure all wiring to prevent shorts or damage. Once all connections are made, double-check everything for accuracy. Ensure that all wires are properly insulated and secured.
After completing the installation, it’s crucial to test the system thoroughly. Plug the Gaggia Classic Pro back into the power outlet. Turn on the machine and observe the PID controller display. Verify that the temperature reading is accurate and that the PID controller is actively regulating the boiler temperature. Allow the machine to heat up to the desired brewing temperature. Once the temperature is stable, run a test shot of espresso to ensure that the PID controller is functioning correctly. Monitor the extraction process and assess the taste of the espresso. If everything appears to be working as expected, reassemble the Gaggia Classic Pro. If you encounter any issues during the installation or testing process, consult the Sungaze PID Kit documentation or seek assistance from online forums or espresso machine repair experts. The installation process requires careful attention to detail, but the end result – a Gaggia Classic Pro with precise temperature control – is well worth the effort.
| Step | Description |
|---|---|
| 1 | Unplug and cool down the Gaggia Classic Pro. |
| 2 | Gather tools: screwdrivers, wire strippers, crimpers, multimeter. |
| 3 | Read the Sungaze PID Kit installation instructions carefully. |
| 4 | Disassemble the Gaggia Classic Pro. |
| 5 | Disconnect the existing thermostat wiring. |
| 6 | Install the new temperature sensor. |
| 7 | Mount the PID controller and connect the SSR. |
| 8 | Wire the power supply and secure all wiring. |
| 9 | Double-check all connections. |
| 10 | Test the system and run a test shot. |
| 11 | Reassemble the Gaggia Classic Pro. |
Performance Benefits: Espresso Quality and Consistency
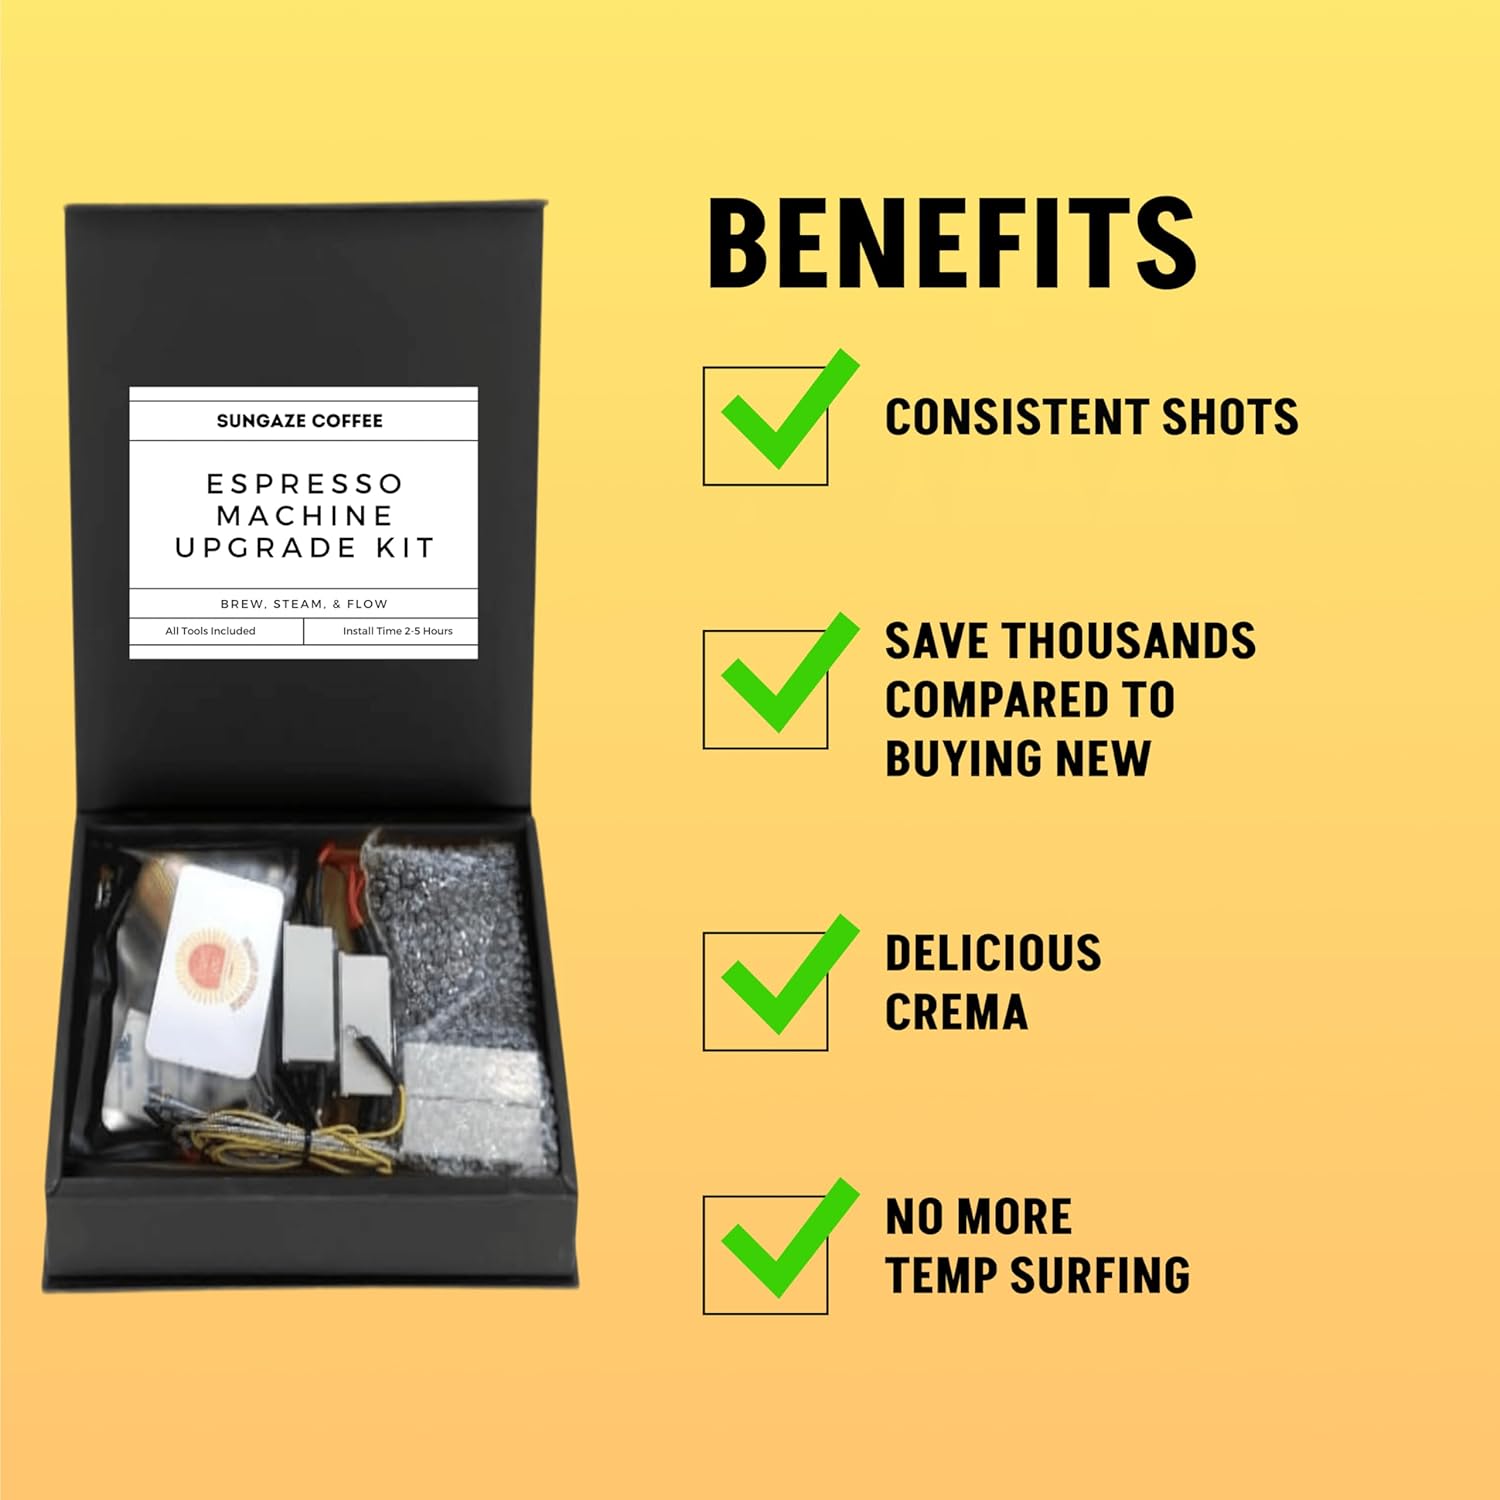
The primary benefit of installing a Sungaze PID Kit on your Gaggia Classic Pro is significantly improved espresso quality and consistency. With precise temperature control, the machine maintains a stable brewing temperature, eliminating the temperature swings that plague the stock thermostat-controlled machine. This results in more consistent espresso extractions, shot after shot. The ability to fine-tune the brewing temperature allows you to optimize the extraction for different coffee beans. Lighter roasts, for example, often benefit from slightly higher brewing temperatures, while darker roasts may require lower temperatures to avoid bitterness. The PID controller allows you to dial in the perfect temperature for each bean, maximizing its flavor potential.
Pre-infusion, often included in PID kits, further enhances espresso quality. By gently saturating the coffee grounds before applying full pressure, pre-infusion allows for a more even extraction and reduces the likelihood of channeling. This results in a more balanced and flavorful espresso shot. The shot timer, another common feature, provides a visual indication of extraction time, allowing you to consistently pull shots within the desired time range. This is crucial for achieving optimal extraction and avoiding under- or over-extraction. The improved temperature stability also benefits milk frothing. With consistent steam power, it becomes easier to create microfoam, the silky-smooth texture that is essential for latte art and other specialty coffee drinks.
Beyond the technical aspects, the improved espresso quality translates into a more enjoyable coffee experience. You’ll be able to consistently pull delicious espresso shots that rival those from your favorite cafe. The increased control over the brewing process allows you to experiment with different coffee beans and extraction techniques, unlocking new flavors and aromas. The Sungaze PID Kit empowers you to become a more skilled and confident home barista, taking your espresso game to the next level. The consistency it brings to brewing allows you to hone in on other brewing variables like grind size and tamping pressure, all for the goal of a better cup of espresso. The Gaggia Classic Pro PID is a game-changer for the serious home barista.
Pros and Cons of the Sungaze Gaggio Classic Pro PID Kit
Like any product, the Sungaze PID Kit for the Gaggia Classic Pro has its pros and cons. Understanding these advantages and disadvantages can help you make an informed decision about whether it’s the right upgrade for you. One of the biggest pros is, undoubtedly, the improved temperature stability. The PID controller maintains a consistent brewing temperature, leading to more consistent espresso extractions and better flavor clarity. The inclusion of pre-infusion and a shot timer further enhances the brewing process, providing more control and repeatability. The ability to fine-tune the brewing temperature allows you to optimize the extraction for different coffee beans. The kit often includes high-quality components, ensuring reliable performance and longevity. The installation process, while potentially challenging, is manageable with careful planning and the right tools. The user-friendly interface of the PID controller makes it easy to monitor the temperature and adjust settings.
However, there are also some potential drawbacks to consider. The installation process can be time-consuming and requires some technical skills. There’s a risk of damaging the machine if the installation is not done correctly. The initial cost of the PID kit can be a significant investment. While the long-term benefits of improved espresso quality and consistency may outweigh the cost, it’s still an important factor to consider. Some users may find the learning curve associated with using a PID controller and fine-tuning the brewing parameters to be steep. It takes time and experimentation to master the art of espresso making with a PID-controlled machine. Finally, while the Sungaze PID Kit is designed specifically for the Gaggia Classic Pro, there may be compatibility issues with certain models or variations. It’s always best to verify compatibility before purchasing the kit.
Ultimately, the decision of whether or not to purchase a Sungaze PID Kit depends on your individual needs and priorities. If you’re a serious home barista who is committed to pulling consistently high-quality espresso shots, the benefits of improved temperature stability, pre-infusion, and a shot timer likely outweigh the potential drawbacks. However, if you’re a casual espresso drinker who is satisfied with the performance of the stock Gaggia Classic Pro, the investment may not be necessary. Consider your budget, your technical skills, and your overall espresso goals before making a decision. A well-implemented PID kit will always offer improved consistency when brewing that perfect espresso using a Gaggia Classic Pro.
- Pros:
- Improved temperature stability
- More consistent espresso extractions
- Better flavor clarity
- Pre-infusion and shot timer features
- Adjustable brewing temperature
- High-quality components
- User-friendly interface
- Cons:
- Installation can be challenging
- Risk of damaging the machine during installation
- Initial cost can be significant
- Learning curve associated with using a PID controller
- Potential compatibility issues
FAQ
What is a PID controller and why is it important for espresso?
A PID (Proportional-Integral-Derivative) controller is a sophisticated temperature control system that uses feedback to maintain a precise and stable temperature. In the context of espresso machines, it’s crucial because consistent temperature is essential for consistent espresso extractions. Traditional espresso machines often rely on thermostats, which can lead to significant temperature fluctuations during brewing. These fluctuations result in inconsistent shots, as the water temperature affects the extraction of flavors from the coffee grounds. A PID controller monitors the actual water temperature, compares it to the desired temperature, and adjusts the heating element accordingly, ensuring that the water remains at the optimal temperature throughout the brewing process. This leads to more predictable and repeatable espresso shots with improved flavor and aroma.
Is the Sungaze PID Kit difficult to install?
The installation difficulty of the Sungaze PID Kit depends on your technical skills and experience. The kit typically comes with detailed instructions, but it involves disassembling the Gaggia Classic Pro, disconnecting and reconnecting wires, and mounting the PID controller. If you’re comfortable working with electronics and have some experience with DIY projects, you should be able to install the kit yourself. However, if you’re not confident in your abilities, it’s best to seek assistance from a qualified technician or espresso machine repair expert. There’s always a risk of damaging the machine if the installation is not done correctly, so it’s important to proceed with caution and follow the instructions carefully. Plenty of YouTube videos also exist to help guide you through the process.
Will a PID kit improve the taste of my espresso?
Yes, a PID kit can significantly improve the taste of your espresso by providing more consistent and stable brewing temperatures. Temperature stability allows for better flavor extraction. With precise temperature control, you can fine-tune the brewing temperature to optimize the extraction for different coffee beans, bringing out their unique flavors and aromas. A PID kit can also reduce the likelihood of under-extraction (sour taste) and over-extraction (bitter taste), resulting in a more balanced and flavorful espresso shot. The pre-infusion feature, often included in PID kits, further enhances the taste by gently saturating the coffee grounds before applying full pressure, leading to a more even extraction.
How long does it take to install the Sungaze PID Kit?
The installation time for the Sungaze PID Kit can vary depending on your experience and skill level. For experienced DIYers, the installation may take around 2-3 hours. However, if you’re new to working with espresso machines or electronics, it may take longer, perhaps 4-6 hours or even longer. It’s important to take your time and follow the instructions carefully to avoid making mistakes or damaging the machine. Rushing the installation process can lead to errors that can be difficult to troubleshoot. Allocate enough time to complete the installation in a relaxed and focused manner.
What tools do I need to install the Sungaze PID Kit?
To install the Sungaze PID Kit, you’ll need a basic set of tools commonly used for electronics and appliance repair. These include:
- Screwdrivers (Phillips and flathead)
- Wire strippers
- Wire crimpers
- Pliers
- Multimeter (optional, but helpful for troubleshooting)
- Adjustable wrench
- Socket set
It’s also helpful to have a well-lit workspace and a magnifying glass to inspect small components. Having a digital camera to document each step before disassembly is a good idea as well.
Can I damage my Gaggia Classic Pro during the installation process?
Yes, there is a risk of damaging your Gaggia Classic Pro during the installation process if you’re not careful or if you make mistakes. Common mistakes include:
- Stripping screws
- Breaking plastic components
- Disconnecting wires incorrectly
- Short-circuiting electrical components
To minimize the risk of damage, it’s important to follow the instructions carefully, use the correct tools, and work in a well-lit and organized workspace. If you’re not confident in your abilities, it’s best to seek assistance from a qualified technician.
Is the Sungaze PID Kit worth the investment?
The value proposition of the Sungaze PID Kit depends on your individual needs and priorities. If you’re a serious home barista who is committed to pulling consistently high-quality espresso shots and are willing to invest the time and effort to install and learn to use a PID controller, then the Sungaze PID Kit is likely worth the investment. The improved temperature stability, pre-infusion feature, and shot timer can significantly enhance the quality and consistency of your espresso. However, if you’re a casual espresso drinker who is satisfied with the performance of the stock Gaggia Classic Pro, or if you’re not comfortable with DIY projects, the investment may not be necessary. It’s important to weigh the benefits against the cost and effort involved before making a decision.

Price: $169.99
(as of Sep 06, 2025 07:36:56 UTC – Details)


