
KYDA Liquid Contour Pen, Rotatable Face Review bronzer Buying Guide – Oemiu
The Ultimate Guide to Sculpting and Bronzing: KYDA Liquid Contour Pen and Choosing the Perfect Rotatable Face Bronzer
Imagine the perfect sun-kissed glow, even in the dead of winter. Or the defined cheekbones you’ve always dreamed of, effortlessly achieved with a few strategically placed strokes. This isn’t just wishful thinking; it’s the promise of modern contouring and bronzing techniques. The beauty industry is overflowing with products promising to deliver these results, but two stand out for their user-friendliness and effectiveness: the KYDA Liquid Contour Pen and rotatable face bronzers. These tools, when used correctly, can transform your makeup routine and elevate your look. This comprehensive guide delves into the specifics of each product, exploring their features, benefits, and how to choose the perfect one for your skin tone and makeup style. We’ll also uncover the secrets to achieving a natural, sculpted look that enhances your features without appearing overdone. Get ready to unlock the power of contouring and bronzing!
Demystifying Contour and Bronze: Understanding the Difference
Before we dive into specific products, it’s crucial to understand the distinct roles of contour and bronzer. While often used interchangeably, they serve different purposes in the makeup world. Contour is all about creating shadows and defining facial features, while bronzer aims to add warmth and mimic a sun-kissed glow.
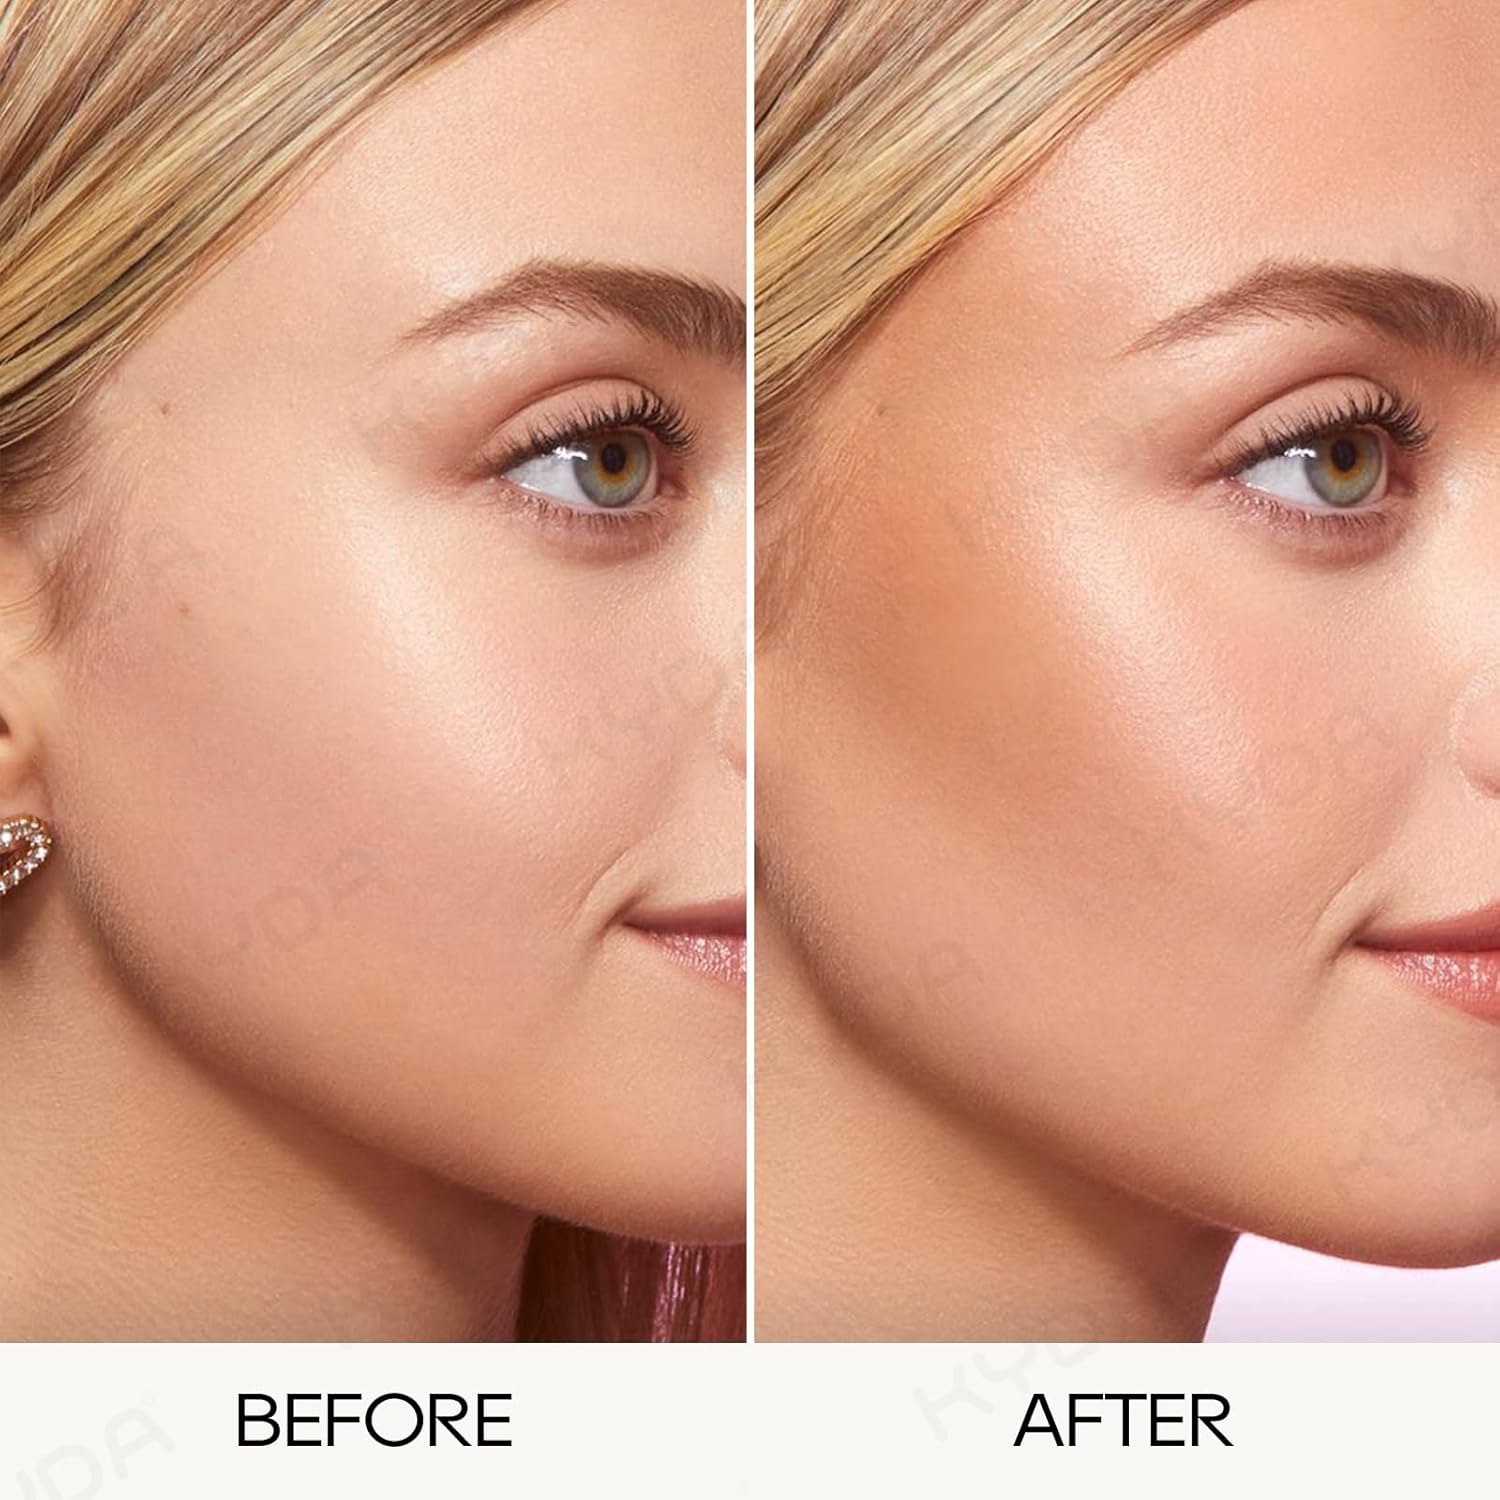
Contouring products are typically cool-toned, matte shades that are darker than your skin tone. They are applied to areas where natural shadows would fall, such as the hollows of your cheeks, along your jawline, and on the sides of your nose. The goal is to create depth and dimension, making your features appear more sculpted. Imagine you’re reshaping your face with shadow and light, almost like an artist sculpting with clay. This technique is especially effective for defining cheekbones and slimming the face. Many love the KYDA Liquid Contour Pen for this particular purpose.
Bronzer, on the other hand, comes in warmer tones, often with a slight shimmer or sheen. It’s applied to the areas where the sun naturally hits your face, such as your forehead, cheeks, nose, and chin. The purpose of bronzer is to add warmth and radiance, giving you a healthy, sun-kissed appearance. Think of it as adding a touch of sunshine to your complexion. Using the right *easy to blend bronzer* can make all the difference between a radiant glow and an unnatural orange tint. The *best bronzer for fair skin* is often lighter and less pigmented than those formulated for darker skin tones.
The key difference lies in the intent and the shades used. Contour creates shadows, while bronzer adds warmth. Using them together, or individually depending on your desired look, can dramatically enhance your makeup. Remember, a little goes a long way! Start with a small amount of product and build up the intensity as needed. Proper blending is essential for achieving a seamless, natural finish.
KYDA Liquid Contour Pen: Precision and Ease of Use
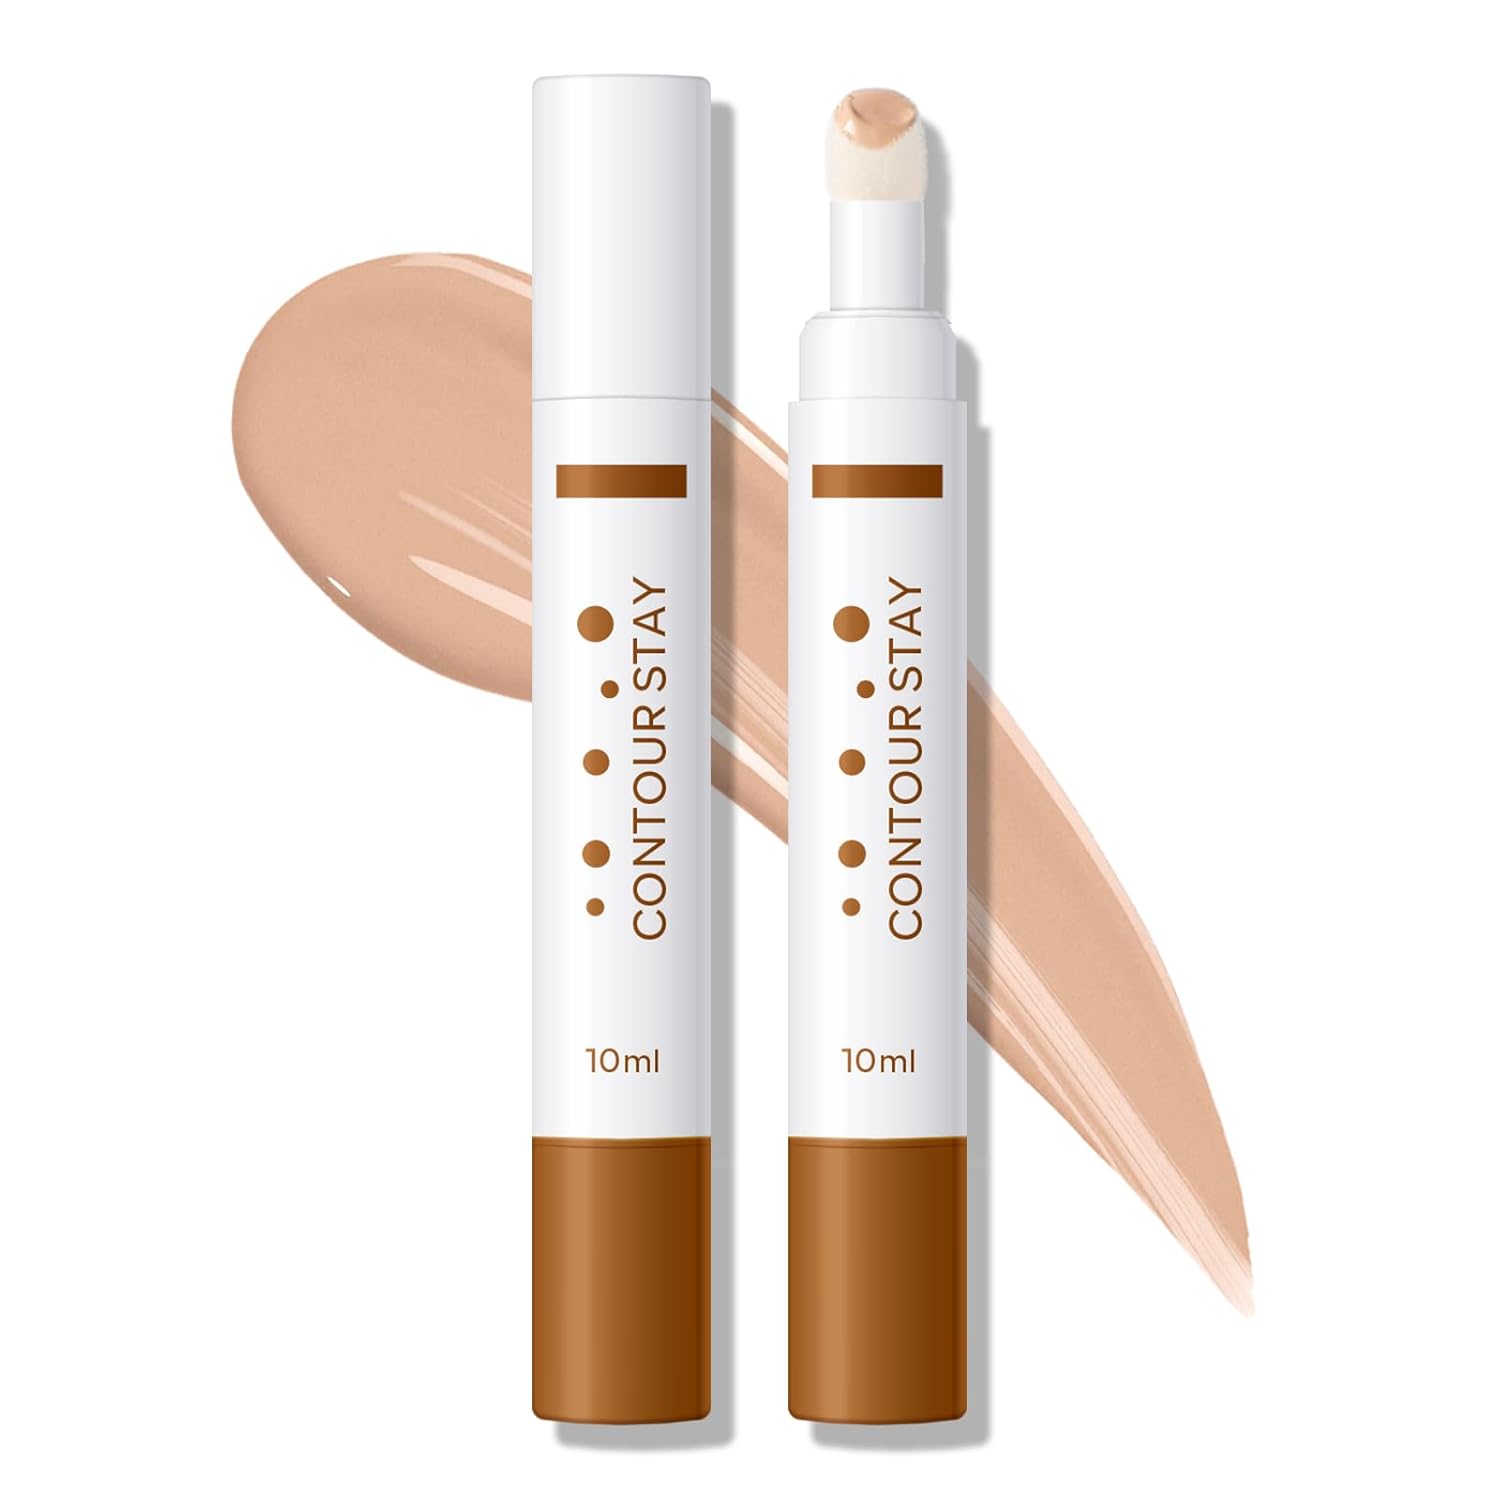
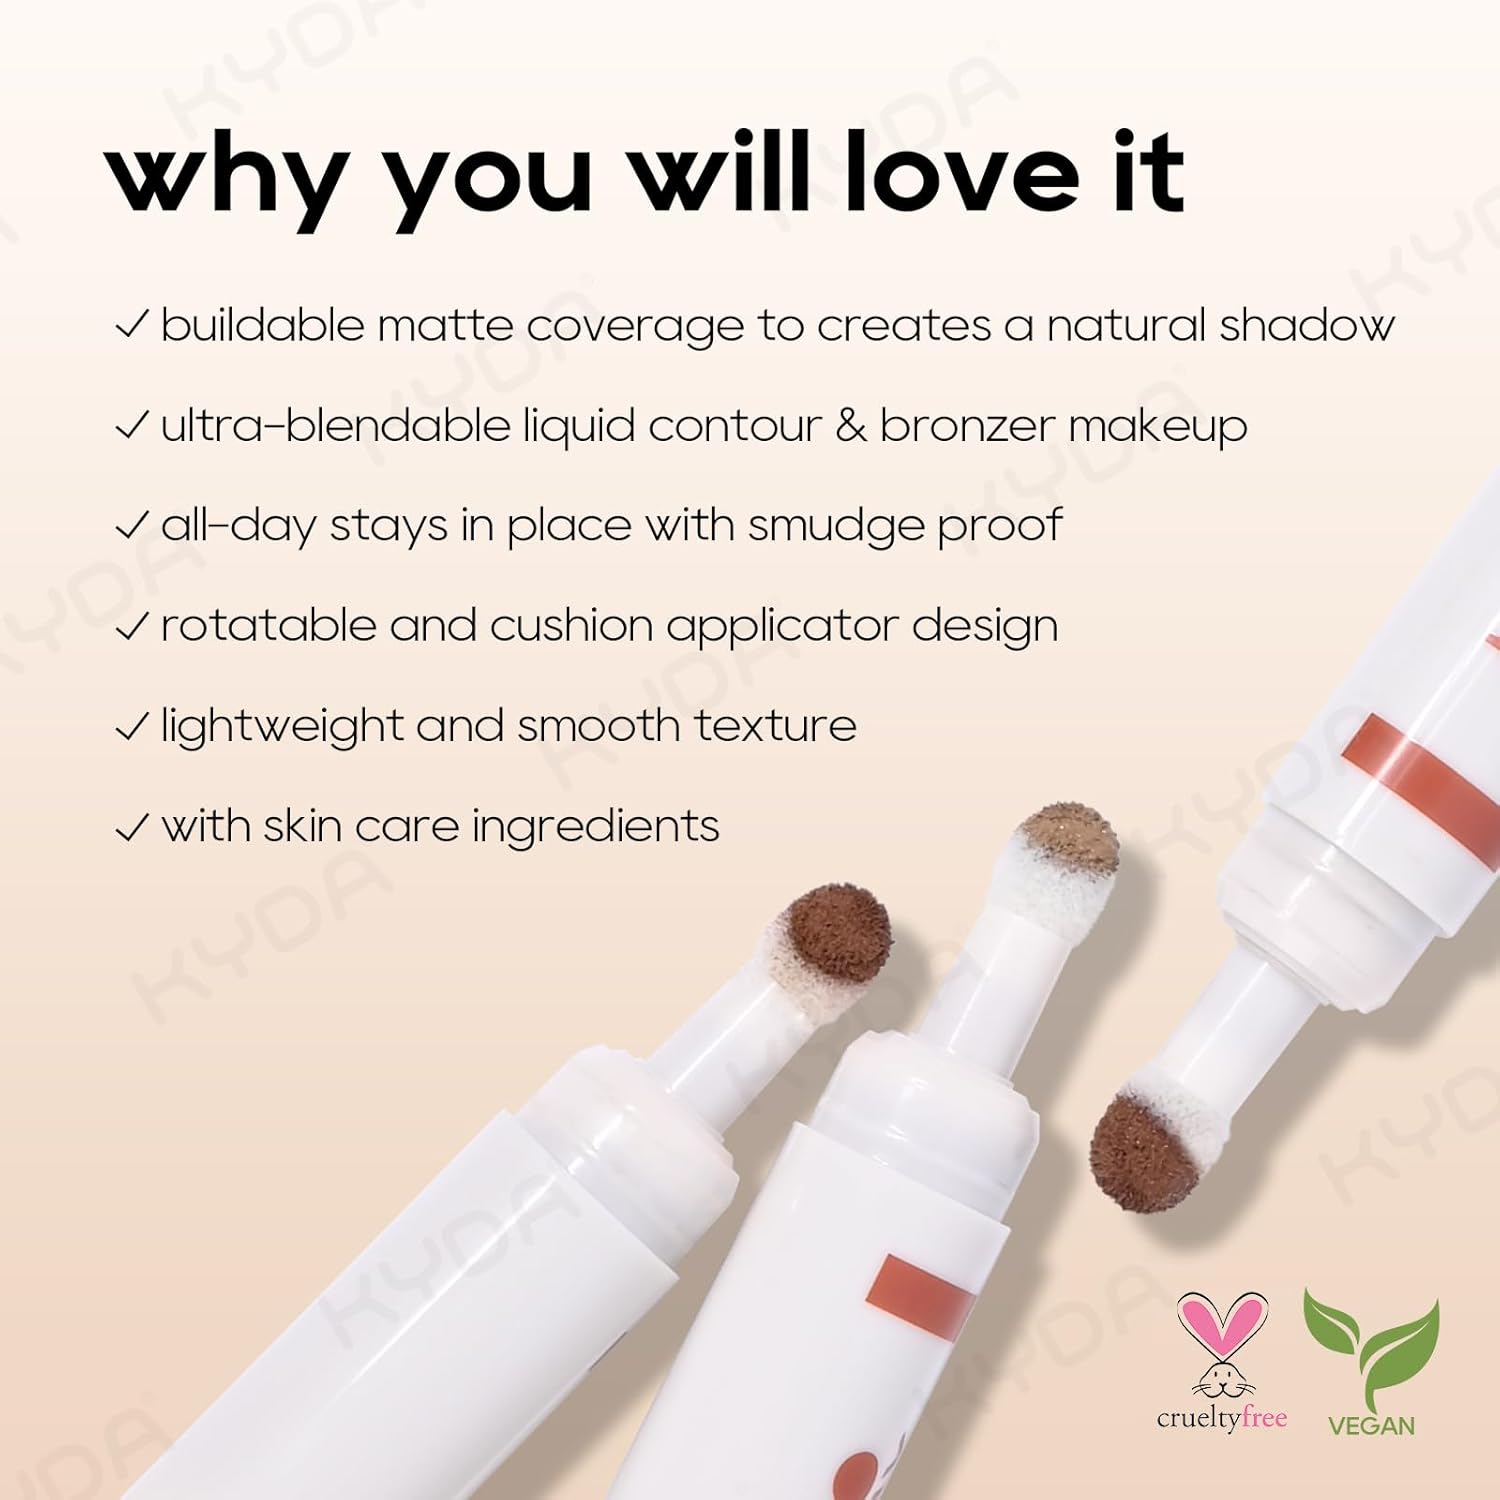
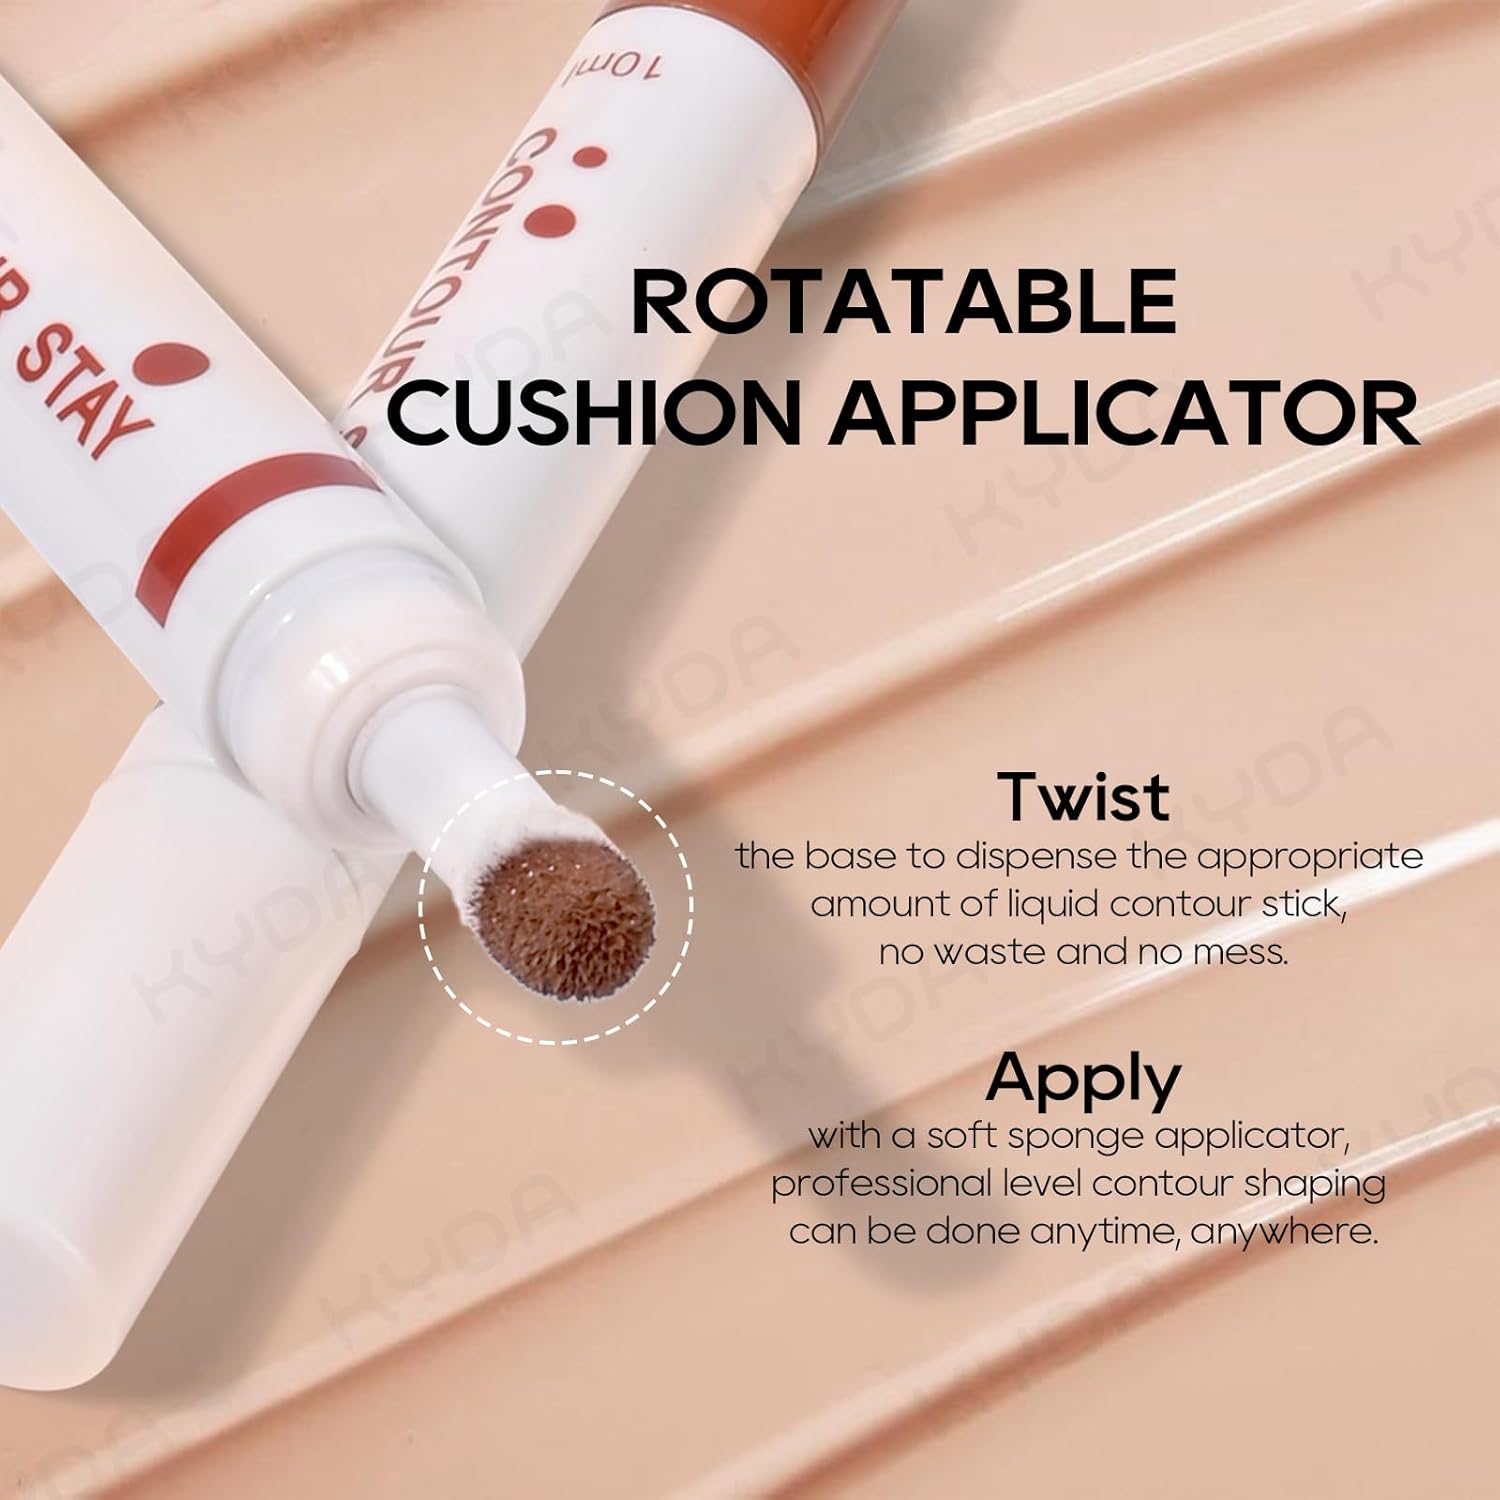
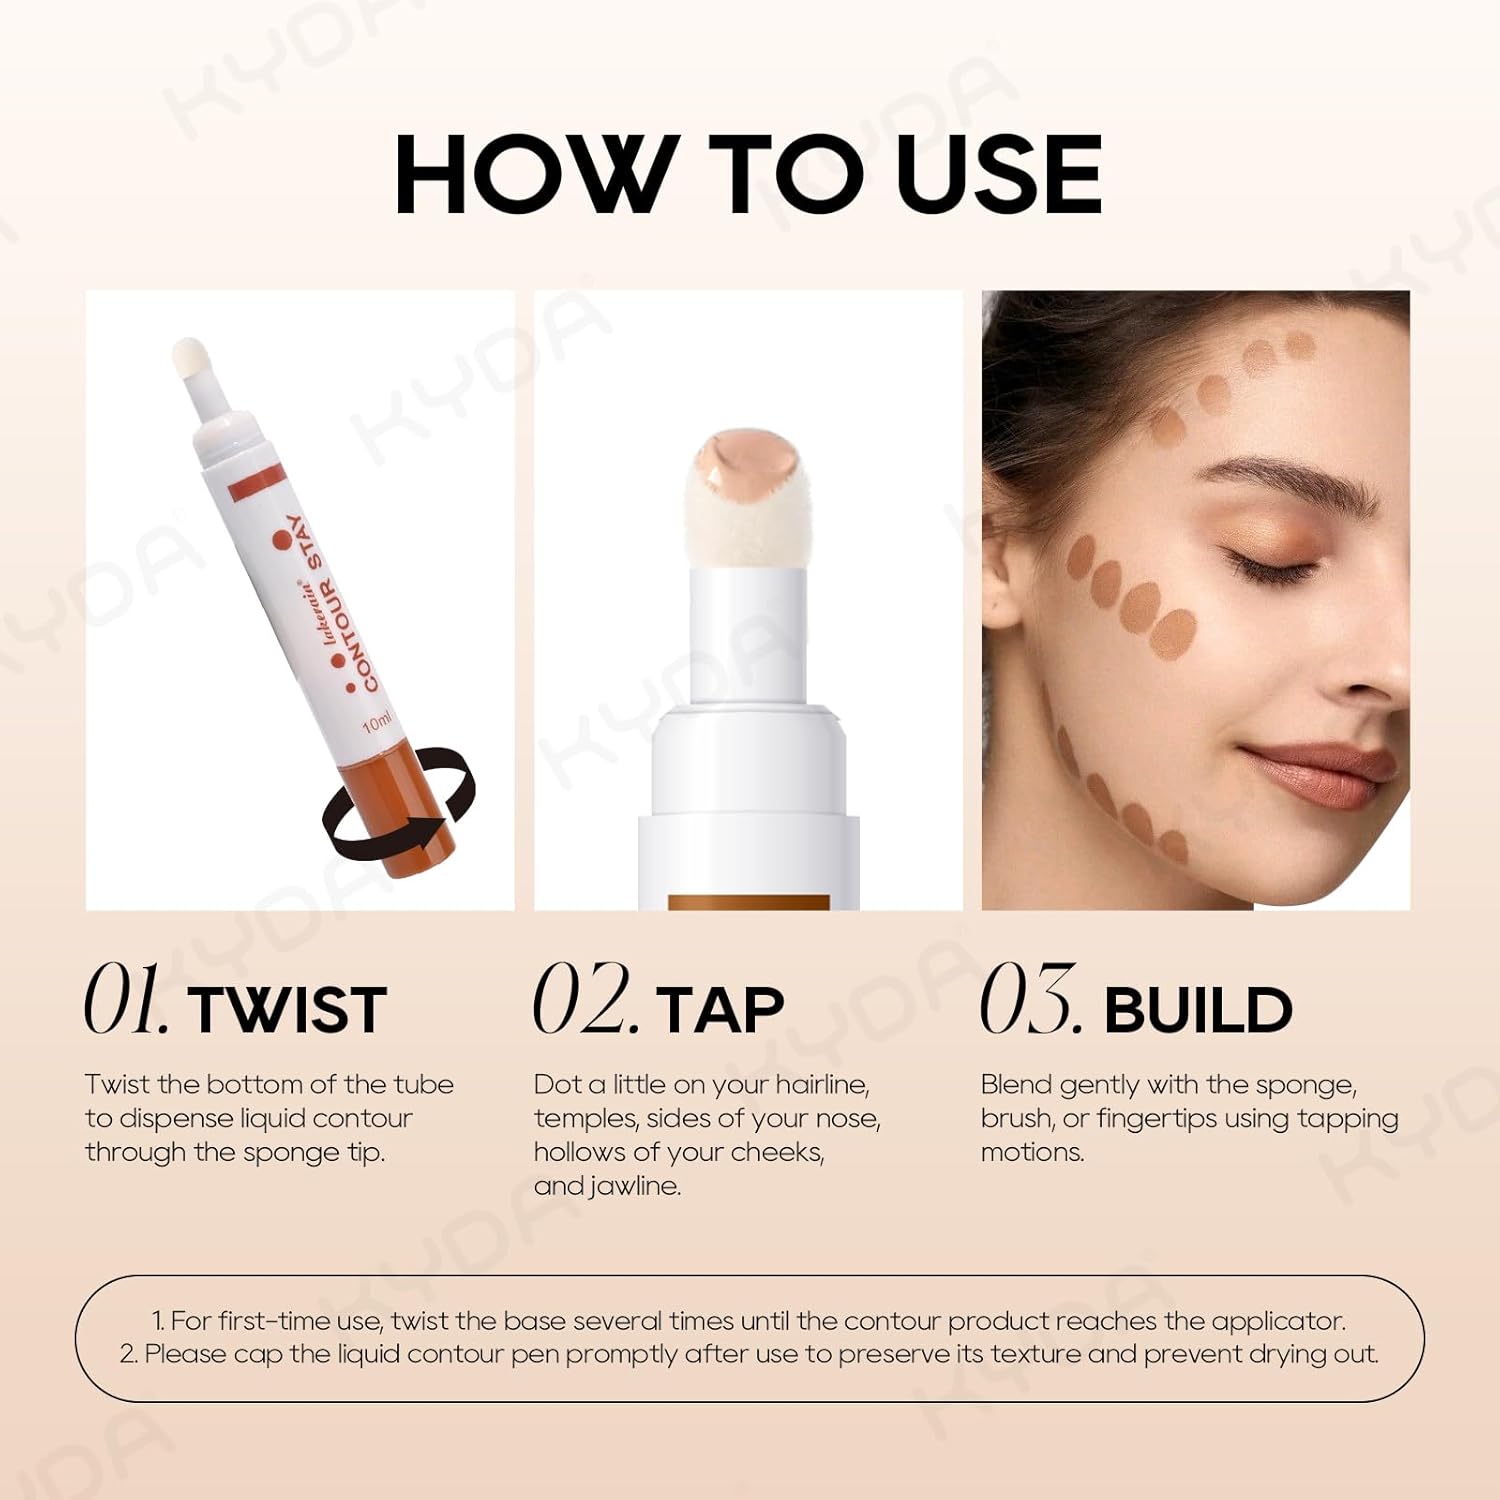
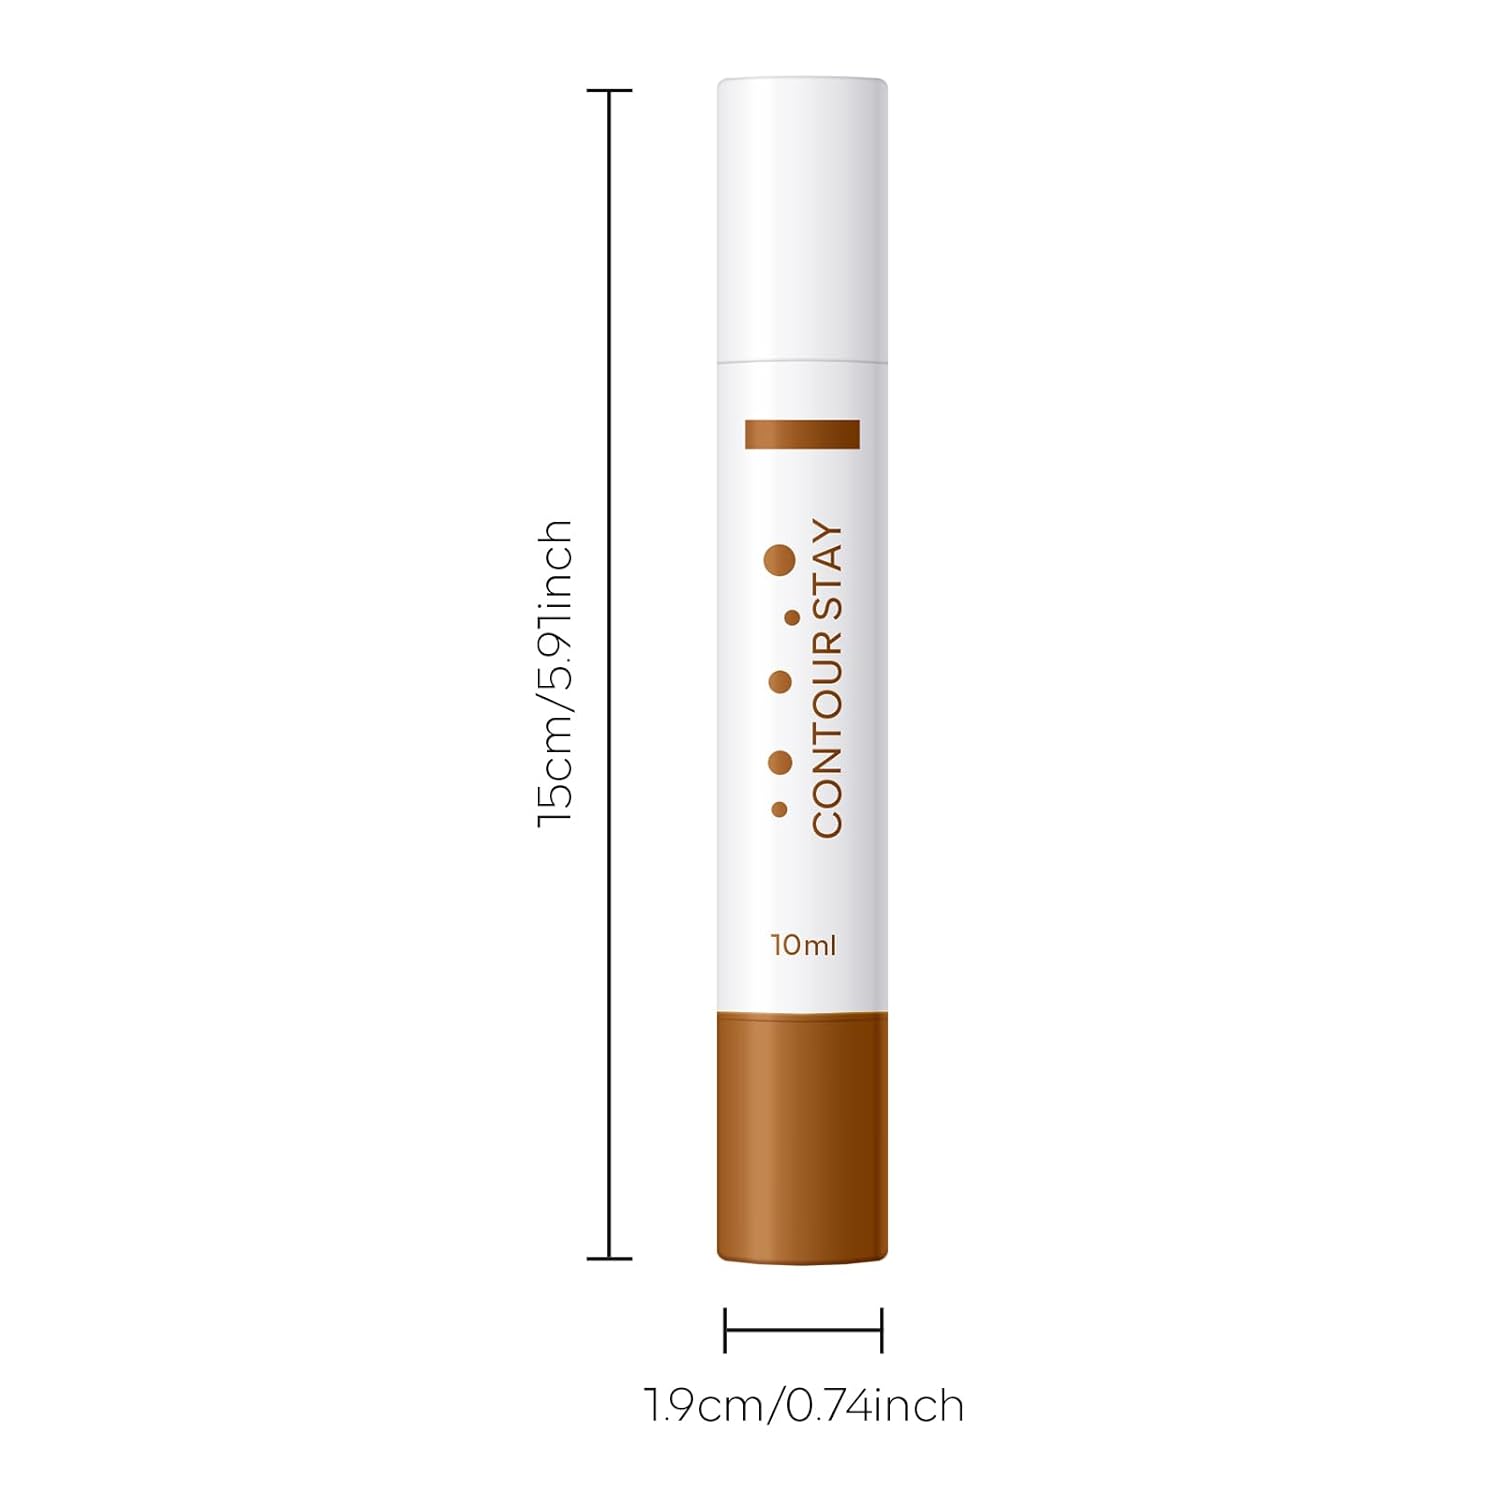
The KYDA Liquid Contour Pen is a game-changer for anyone intimidated by traditional contouring methods. Its innovative design and user-friendly application make it a favorite among both beginners and experienced makeup enthusiasts. The pen format allows for precise placement of the product, ensuring that you contour exactly where you want to, without the risk of over-application or muddiness.
What sets the KYDA Liquid Contour Pen apart is its lightweight, blendable formula. The liquid consistency glides effortlessly onto the skin, allowing you to easily blend it out with a brush, sponge, or even your fingertips. The formula is buildable, so you can start with a subtle contour and gradually increase the intensity as desired. This is particularly useful for achieving a natural-looking contour that complements your skin tone.
The pen’s precision tip is another major advantage. It allows you to create clean, defined lines, making it ideal for contouring specific areas, such as the cheekbones, jawline, and nose. This level of precision is difficult to achieve with traditional powder contours, which can often result in a less defined, more diffused look. *Liquid bronzer sticks* like the KYDA Contour Pen offer increased control over the application process.
Here’s a breakdown of the key benefits:
* **Precise Application:** The pen format allows for targeted contouring, ensuring that you place the product exactly where you want it.
* **Blendable Formula:** The lightweight liquid formula blends seamlessly into the skin, creating a natural, sculpted look.
* **Buildable Coverage:** You can start with a subtle contour and gradually increase the intensity as needed.
* **Long-Lasting Wear:** The formula is designed to stay put throughout the day, without fading or creasing.
* **User-Friendly Design:** The pen format is easy to use, even for beginners.
| Feature | Description |
|---|---|
| Format | Liquid pen |
| Application | Precision tip |
| Formula | Lightweight, blendable |
| Coverage | Buildable |
| Finish | Natural, sculpted |
| Longevity | Long-lasting |
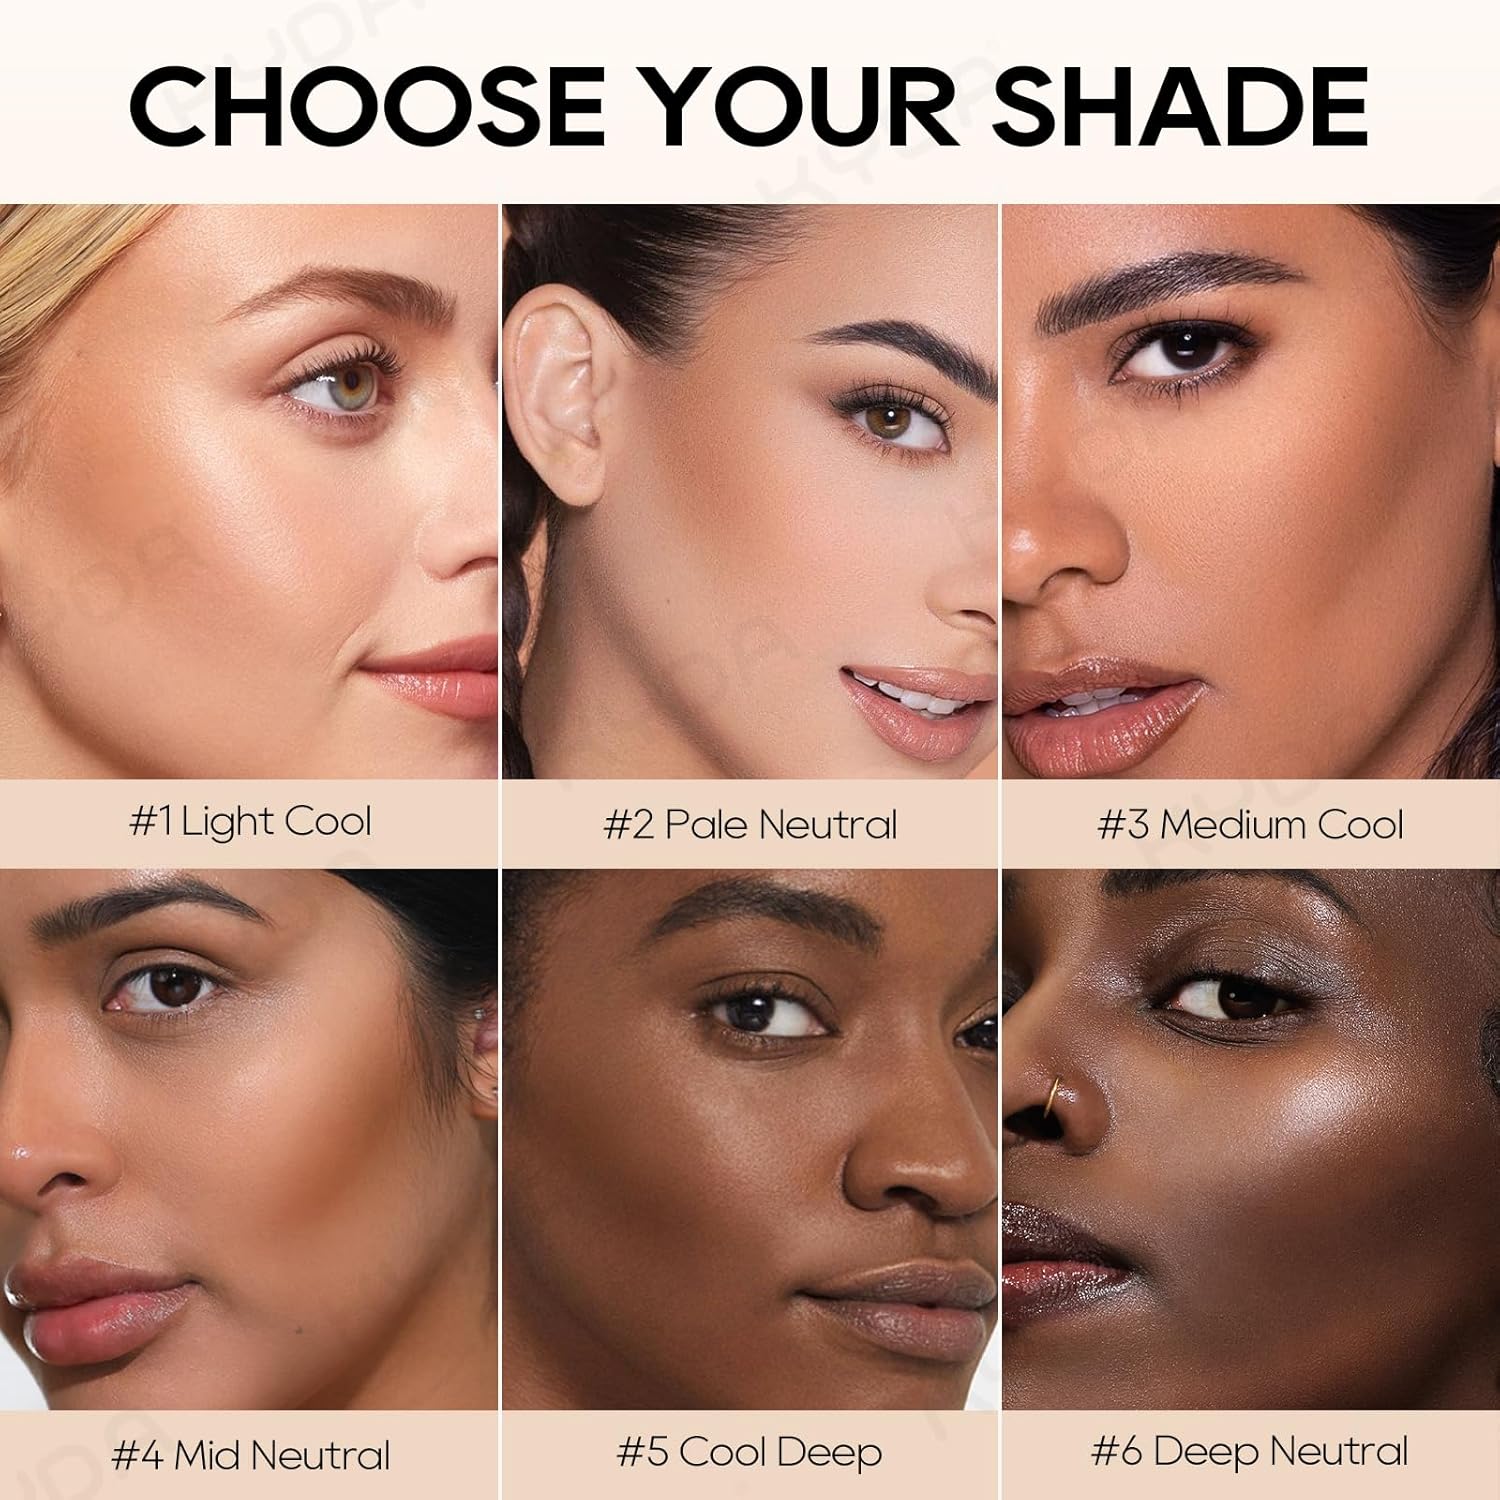
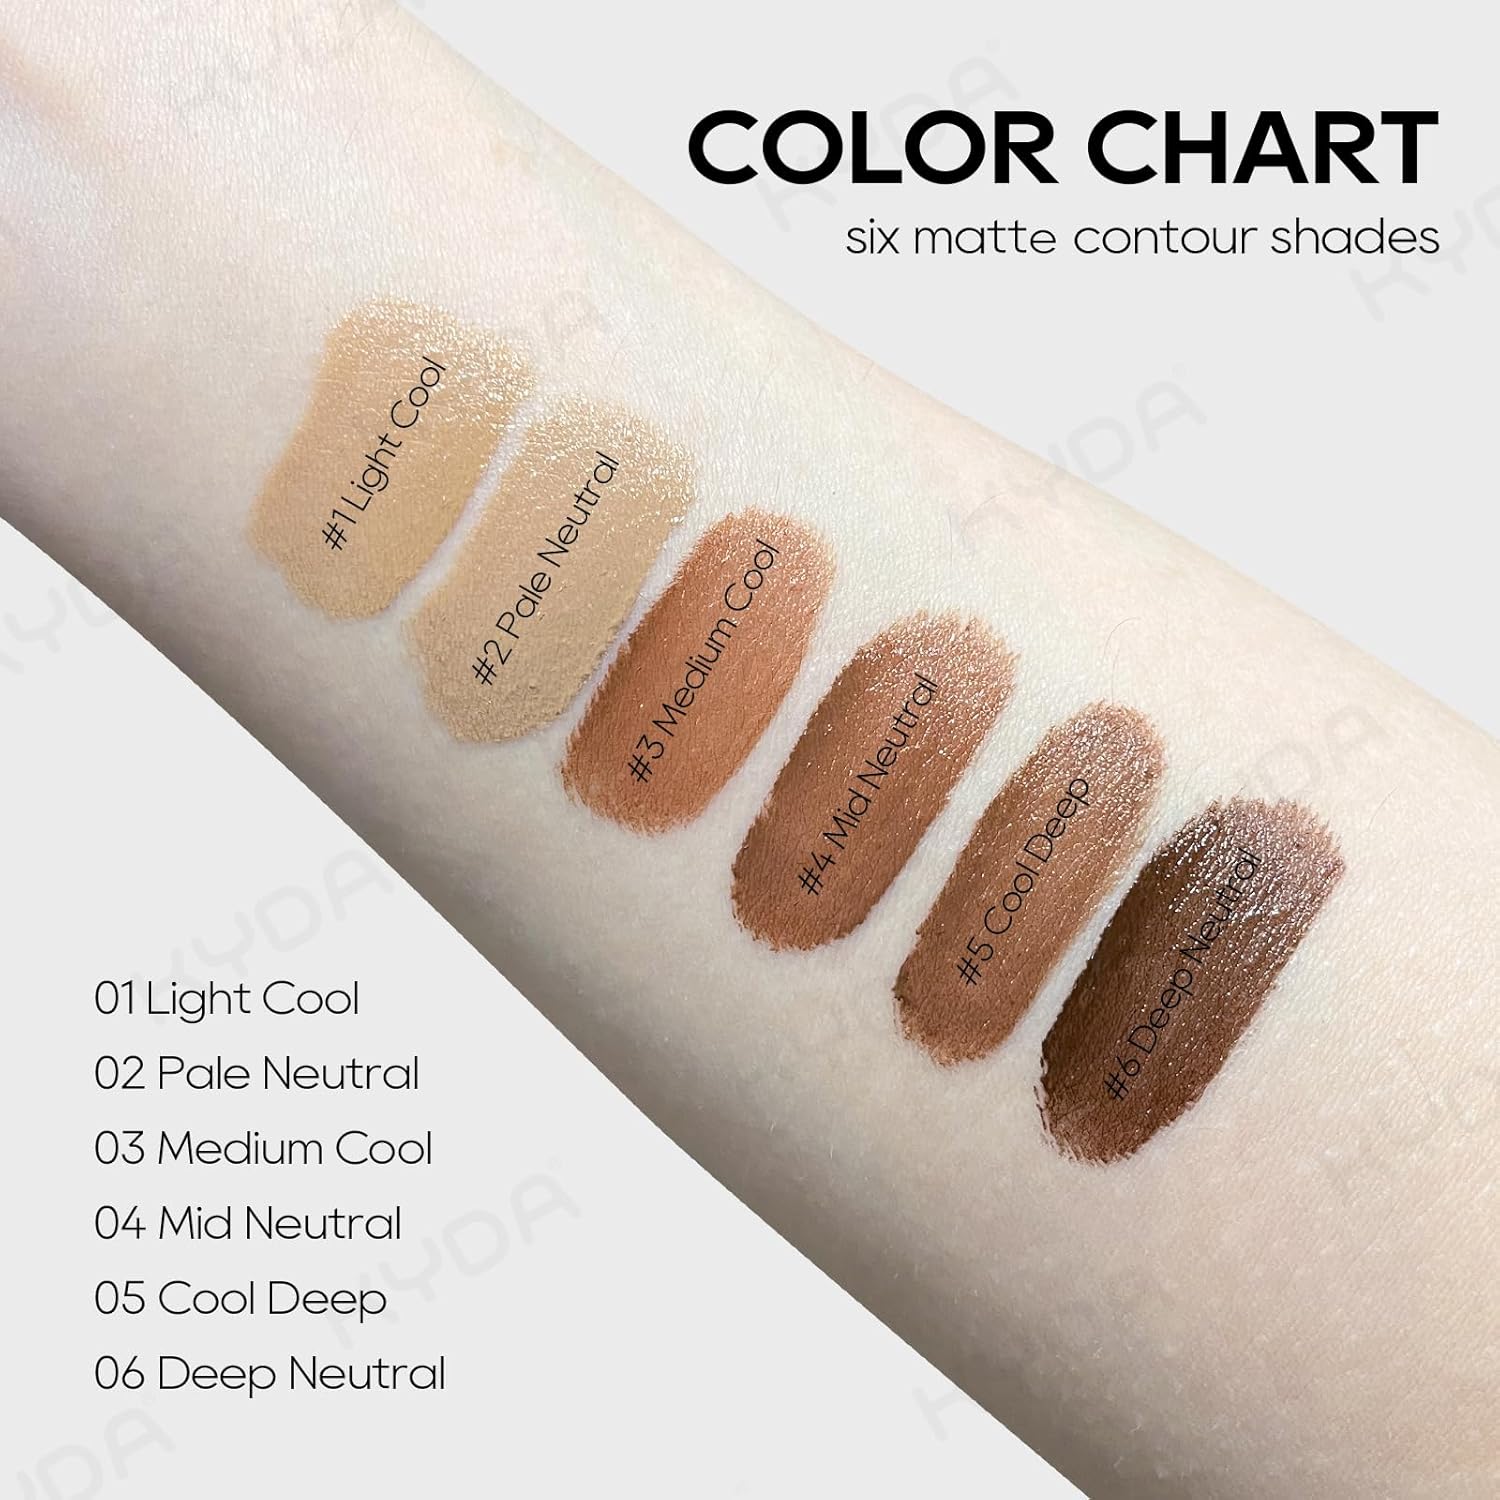
The KYDA Liquid Contour Pen comes in a range of shades to suit different skin tones. It’s important to choose a shade that is only one or two shades darker than your natural skin tone to avoid creating a harsh, unnatural look. When selecting your shade, consider your undertones. Cool-toned individuals should opt for a contour shade with cool undertones, while warm-toned individuals should choose a contour shade with warm undertones.
Rotatable Face Review Bronzers: Exploring the Benefits of a Swirling Application
Rotatable face bronzers, often featuring a unique swirling design, offer a different approach to achieving a sun-kissed glow. These bronzers typically consist of multiple shades blended together in a circular pattern, allowing you to customize your bronzing experience with a single product. The rotatable format often means the product is baked, offering a longer-lasting wear.
The key benefit of rotatable face bronzers is their versatility. The multiple shades allow you to create a customized bronzed look that complements your skin tone. You can use a large, fluffy brush to swirl the shades together for an all-over bronzed effect, or you can use a smaller brush to target specific areas, such as the cheekbones and temples.
The swirling design also makes it easier to achieve a natural, blended look. The different shades seamlessly blend together, creating a soft, diffused finish that mimics the look of a natural tan. This is particularly useful for avoiding harsh lines and unnatural-looking bronzer.
Here are some of the key advantages of rotatable face bronzers:
* **Customizable Color:** The multiple shades allow you to create a customized bronzed look.
* **Easy Blending:** The swirling design makes it easy to achieve a natural, blended finish.
* **Versatile Application:** You can use a large brush for an all-over bronzed effect or a smaller brush for targeted application.
* **Natural-Looking Glow:** The blended shades create a soft, diffused finish that mimics the look of a natural tan.
* **Convenient Packaging:** The compact packaging makes it easy to take on the go.
| Feature | Description |
|---|---|
| Format | Powder (often baked) |
| Application | Swirling motion with a brush |
| Color Palette | Multiple shades blended together |
| Finish | Natural, sun-kissed |
| Versatility | Customizable bronzing |
| Portability | Compact packaging |
When choosing a rotatable face bronzer, consider your skin tone and desired level of warmth. Fair skin tones should opt for lighter bronzers with cool undertones, while medium skin tones can handle warmer bronzers with golden undertones. Dark skin tones can choose richer, more pigmented bronzers with bronze or terracotta undertones. Always test the bronzer on your skin before purchasing to ensure that it complements your complexion. Also, if you have *pale skin bronzer* needs a lighter touch and cooler tone.
Choosing the Right Bronzer Formula: Powder, Cream, or Liquid?
Beyond the KYDA Liquid Contour Pen and rotatable face bronzers, the world of bronzer is vast, offering a variety of formulas to suit different skin types and preferences. The most common types are powder, cream, and liquid bronzers. Each has its own unique set of benefits and drawbacks. Understanding these differences will help you choose the perfect formula for your individual needs.
**Powder Bronzers:** Powder bronzers are the most traditional and widely available option. They are typically easy to blend and buildable, making them a good choice for beginners. Powder bronzers are best suited for oily or combination skin, as they help to absorb excess oil and create a matte finish. However, they can sometimes look dry or cakey on dry skin, so it’s important to choose a finely milled powder and use a hydrating primer.
**Cream Bronzers:** Cream bronzers are known for their dewy, natural finish. They are ideal for dry or mature skin, as they provide hydration and create a healthy, radiant glow. Cream bronzers can be applied with a brush, sponge, or even your fingertips. They are typically more pigmented than powder bronzers, so it’s important to start with a small amount and build up the intensity as needed.
**Liquid Bronzers:** Liquid bronzers offer a lightweight, blendable option that is suitable for all skin types. They can be mixed with foundation or moisturizer for an all-over glow, or they can be applied directly to the skin for targeted bronzing. Liquid bronzers are often buildable, allowing you to customize the intensity of your tan. The KYDA Liquid Contour Pen is a great example, offering both contour and bronzing potential depending on the shade.
Here’s a quick comparison table:
| Formula | Best Suited For | Finish | Application | Pros | Cons |
|---|---|---|---|---|---|
| Powder | Oily/Combination Skin | Matte | Brush | Easy to blend, buildable, oil-absorbing | Can look dry on dry skin |
| Cream | Dry/Mature Skin | Dewy | Brush, Sponge, Fingers | Hydrating, natural-looking, radiant | Can be greasy on oily skin |
| Liquid | All Skin Types | Natural | Brush, Sponge, Fingers, Mixed with Foundation | Lightweight, blendable, versatile | Can be tricky to apply evenly |
Ultimately, the best bronzer formula for you will depend on your skin type, personal preferences, and desired finish. Experiment with different formulas to find the one that works best for you.
The Art of Application: Mastering Bronzer and Contour Techniques
Choosing the right product is only half the battle. Mastering the application technique is essential for achieving a flawless, natural-looking contour and bronze. Whether you’re using the KYDA Liquid Contour Pen or a rotatable face bronzer, here are some tips to help you perfect your application:
**Contouring:**
1. **Identify Your Face Shape:** Understanding your face shape is crucial for knowing where to apply contour. Round faces benefit from contouring along the sides of the forehead, cheekbones, and jawline to create definition. Square faces can soften their features by contouring the corners of the forehead and the jawline.
2. **Apply to the Hollows of Your Cheeks:** To find the hollows of your cheeks, suck in your cheeks and feel for the indentation. Apply the KYDA Liquid Contour Pen or a powder contour in this area, starting from the ear and blending towards the corner of your mouth. Stop about two finger widths away from your nose to avoid creating a muddy look.
3. **Contour Your Jawline:** Apply contour along your jawline to define your face and create a more sculpted look. Blend downwards into your neck to avoid a harsh line.
4. **Contour Your Nose (Optional):** If you want to slim your nose, apply a thin line of contour along the sides of your nose, starting from the inner corner of your eyebrows and blending downwards. Be careful not to overdo it, as this can look unnatural.
5. **Blend, Blend, Blend:** Blending is key to achieving a seamless, natural-looking contour. Use a brush, sponge, or your fingertips to blend the contour until there are no harsh lines.
**Bronzing:**
1. **Use a Large, Fluffy Brush:** A large, fluffy brush will help you apply bronzer evenly and create a natural-looking glow.
2. **Apply to the High Points of Your Face:** Apply bronzer to the areas where the sun naturally hits your face, such as your forehead, cheeks, nose, and chin.
3. **Start Lightly:** It’s always better to start with a small amount of bronzer and build up the intensity as needed.
4. **Blend, Blend, Blend:** Just like with contouring, blending is essential for achieving a seamless, natural-looking bronze.
5. **Don’t Forget Your Neck and Décolletage:** To avoid a noticeable line between your face and neck, lightly dust bronzer down your neck and décolletage.
Whether you’re after the *best bronzer stick* or a powder, remember that practice makes perfect. Experiment with different techniques and find what works best for your face shape and skin tone.
Common Mistakes to Avoid: Ensuring a Flawless Finish
Even with the best products and techniques, it’s easy to make mistakes when contouring and bronzing. Here are some common mistakes to avoid to ensure a flawless finish:
* **Using the Wrong Shade:** Choosing a contour shade that is too dark or a bronzer that is too orange can result in an unnatural-looking finish. Always test the product on your skin before purchasing to ensure that it complements your complexion.
* **Over-Applying Product:** Applying too much contour or bronzer can make your makeup look heavy and cakey. Start with a small amount of product and build up the intensity as needed.
* **Not Blending Properly:** Failing to blend your contour and bronzer properly can result in harsh lines and an unnatural-looking finish. Take the time to blend the product thoroughly until there are no visible lines.
* **Contouring in the Wrong Areas:** Contouring in the wrong areas can actually accentuate your flaws rather than enhance your features. Understand your face shape and contour accordingly.
* **Using Shimmery Bronzer for Contouring:** Shimmery bronzers are great for adding warmth and radiance, but they are not suitable for contouring. Use a matte contour shade to create shadows and definition.
* **Ignoring Your Undertones:** Your undertones play a crucial role in choosing the right contour and bronzer shades. Cool-toned individuals should opt for cool-toned contours and bronzers, while warm-toned individuals should choose warm-toned products.
* **Forgetting to Set Your Makeup:** Setting your makeup with a translucent powder can help to prevent your contour and bronzer from fading or creasing throughout the day.
By avoiding these common mistakes, you can ensure that your contour and bronze always look flawless and natural. Remember, makeup is a journey, and the best way to improve is to experiment and learn from your mistakes.
Frequently Asked Questions (FAQ)
What is the difference between contour and bronzer?
Contour and bronzer are both used to enhance the face, but they serve different purposes. Contour is used to create shadows and define facial features, making them appear more sculpted. It’s typically a cool-toned, matte shade that’s applied to the hollows of the cheeks, along the jawline, and on the sides of the nose. Bronzer, on the other hand, is used to add warmth and mimic a sun-kissed glow. It’s typically a warmer tone, often with a slight shimmer, and is applied to the high points of the face where the sun would naturally hit, such as the forehead, cheeks, nose, and chin. Think of contour as sculpting with shadow, while bronzer is about adding warmth and radiance. Using both correctly can create a beautifully defined and glowing complexion.
How do I choose the right shade of bronzer for my skin tone?
Choosing the right bronzer shade is crucial for achieving a natural-looking sun-kissed glow. For fair skin, opt for lighter bronzers with peach or beige undertones to avoid looking orange. Medium skin tones can typically handle warmer, golden bronzers. Dark skin tones can choose richer, more pigmented bronzers with bronze or terracotta undertones. Consider your undertones, too. If you have cool undertones, choose a bronzer with pinkish or reddish undertones. If you have warm undertones, choose a bronzer with golden or yellow undertones. Always test the bronzer on your skin in natural light before purchasing to ensure it complements your complexion. A subtle difference in shade can make a big difference in the overall effect.
What is the best way to apply the KYDA Liquid Contour Pen?
The KYDA Liquid Contour Pen is designed for precise application. Start by identifying the areas you want to contour, such as the hollows of your cheeks, along your jawline, and on the sides of your nose. Using the pen’s precision tip, draw a thin line along these areas. Remember, less is more! You can always build up the intensity as needed. Once you’ve applied the product, use a brush, sponge, or your fingertips to blend it out. Blend upwards on the cheeks and jawline, and downwards on the nose. The key is to blend until there are no harsh lines, creating a seamless, natural-looking shadow. Practice makes perfect, so don’t be afraid to experiment until you find the technique that works best for you.
How can I prevent my bronzer from looking orange?
An orange bronzer is a common makeup mishap! The key to avoiding this is selecting the right shade and undertone. Choose a bronzer that’s only one or two shades darker than your natural skin tone. Avoid bronzers with overly warm, orange undertones, especially if you have fair or cool-toned skin. Consider using a bronzer with neutral or slightly cool undertones instead. Start with a light hand when applying, and build up the intensity gradually. Over-application is a surefire way to end up with an orange tint. Ensure your bronzer is thoroughly blended into the skin. Harsh lines can make the color appear more intense and less natural.
What are the best brushes to use for contouring and bronzing?
The right brushes can significantly impact the application and blending of contour and bronzer. For contouring, a smaller, angled brush is ideal for precise placement. This allows you to create defined shadows in the hollows of your cheeks and along your jawline. For bronzing, a large, fluffy brush is best for applying product evenly over a wider area. Look for brushes with soft bristles that are dense enough to pick up the product but not so dense that they create harsh lines. Synthetic brushes are a great option for cream and liquid products, while natural hair brushes are better for powder products. Remember to clean your brushes regularly to prevent product buildup and ensure a smooth application.
Is it possible to use bronzer as eyeshadow?
Yes, bronzer can absolutely be used as eyeshadow, especially for creating a warm, natural look. Choose a matte bronzer that’s close to your natural skin tone. Apply it to your crease to add depth and dimension. You can also use it all over your lid for a subtle, sun-kissed effect. Shimmery bronzers can be used on the lid to add a touch of radiance. Blend the bronzer well to avoid any harsh lines. Using bronzer as eyeshadow is a great way to create a cohesive, monochromatic makeup look. It’s also a convenient option when you’re traveling or want to simplify your makeup routine.
How do I make my bronzer last longer throughout the day?
To make your bronzer last longer throughout the day, start with a well-hydrated and primed base. A good primer will create a smooth surface for your makeup to adhere to. Apply your bronzer after your foundation and concealer. Set your makeup with a translucent setting powder to help lock it in place. Consider using a setting spray to further enhance the longevity of your makeup. If you have oily skin, blotting your face throughout the day can help to prevent your bronzer from fading or disappearing. Choose long-wearing or waterproof bronzer formulas.
Price: $7.99
(as of Sep 08, 2025 06:26:56 UTC – Details)


