Black Friday Complete Sourdough Starter Kit, Banneton Baking Kit Review – Oemiu
Unlocking Sourdough Success: A Comprehensive Review of the Complete Starter and Banneton Baking Kit
The allure of homemade sourdough bread, with its complex flavors and satisfyingly chewy texture, has captured the hearts of bakers worldwide. But venturing into the world of sourdough can feel daunting, especially for beginners. Where do you even begin? Fortunately, complete sourdough starter kits and banneton baking kits offer a streamlined path to sourdough success, providing all the essential tools and resources needed to cultivate a thriving starter and bake beautiful, artisanal loaves. This comprehensive review dives deep into the world of these kits, exploring their components, benefits, and considerations to help you determine if they’re the right fit for your sourdough journey.
The Sourdough Starter: Your Journey Begins
The heart of sourdough bread is, without a doubt, the sourdough starter. This living culture of wild yeasts and beneficial bacteria is what gives sourdough its characteristic tang, airy crumb, and delightful crust. Cultivating a starter from scratch can be a time-consuming and sometimes frustrating process, often requiring weeks of consistent feeding and observation. A complete sourdough starter kit eliminates much of this initial uncertainty by providing pre-measured ingredients, detailed instructions, and sometimes even a dehydrated starter culture ready to be rehydrated. These kits aim to simplify the process and increase your chances of success, especially for those new to sourdough baking. A well-chosen kit can significantly reduce the learning curve and get you baking delicious bread sooner rather than later.
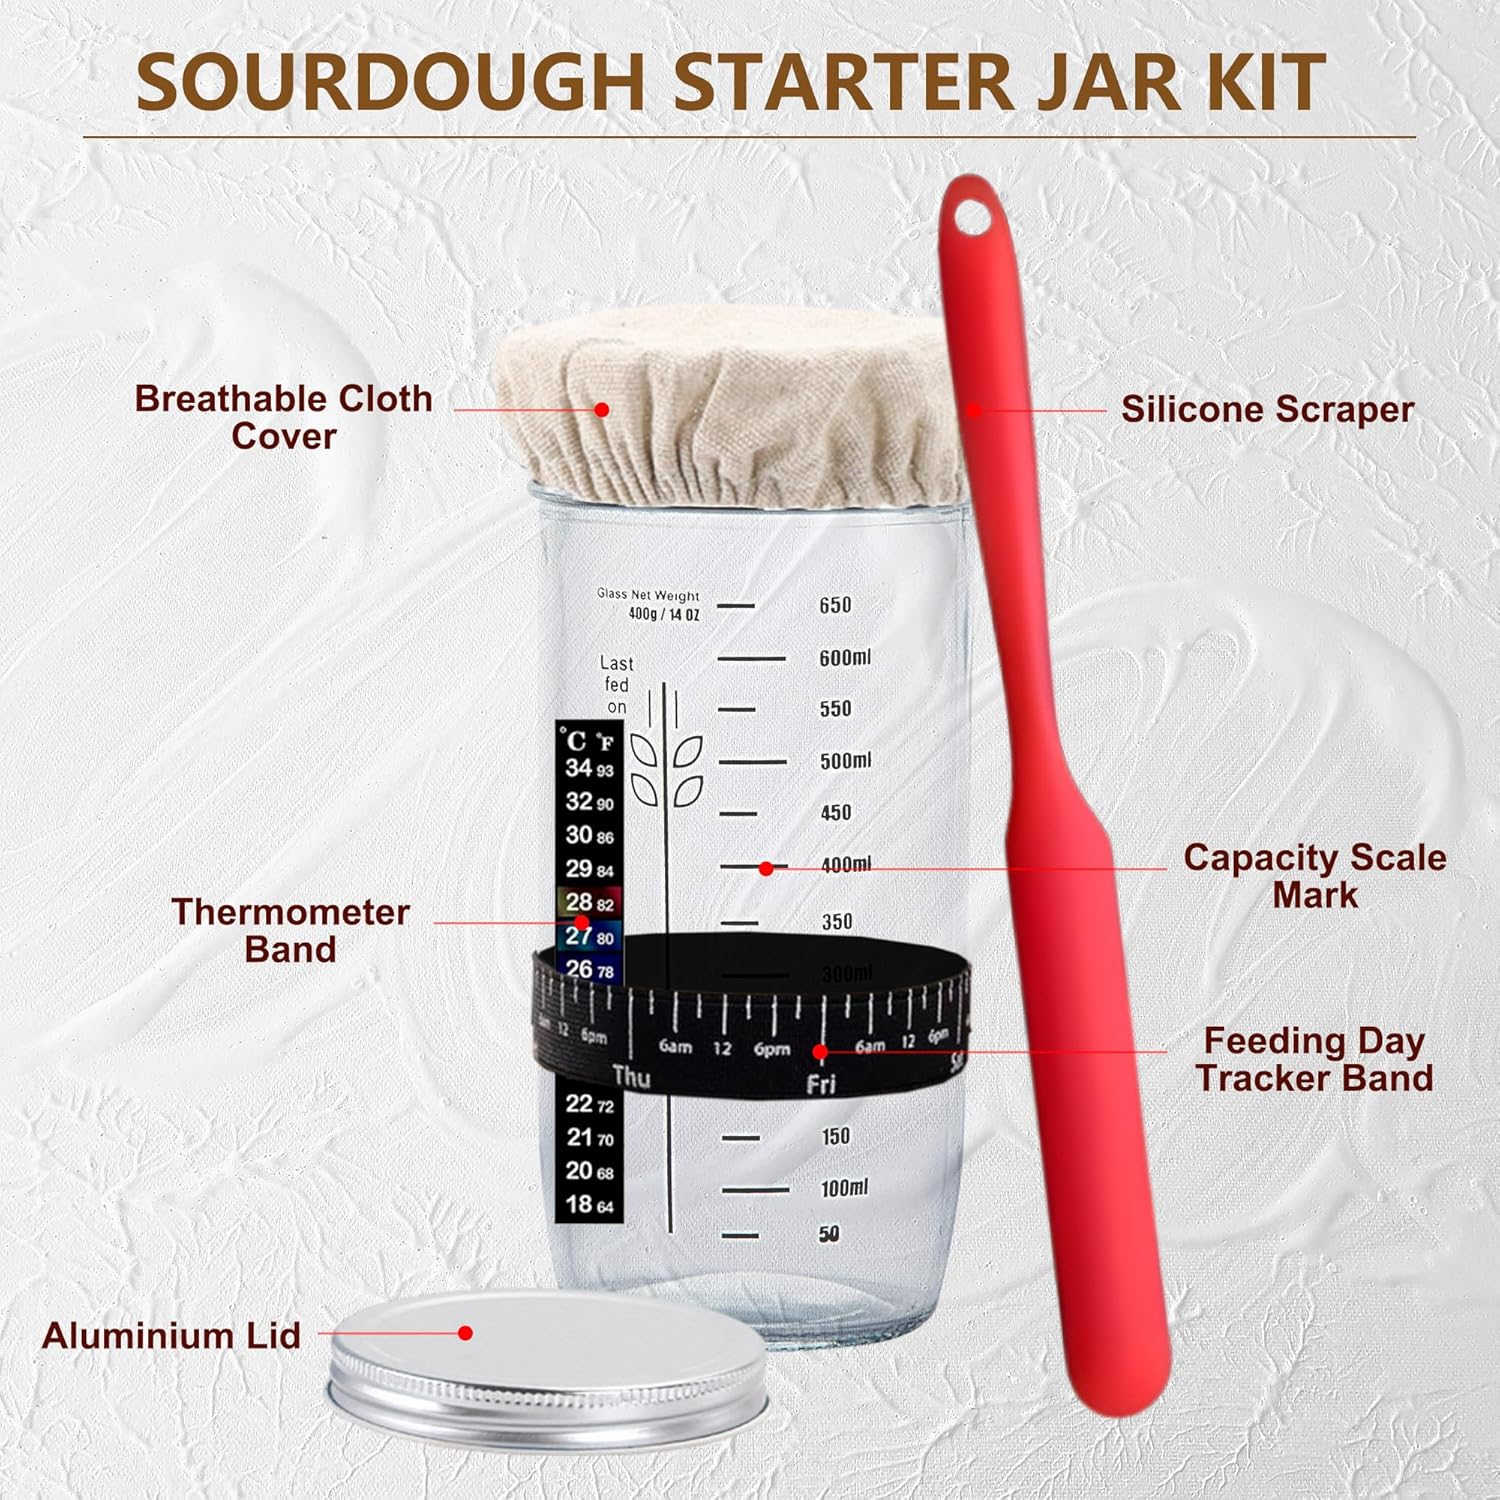
These starter kits typically include high-quality flour (often a blend of whole wheat and unbleached all-purpose), a suitable jar or container for housing the starter, a thermometer to monitor temperature (crucial for yeast activity), and a scraper for easy cleaning and feeding. Some kits even include a small digital scale for precise measurements, which is highly recommended for consistent results. The quality of the flour used in the starter significantly impacts its activity and overall flavor. Organic, unbleached flours are often preferred for their natural yeasts and lack of chemicals that could inhibit starter growth. The instructions provided in these kits are equally important, offering guidance on feeding schedules, environmental conditions, and troubleshooting common issues like slow growth or mold contamination. A clear, concise, and well-written instruction manual can be the difference between a thriving starter and a failed attempt. Pay close attention to details such as the ideal temperature range for your starter and the signs of a healthy, active culture. As you become more experienced, you can experiment with different flours and feeding ratios to develop your own unique starter profile.
Key Components of a Sourdough Starter Kit
- High-Quality Flour: Organic, unbleached all-purpose and whole wheat flour blend.
- Glass Jar/Container: A clear jar with markings for easy volume tracking.
- Thermometer: A stick-on or digital thermometer to monitor starter temperature.
- Scraper: A flexible scraper for cleaning the jar and mixing the starter.
- Detailed Instructions: Step-by-step guidance on feeding, maintenance, and troubleshooting.
- Optional: Digital Scale: For precise measurement of flour and water.
- Optional: Dehydrated Starter: Provides a jumpstart to the starter cultivation process.
Choosing the right starter kit depends on your experience level and preferences. If you’re a complete beginner, a kit with a dehydrated starter and detailed instructions might be the best option. If you’re already familiar with the basics of sourdough, you might prefer a kit with higher-quality flour and more advanced instructions on manipulating the starter’s flavor profile. Consider the size of the jar included in the kit, as this will determine the amount of starter you can maintain. Also, look for kits that offer customer support in case you encounter any problems along the way. The ultimate goal is to create a robust and active starter that will consistently produce delicious sourdough bread.
The Banneton Baking Kit: Shaping Your Sourdough Dreams
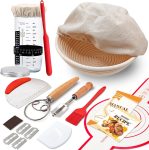
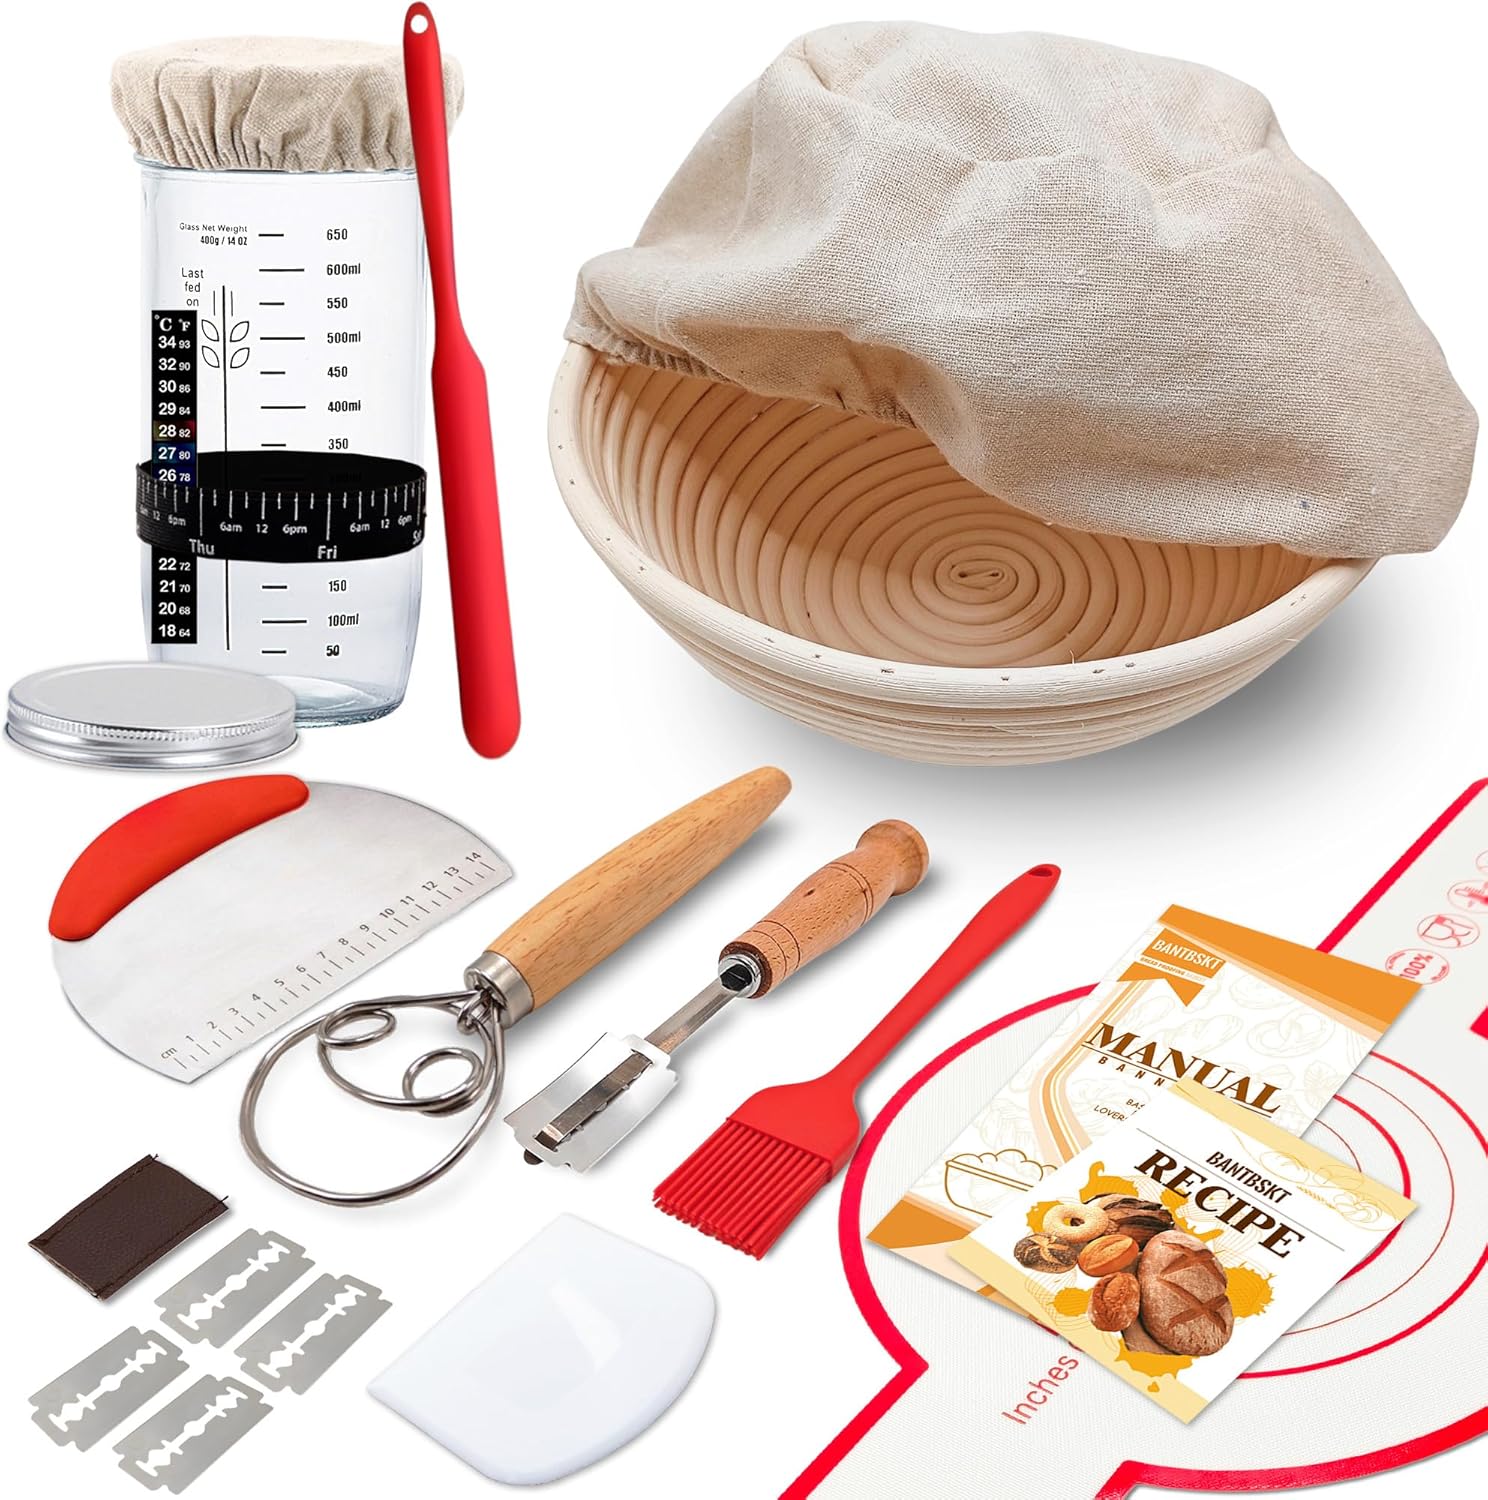
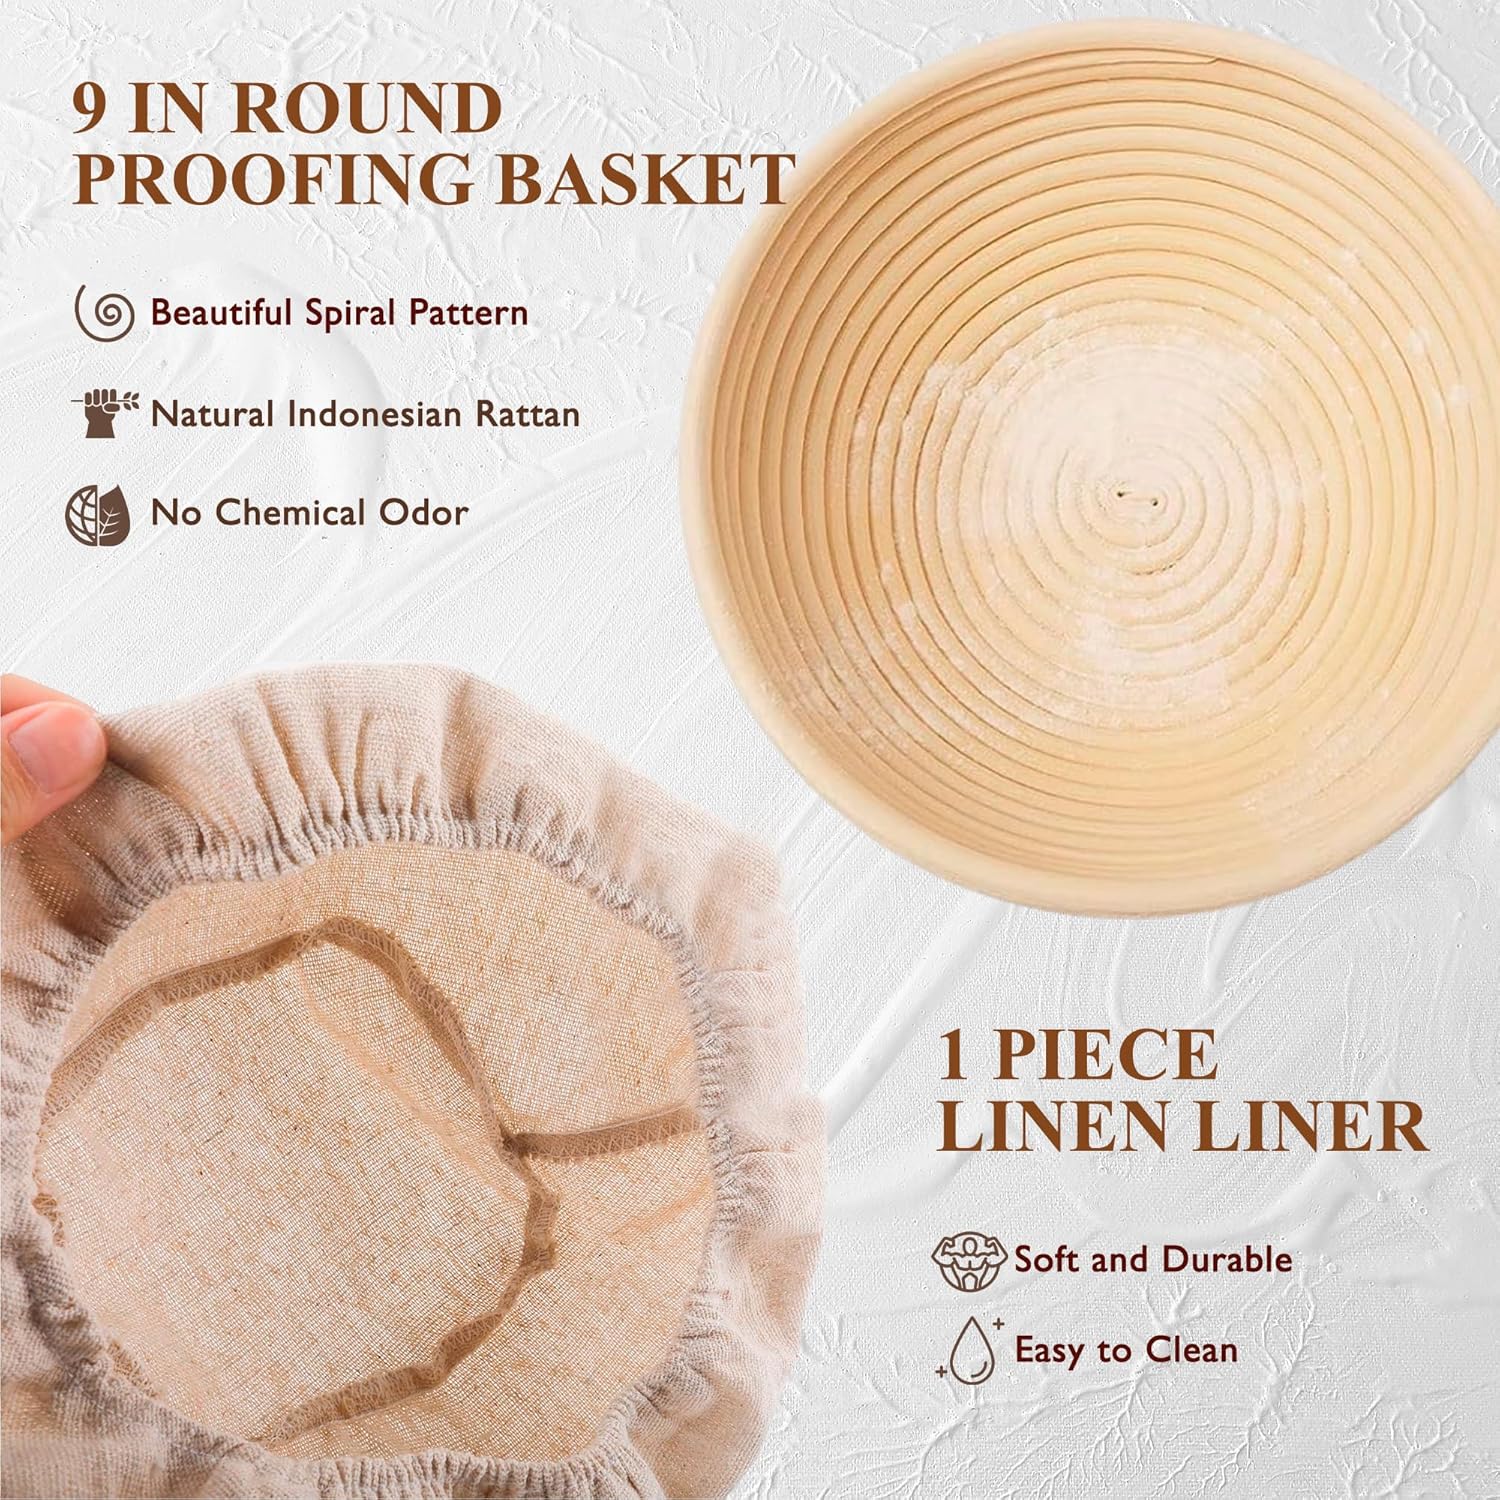
Once your sourdough starter is bubbling with activity, it’s time to move on to the shaping and baking process. This is where the banneton baking kit comes into play. A banneton, also known as a proofing basket, is a specialized container used to support and shape your sourdough dough during its final proofing stage. These baskets are typically made from natural materials like rattan or wood pulp, and they help to create a beautiful, even shape while wicking away excess moisture, resulting in a crispier crust. The banneton baking kit often includes the banneton itself, along with a linen liner, a dough scraper, and sometimes a bread lame (a sharp blade used for scoring the dough). A well-equipped banneton baking kit is essential for achieving professional-looking sourdough loaves with consistent shape and texture.
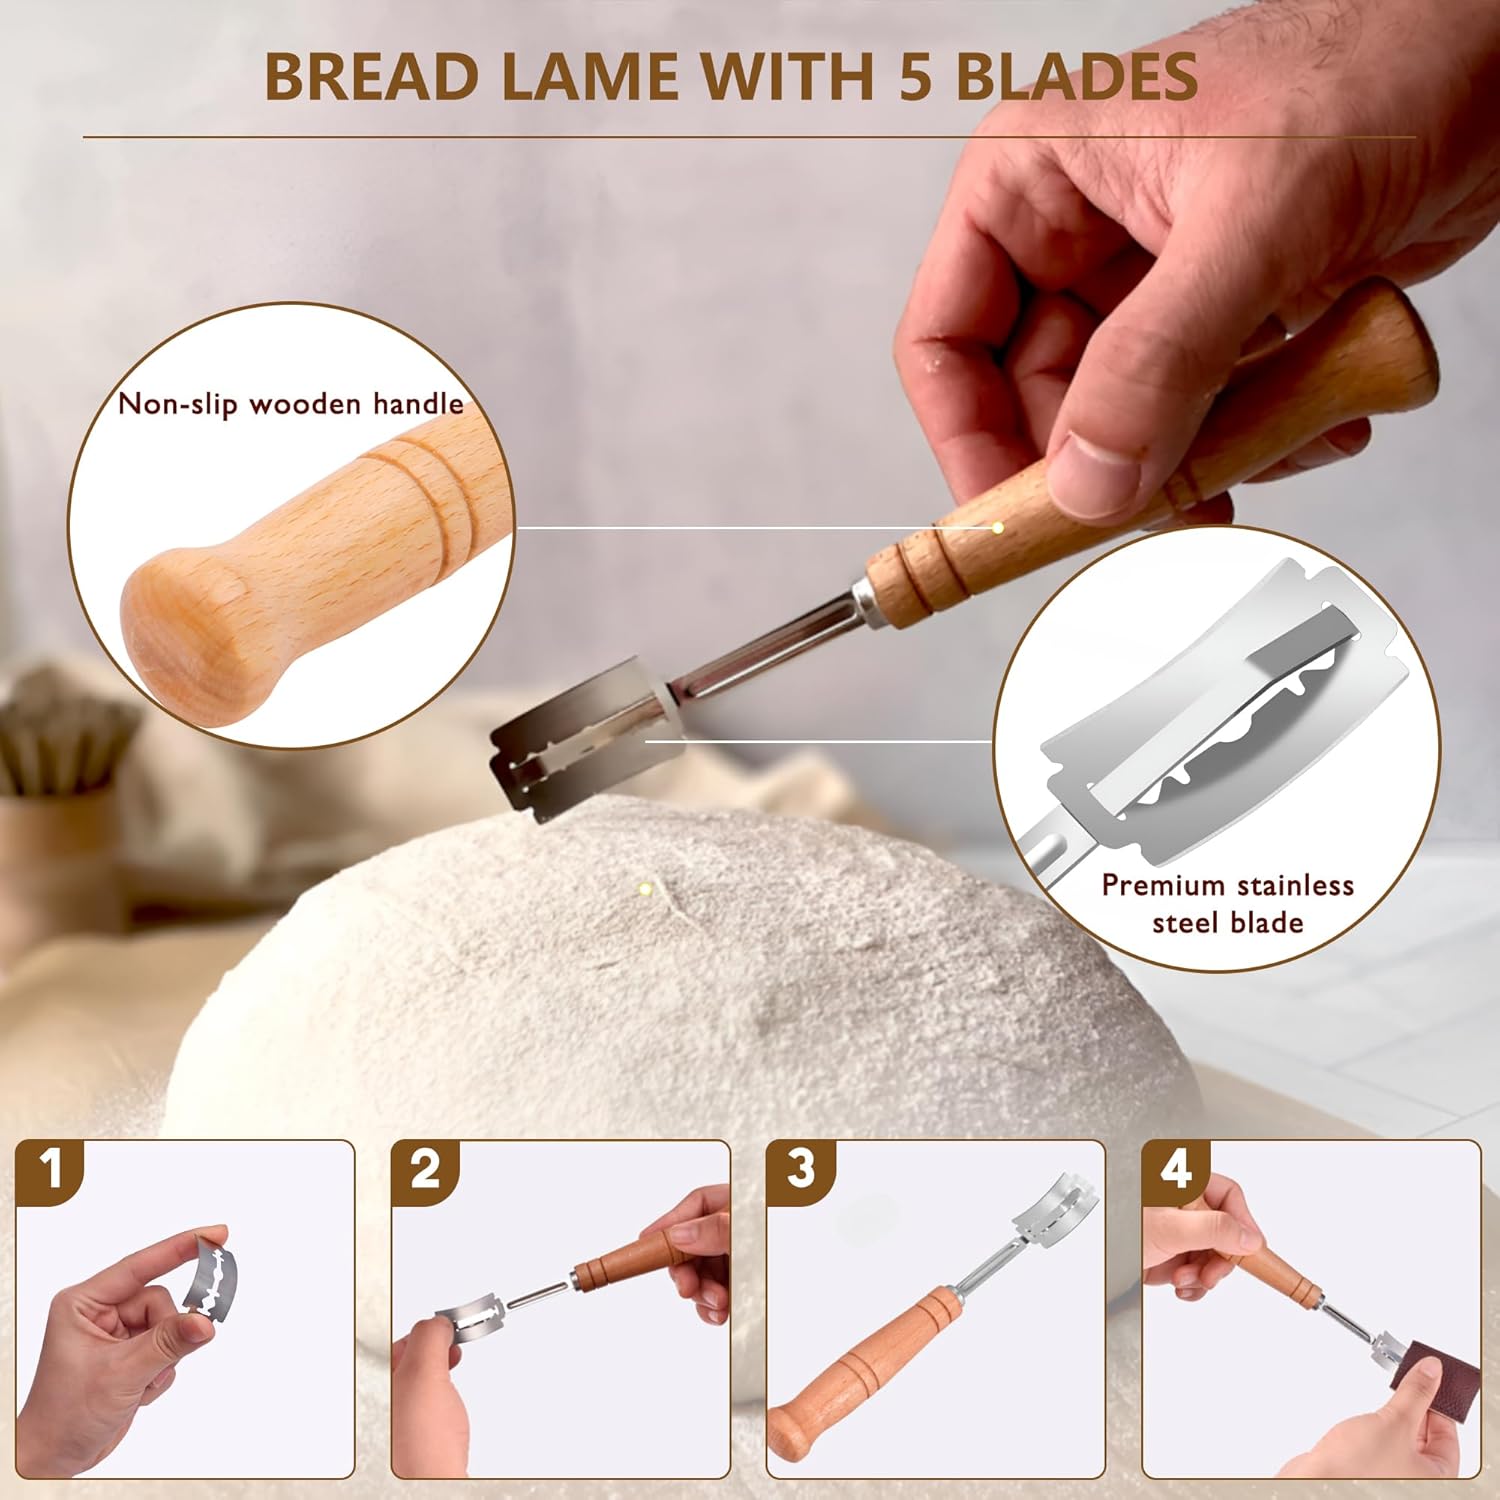
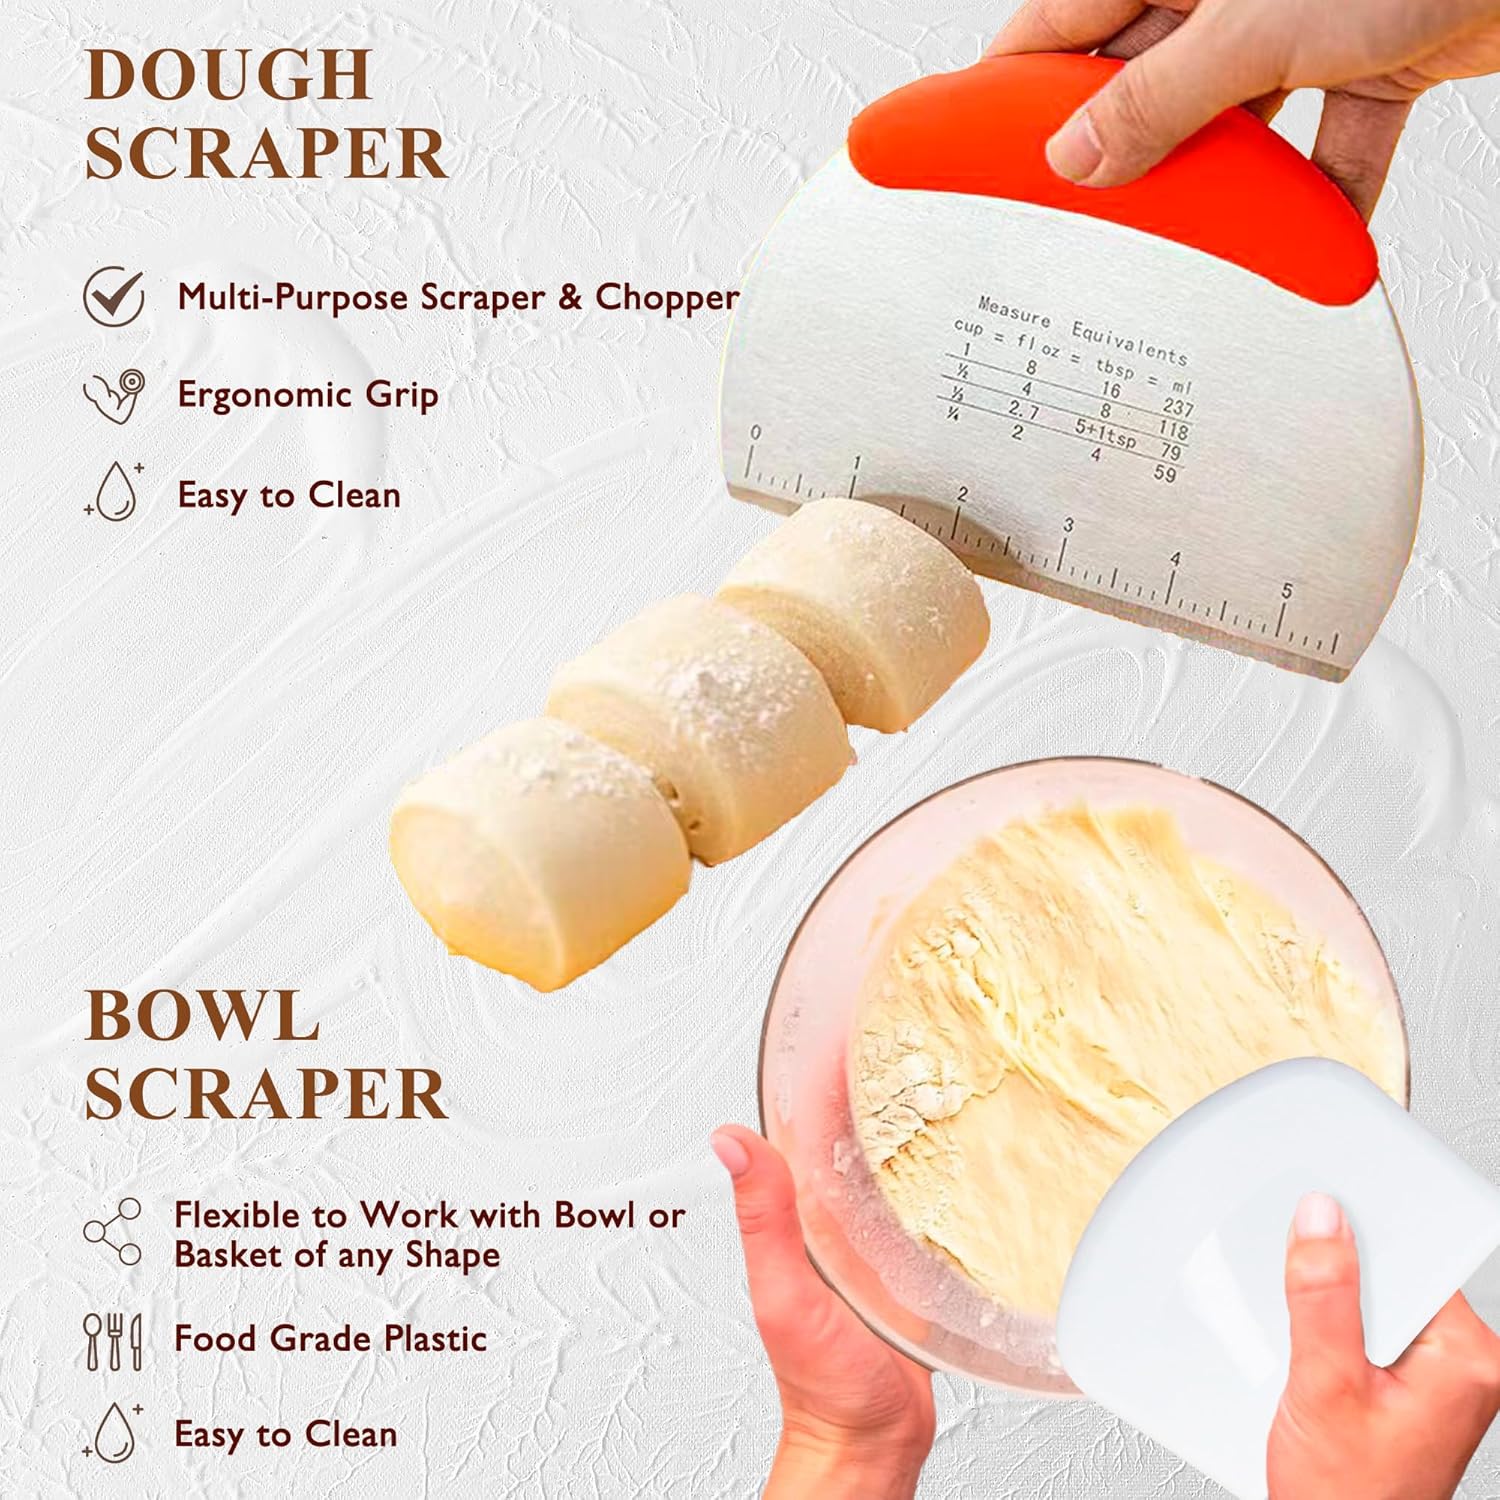
The primary function of the banneton is to provide structural support to the dough as it proofs, preventing it from spreading out and losing its shape. The coiled design of rattan bannetons creates a distinctive spiral pattern on the surface of the loaf, adding to its visual appeal. The linen liner helps to prevent the dough from sticking to the banneton and makes it easier to transfer the loaf to the baking vessel. The dough scraper is a versatile tool used for dividing the dough, shaping it, and cleaning up any sticky residue. The bread lame is used to score the surface of the dough before baking, allowing it to expand properly in the oven and creating beautiful patterns on the crust. Scoring also helps to control the direction of the oven spring, preventing the loaf from cracking unevenly. The quality of the banneton itself is crucial. Look for baskets that are well-constructed, durable, and free from splinters or rough edges. The linen liner should be made from a natural, breathable fabric that is easy to clean. A good quality bread lame will have a sharp, replaceable blade and a comfortable handle.
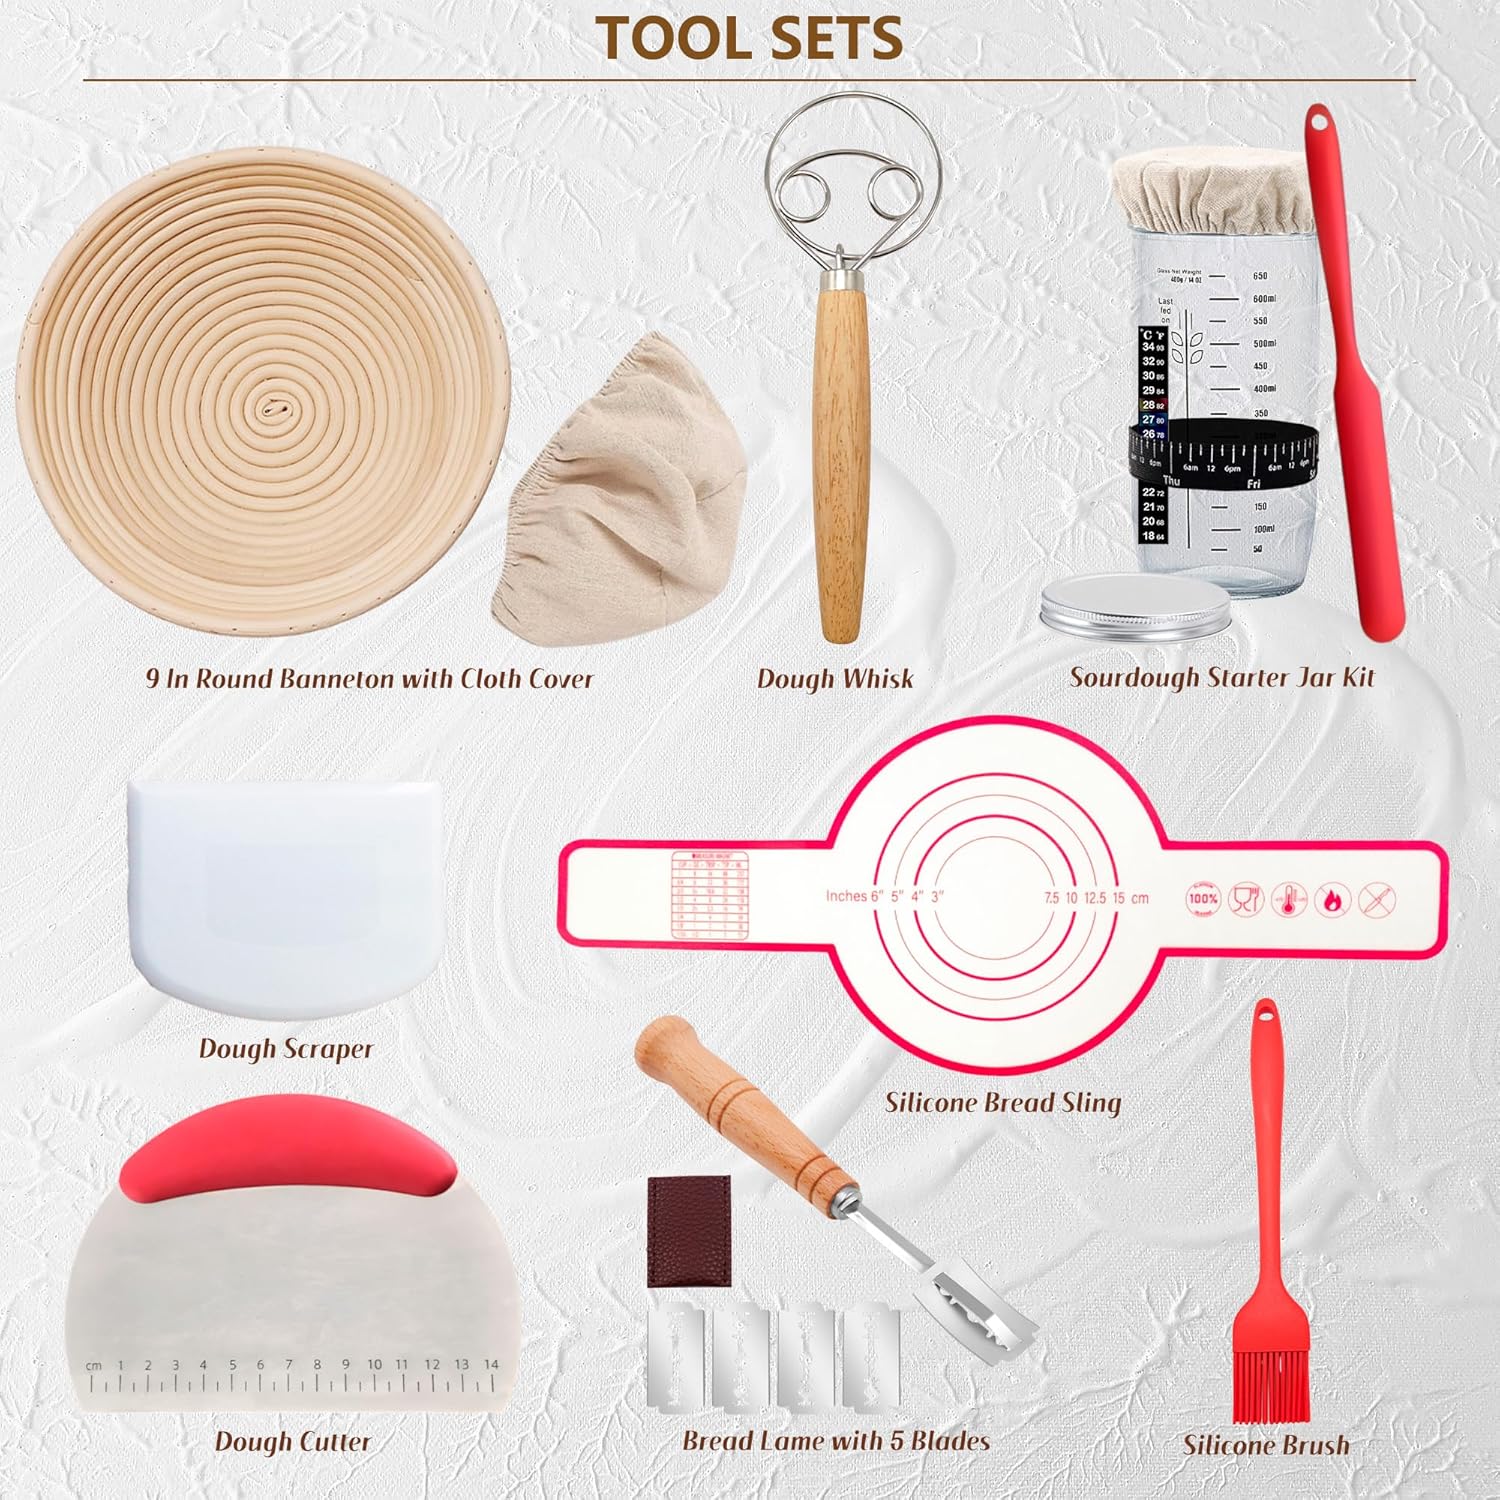
Essential Components of a Banneton Baking Kit
- Banneton Basket: Rattan or wood pulp proofing basket in various shapes and sizes.
- Linen Liner: A removable liner to prevent sticking and aid in dough transfer.
- Dough Scraper: A flexible scraper for dividing, shaping, and cleaning dough.
- Bread Lame: A sharp blade for scoring the dough before baking.
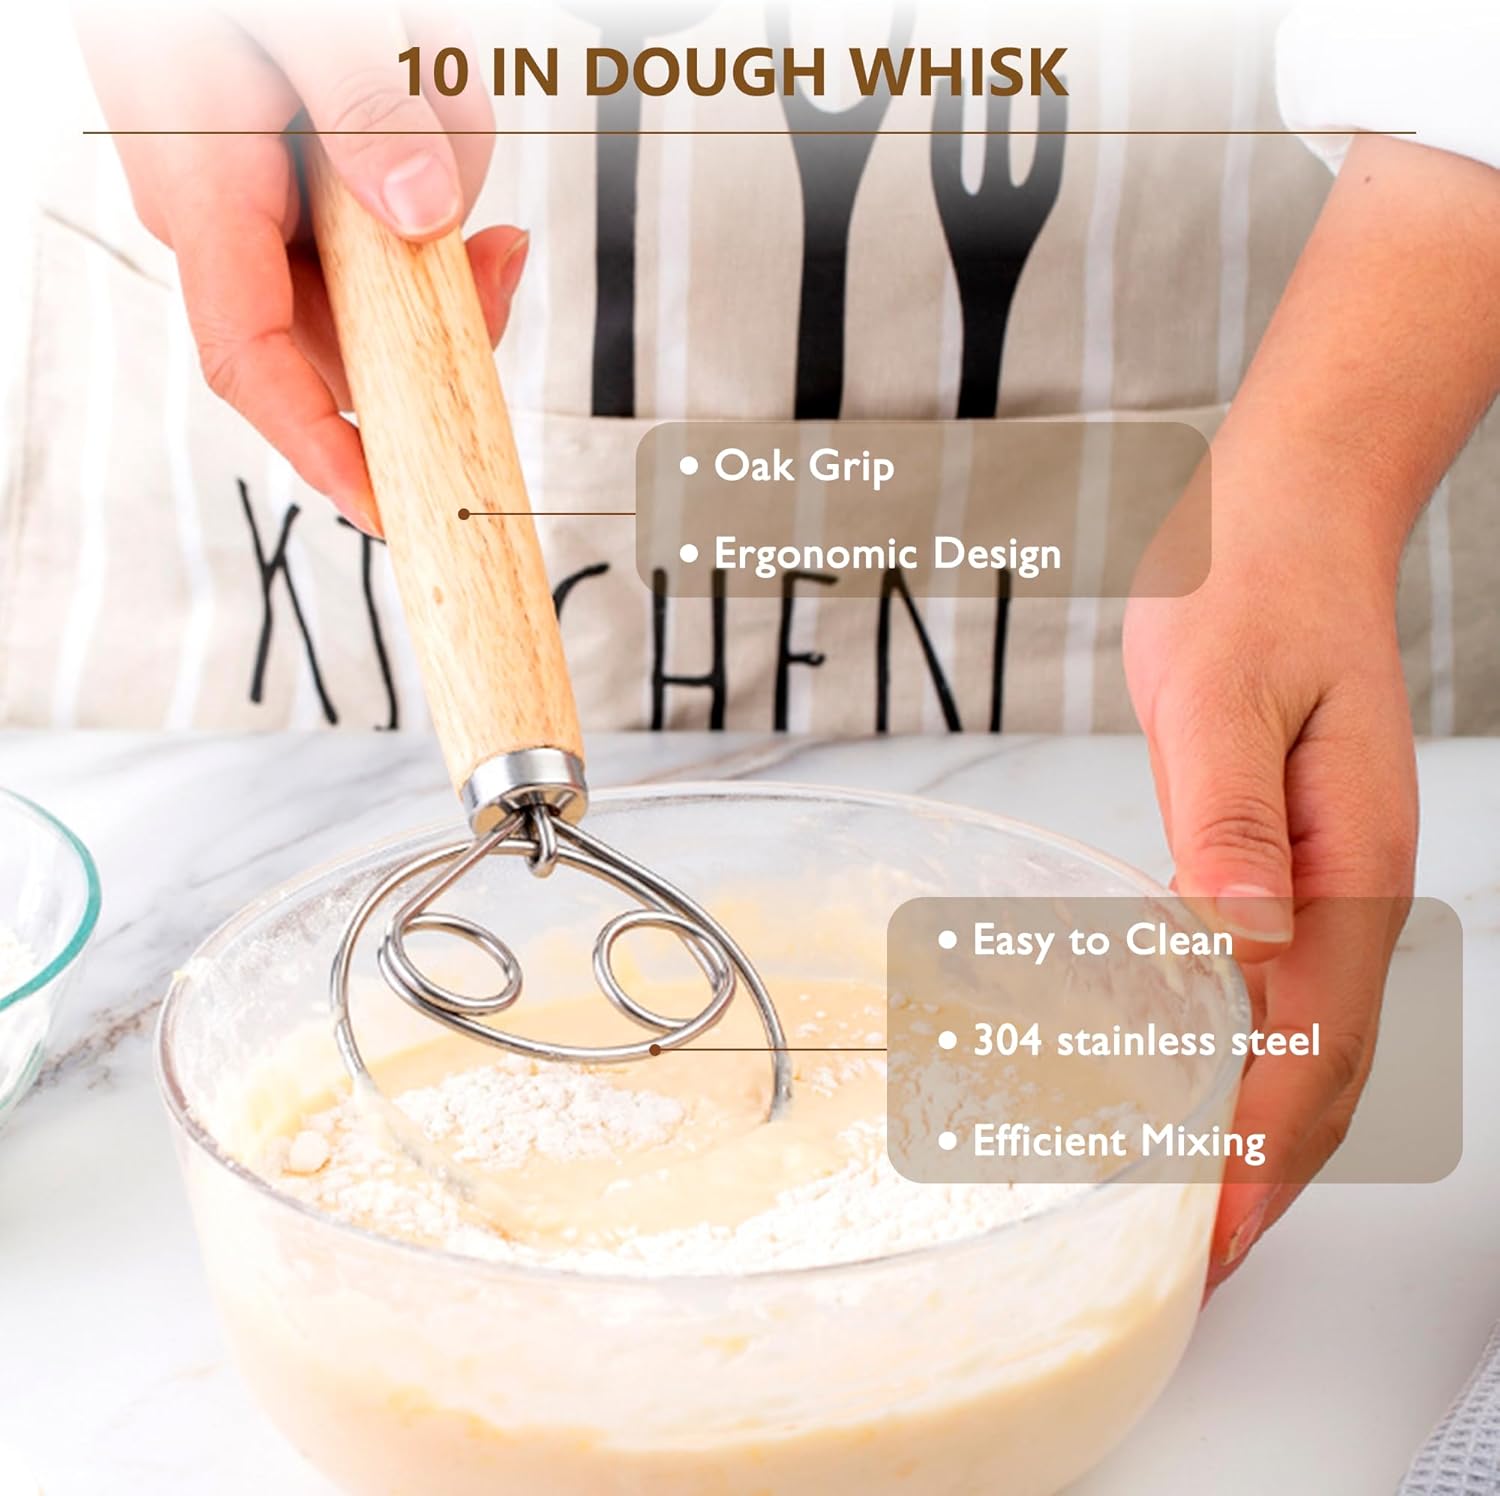
- Optional: Dough Whisk: To thoroughly and gently incorporate ingredients.
When choosing a banneton baking kit, consider the size and shape of the banneton. Round bannetons are ideal for boules (round loaves), while oval bannetons are better suited for batards (oval loaves). The size of the banneton should correspond to the amount of dough you typically bake. Also, consider the material of the banneton. Rattan bannetons are more traditional and offer excellent moisture wicking, while wood pulp bannetons are easier to clean and maintain. A good quality banneton will last for years with proper care. After each use, brush out any excess flour and allow the banneton to air dry completely. Occasionally, you may need to wash the linen liner to remove any accumulated dough. With the right tools and techniques, a banneton baking kit can elevate your sourdough baking from amateur to artisanal.
Beyond the Basics: Choosing the Right Complete Sourdough Baking Kit
While sourdough starter kits and banneton baking kits provide the foundational tools for sourdough baking, a complete sourdough baking kit takes things a step further by combining both starter and shaping components into a single, comprehensive package. These kits often include additional items like a Dutch oven (a heavy-bottomed pot ideal for baking sourdough), a bread thermometer, and a recipe book or online course. The advantage of a complete kit is that it provides everything you need to start baking sourdough from start to finish, eliminating the need to source individual items from different suppliers. This can be particularly appealing for beginners who are overwhelmed by the sheer number of options available.
Before investing in a complete sourdough baking kit, carefully consider its contents and quality. Look for kits that include high-quality ingredients, durable tools, and comprehensive instructions. The Dutch oven should be made from cast iron or enameled cast iron and should be large enough to accommodate your preferred loaf size. The bread thermometer should be accurate and easy to read, ensuring that your bread is baked to the perfect internal temperature. The recipe book or online course should provide clear, concise instructions and a variety of recipes to experiment with. Pay attention to the reviews of the kit and read customer feedback to get an idea of its overall quality and performance. A well-designed complete sourdough baking kit can be a valuable investment for anyone serious about mastering the art of sourdough baking. It saves time, money, and frustration by providing all the essential tools and resources in one convenient package. More experienced bakers might prefer to curate their own collection of tools, but for beginners, a complete kit is an excellent way to get started on the right foot.
What to Look for in a Complete Sourdough Baking Kit
- Sourdough Starter Kit: As described above, including flour, jar, thermometer, and instructions.
- Banneton Baking Kit: As described above, including banneton, liner, scraper, and lame.
- Dutch Oven: Cast iron or enameled cast iron, large enough for your desired loaf size.
- Bread Thermometer: Accurate and easy to read, for monitoring internal temperature.
- Recipe Book/Online Course: Clear instructions and a variety of recipes.
- Optional: Proofing Box: To maintain ideal starter temperature.
Ultimately, the best complete sourdough baking kit is the one that meets your individual needs and preferences. Consider your budget, experience level, and the types of loaves you want to bake. Don’t be afraid to do your research and compare different kits before making a decision. With the right tools and a little patience, you’ll be baking delicious, homemade sourdough bread in no time. The beauty of sourdough baking lies in its simplicity and the satisfaction of creating something truly unique from just a few basic ingredients. A complete sourdough baking kit can help you unlock this potential and embark on a rewarding culinary journey.
Baking Kit Considerations: Price vs. Value
The price of a complete sourdough or banneton baking kit can vary significantly depending on the brand, the quality of the components, and the number of items included. It’s important to consider the price in relation to the value you’re receiving. A cheaper kit might seem appealing at first, but if the components are of poor quality or the instructions are unclear, it could end up costing you more in the long run due to failed attempts and wasted ingredients. Conversely, a more expensive kit might offer higher-quality tools and more comprehensive instructions, but it might not be necessary for your needs if you’re just starting out.
Consider your baking frequency and skill level when evaluating the price. If you plan to bake sourdough regularly, investing in a higher-quality kit with durable components is likely to be a worthwhile investment. If you’re just experimenting with sourdough and not sure if you’ll stick with it, a more basic kit might be sufficient. It’s also important to factor in the cost of ingredients. Sourdough baking requires high-quality flour, which can be more expensive than standard all-purpose flour. However, the superior flavor and texture of sourdough bread are well worth the investment. Don’t be afraid to shop around and compare prices from different retailers. Look for sales and discounts, especially during events like Black Friday. Also, consider purchasing individual components separately if you already have some of the necessary tools. For example, if you already have a Dutch oven, you might only need to purchase a sourdough starter kit and a banneton baking kit. Remember that the ultimate goal is to bake delicious, homemade sourdough bread, and the right tools can help you achieve that goal without breaking the bank.
Here’s a comparison table to help you evaluate different kits based on price and features:
| Kit Type | Price Range | Key Features | Ideal For |
|---|---|---|---|
| Basic Sourdough Starter Kit | $20-$40 | Flour, jar, thermometer, basic instructions | Beginners on a budget |
| Premium Sourdough Starter Kit | $40-$60 | Organic flour, high-quality jar, digital thermometer, detailed instructions | Serious beginners wanting the best start |
| Basic Banneton Baking Kit | $30-$50 | Banneton, liner, scraper | Beginners who already have a starter |
| Premium Banneton Baking Kit | $50-$80 | High-quality banneton, linen liner, dough scraper, bread lame | Experienced bakers seeking better tools |
| Complete Sourdough Baking Kit | $80-$200+ | All components of starter and banneton kits, plus Dutch oven, thermometer, and recipe book | Beginners who want everything in one package |
Maintaining Your Baking Kit: Longevity and Care
Once you’ve invested in a sourdough starter kit and a banneton baking kit, proper maintenance is essential to ensure their longevity and optimal performance. The sourdough starter itself requires ongoing care and feeding to maintain its vitality. Follow the instructions provided in your kit for feeding schedules and storage recommendations. Generally, a sourdough starter should be fed regularly (typically once or twice a day) with equal parts flour and water. The consistency of the starter should be similar to a thick pancake batter. Store the starter in a clean, airtight jar in a cool, dark place, such as the refrigerator. When you’re ready to bake, take the starter out of the refrigerator and allow it to warm up to room temperature before feeding it. This will help to activate the yeasts and bacteria and ensure a strong rise.
The banneton also requires proper care to prevent mold growth and maintain its shape. After each use, brush out any excess flour and allow the banneton to air dry completely. Avoid washing the banneton with soap and water, as this can damage the natural fibers. If necessary, you can gently wipe the banneton with a damp cloth. The linen liner should be washed regularly to remove any accumulated dough. You can wash it by hand or in the washing machine, but avoid using bleach or harsh detergents. Allow the liner to air dry completely before storing it. The dough scraper and bread lame should be cleaned after each use to prevent the buildup of dough and bacteria. You can wash them with soap and water or in the dishwasher. Store the bread lame in a safe place to prevent accidental cuts. With proper care and maintenance, your sourdough starter kit and banneton baking kit will provide you with years of baking enjoyment.
FAQ: Your Sourdough Starter and Baking Kit Questions Answered
What is the best way to start a sourdough starter from scratch?
Starting a sourdough starter from scratch is a rewarding but patient process. You’ll need a clean jar, unbleached flour (whole wheat and all-purpose mix works well), and water. Begin by mixing equal parts flour and water in the jar, creating a thick paste. Cover loosely and leave at room temperature (ideally 70-75°F). For the first few days, you might see some activity like bubbles, but it’s likely just undesirable bacteria. Don’t worry! After a few days, discard about half of the starter and feed it again with equal parts flour and water. This process is called “discarding” and “feeding.” Continue discarding and feeding daily. You should start to see consistent rising and falling after feedings, along with a tangy, sour aroma. This indicates that your starter is becoming active. Once it consistently doubles in size within 4-8 hours after feeding, it’s ready to use for baking. Remember consistency and patience are key!
How do I know if my sourdough starter is active and ready to bake with?
An active sourdough starter exhibits several key signs that it’s ready to bake with. First and foremost, it should double in size within 4-8 hours after feeding. This shows that the yeast and bacteria are thriving and producing gas. Secondly, the starter should have a bubbly, airy texture with a slightly domed top. The aroma should be tangy and sour, but pleasant, similar to yogurt or beer. If your starter doesn’t double in size, has a flat appearance, or smells off (like mold or acetone), it’s not ready. Continue feeding it regularly until it exhibits all the signs of activity. The “float test” is a common method, although not always reliable. Drop a small spoonful of starter into a glass of water; if it floats, it’s generally considered active. However, a starter can float even if it’s not at its peak activity, so rely on the other indicators as well.
What is the purpose of a banneton, and how do I use it?
A banneton, or proofing basket, is used to shape and support sourdough dough during its final proofing stage. It provides structure to the dough, preventing it from spreading out and losing its shape. The banneton also helps to wick away excess moisture, resulting in a crispier crust. To use a banneton, first dust it generously with rice flour (rice flour is less likely to be absorbed by the dough). If using a linen liner, place it inside the banneton. Gently place your shaped dough into the banneton, seam-side up. Cover the banneton with a cloth or plastic wrap and let it proof in the refrigerator for several hours or overnight. When you’re ready to bake, carefully invert the banneton onto a piece of parchment paper. Score the dough with a bread lame and transfer it to your preheated baking vessel. The banneton is essential for achieving a well-shaped, artisanal sourdough loaf.
How often should I feed my sourdough starter, and what is the ideal ratio of flour to water?
The feeding frequency of your sourdough starter depends on whether you keep it at room temperature or in the refrigerator. If kept at room temperature, it should be fed once or twice a day. If kept in the refrigerator, it can be fed less frequently, typically once a week. The ideal ratio of flour to water is generally 1:1, meaning equal parts by weight. However, you can adjust this ratio slightly depending on the consistency of your starter. If your starter is too thick, add a little more water. If it’s too thin, add a little more flour. Consistency is key, so aim for a thick pancake batter-like consistency. Different flours absorb water differently, so adjust accordingly. Experimentation and observation are key to finding what works best for your starter.
What do I do if my sourdough starter is not rising?
Why is my starter not rising?
There are several reasons why your sourdough starter might not be rising. The most common reason is that it’s not being fed frequently enough or with the proper ratio of flour to water. Make sure you’re feeding it regularly and using equal parts flour and water. Another reason could be the temperature. Sourdough starters thrive in warm environments (70-75°F). If your kitchen is too cold, the yeasts and bacteria might not be active enough. Try placing the starter in a warmer location, such as near the oven or on top of the refrigerator. Poor flour quality can also hinder growth. Consider switching to organic, unbleached flour. Lastly, patience is important. It can take several weeks for a new starter to become fully active, so don’t give up too soon. Continue feeding it regularly and monitor its progress.
How do I clean and maintain my banneton basket?
Cleaning and maintaining your banneton basket properly is crucial for preventing mold growth and prolonging its lifespan. After each use, gently tap the banneton to remove any excess flour. Use a dry brush to remove any remaining flour from the crevices. Avoid washing the banneton with soap and water, as this can damage the natural fibers. If necessary, you can gently wipe the banneton with a damp cloth. Allow the banneton to air dry completely before storing it. Ensure it’s completely dry to prevent mold. You can also place it in a warm oven (around 200°F) for a short period to ensure it’s thoroughly dried. Store the banneton in a well-ventilated area. Avoid storing it in a damp or enclosed space. Regularly inspect the banneton for any signs of mold or mildew. If you notice any, discard the banneton and replace it with a new one. The linen liner should be washed regularly to remove any accumulated dough.
What are some common mistakes to avoid when baking sourdough bread?
Baking sourdough bread can be challenging, and there are several common mistakes to avoid. One common mistake is using an inactive starter. Make sure your starter is active and doubling in size before using it in a recipe. Over-proofing or under-proofing the dough can also lead to problems. Over-proofed dough will be flat and dense, while under-proofed dough will be tight and gummy. Experiment with proofing times to find what works best for your environment. Another mistake is not scoring the dough properly. Scoring allows the dough to expand properly in the oven and prevents it from cracking unevenly. Use a sharp bread lame and make a deep, confident slash. Over-mixing the dough can also result in a tough loaf. Mix the dough gently until the ingredients are just combined. Finally, not using enough steam in the oven can result in a dull crust. Use a Dutch oven or add ice cubes to the oven to create steam.
Price: $33.99 - $29.99
(as of Sep 04, 2025 11:05:40 UTC – Details)


