
Best 2 Pack 40 Inches Halloween Skeleton Life Idea Halloween Skeleton Review – Oemiu
Unleashing Spooky Fun: A Deep Dive into the 2-Pack 40-Inch Halloween Skeleton Set
Halloween is a time for creativity, transforming our homes into haunted havens and our gardens into ghostly graveyards. At the heart of many Halloween decorations lies the skeleton, a symbol of mortality and macabre fun. But not all skeletons are created equal. This article delves into the world of the 2-pack 40-inch Halloween Skeleton set, exploring its features, benefits, and how it can elevate your spooky season displays. We’ll examine what makes these bone-chilling companions a worthwhile investment and how to make the most of them in your Halloween setup. Forget flimsy, easily breakable skeletons – we’re talking about decorations that add a touch of realism and enduring charm to your festive decor.
Why a 2-Pack of 40-Inch Skeletons is the Ideal Halloween Upgrade
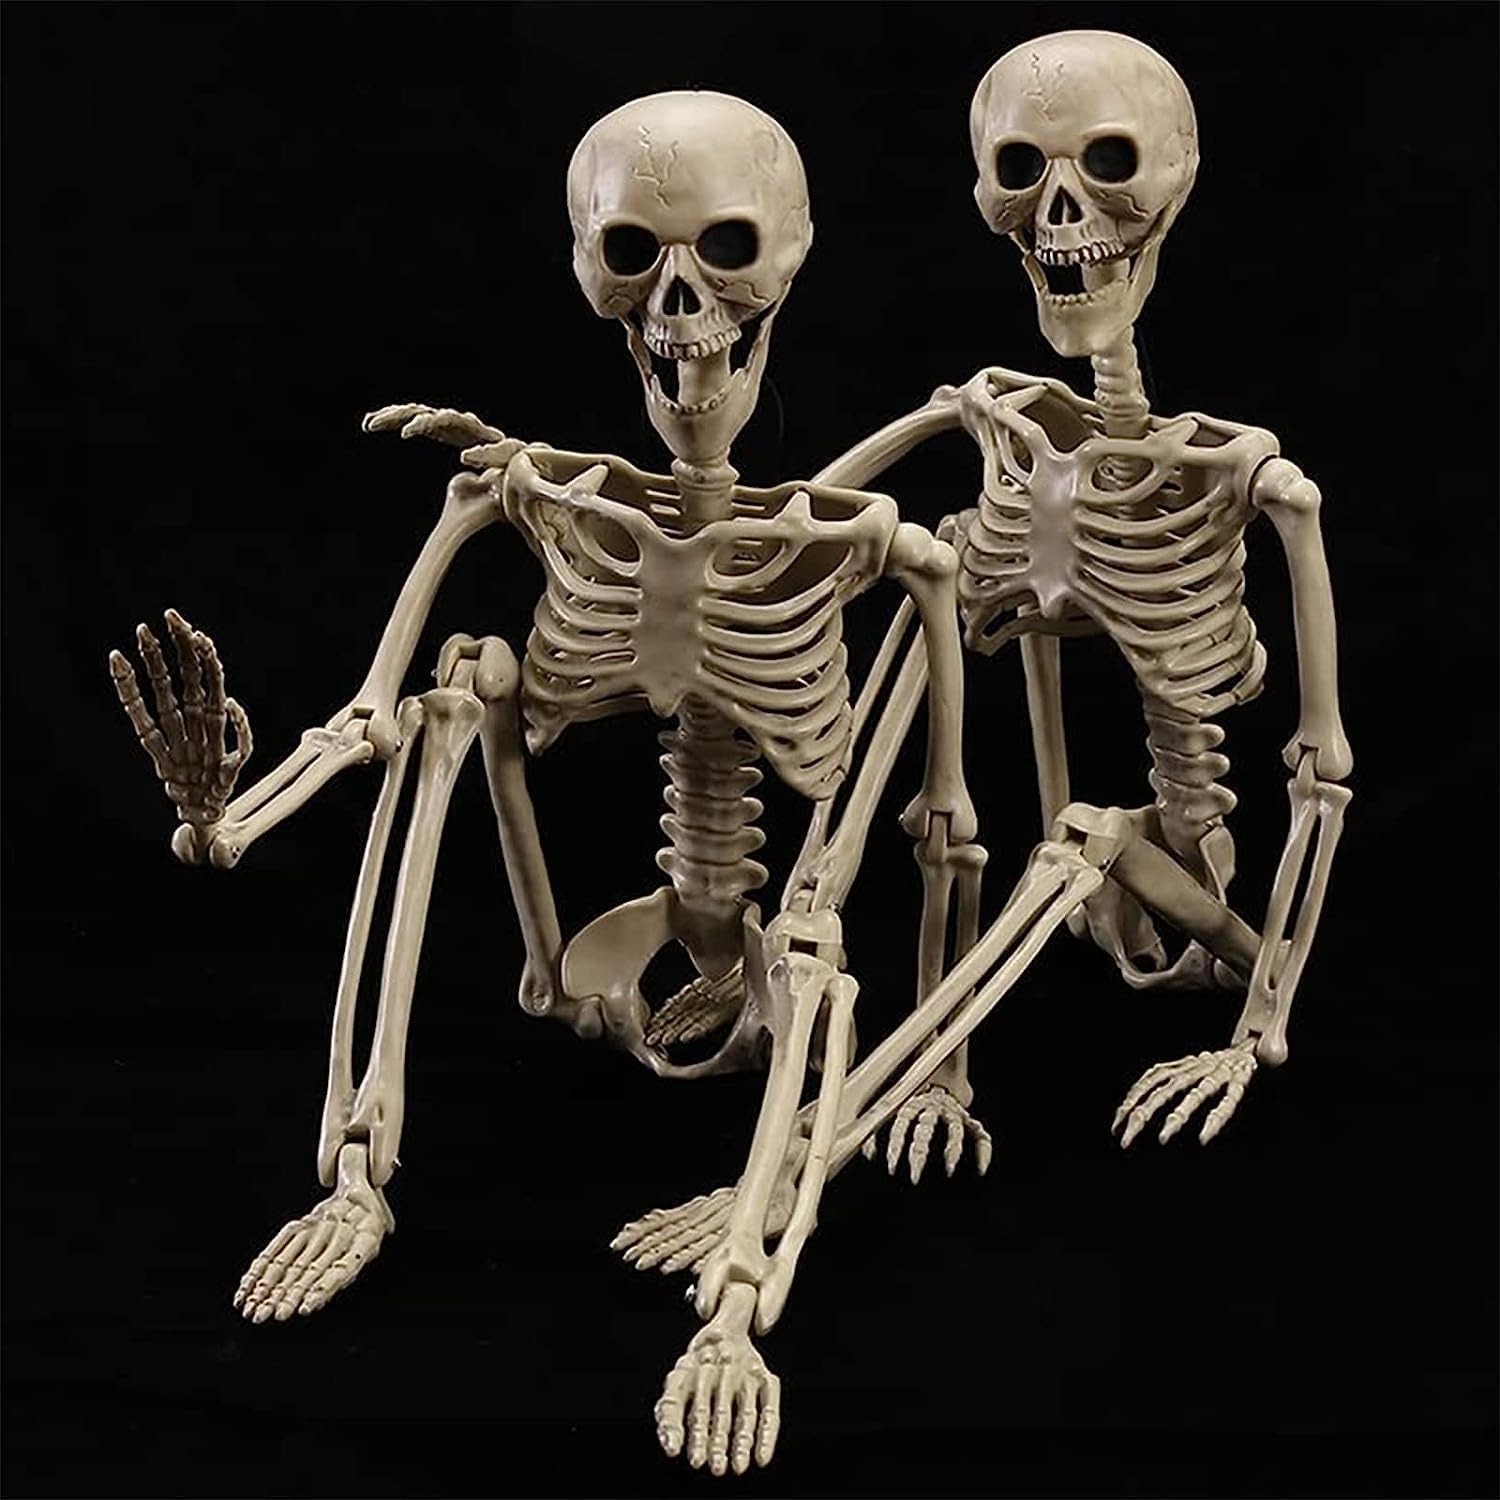
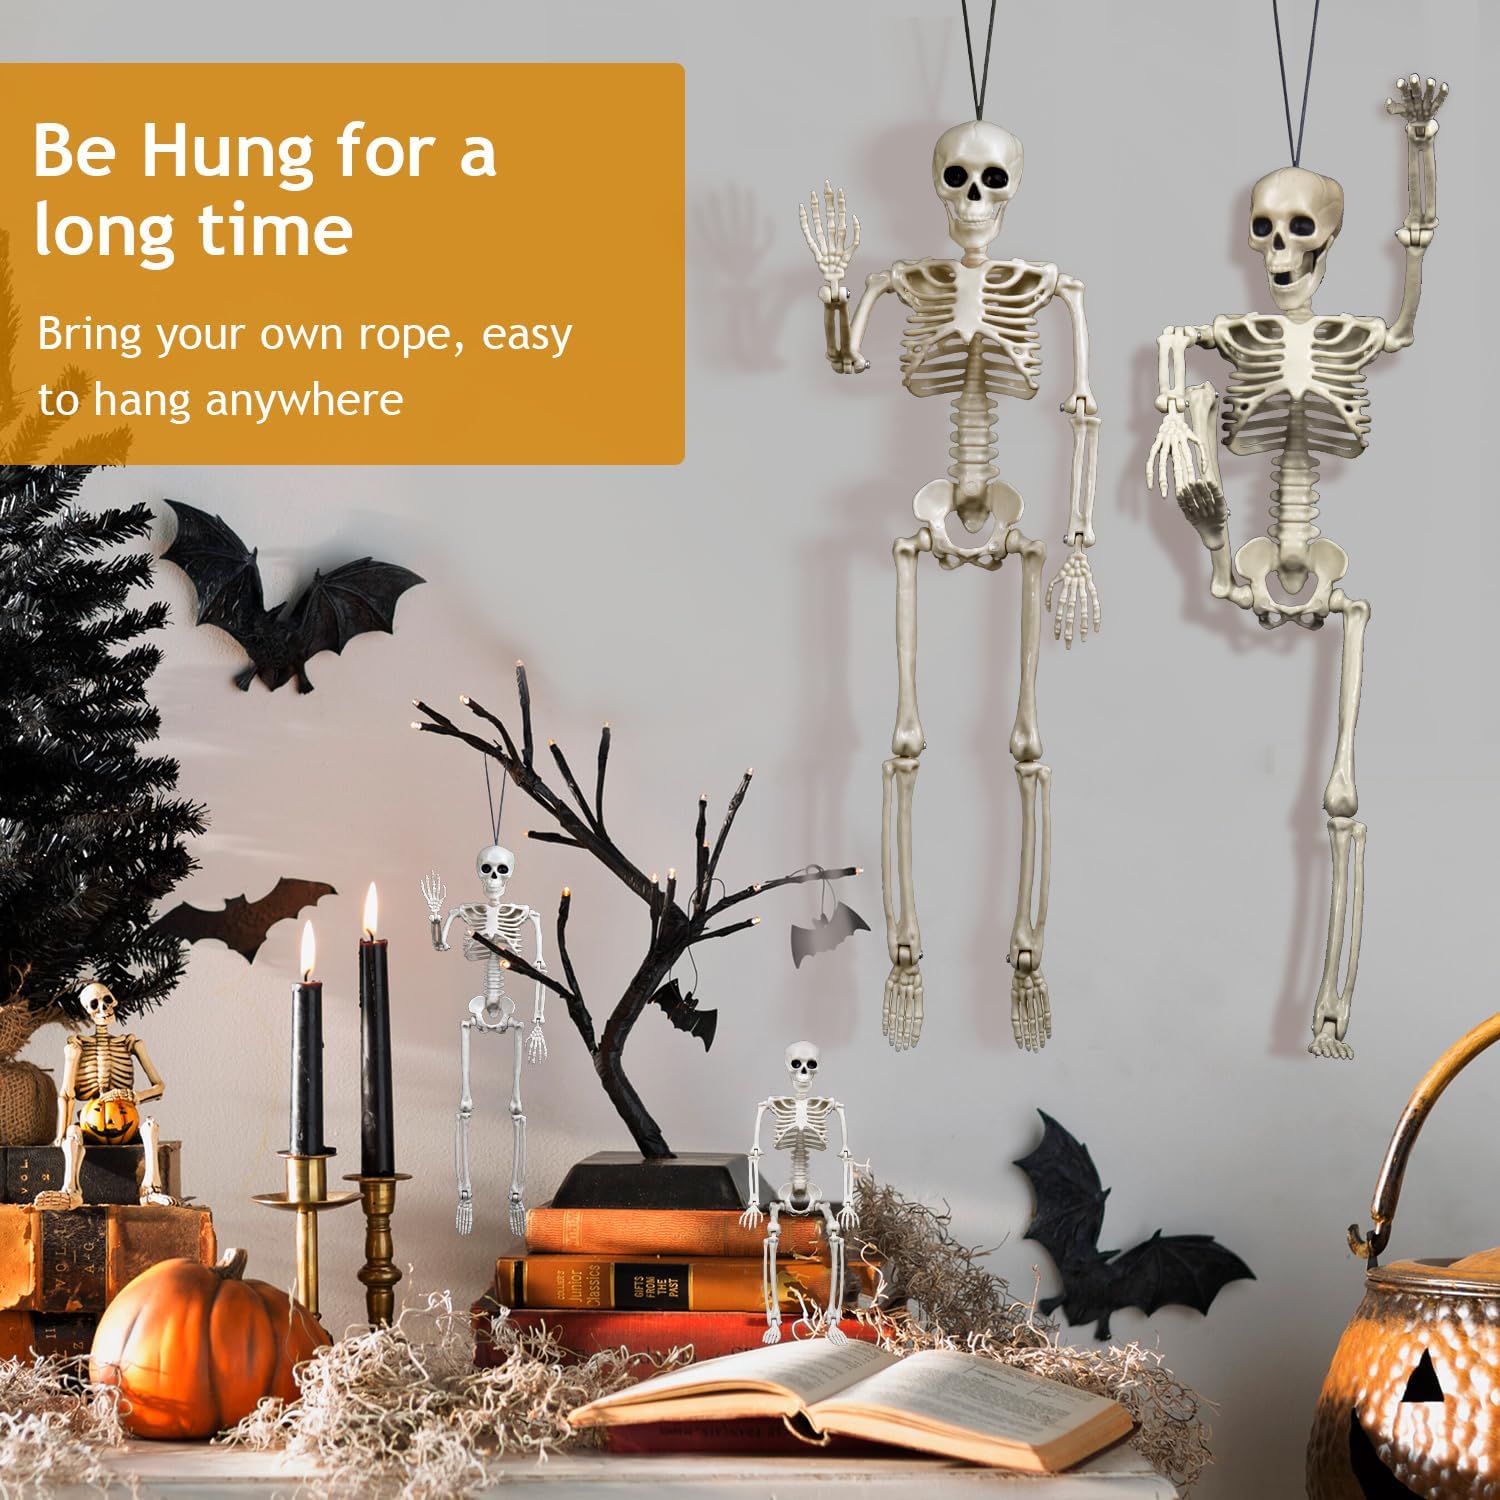
The versatility and impact of a well-placed skeleton during Halloween cannot be overstated. A single skeleton can be a good starting point, but a pair unlocks a multitude of creative possibilities. Having two 40-inch skeletons allows for dynamic posing and interactive scenes. Imagine one skeleton reaching out from a window, while the other lurks behind a bush. Or perhaps a skeletal couple engaged in a spooky dance on your porch. The symmetry and balance offered by a pair creates a more visually compelling and engaging display. Furthermore, the 40-inch size hits a sweet spot – large enough to be noticed from a distance but manageable enough to position easily.
Beyond the aesthetic advantages, buying a 2-pack often translates to better value for your money. Purchasing individual skeletons can be surprisingly costly, and a bundled deal is typically more economical. This means you can invest in higher-quality materials and construction without breaking the bank. Speaking of construction, consider the skeleton’s durability. Look for skeletons made from sturdy plastic that can withstand outdoor conditions. Articulated joints are another crucial feature, allowing you to customize the pose and bring your skeletal characters to life. Imagine bending the arms into a menacing claw or tilting the head for a sinister stare. This level of flexibility separates a static decoration from a truly interactive Halloween prop. This kind of creative display becomes even more achievable with a well-crafted Halloween Skeleton, which is what makes a 2-pack of 40-inch models such an attractive purchase.
Consider the ease of storage when choosing your skeletons. Opt for models that can be easily disassembled for compact storage during the off-season. This prevents them from taking up valuable space and protects them from damage. Think about the overall aesthetic you’re trying to achieve. Do you want realistic-looking skeletons with detailed bone structures, or are you aiming for a more cartoonish and whimsical vibe? The style of the skeletons should complement your other Halloween decorations and reflect your personal taste. Ultimately, a 2-pack of 40-inch Halloween skeletons offers a winning combination of visual impact, creative flexibility, and cost-effectiveness, making it a smart choice for any Halloween enthusiast.
Evaluating Key Features: Durability, Articulation, and Realistic Design
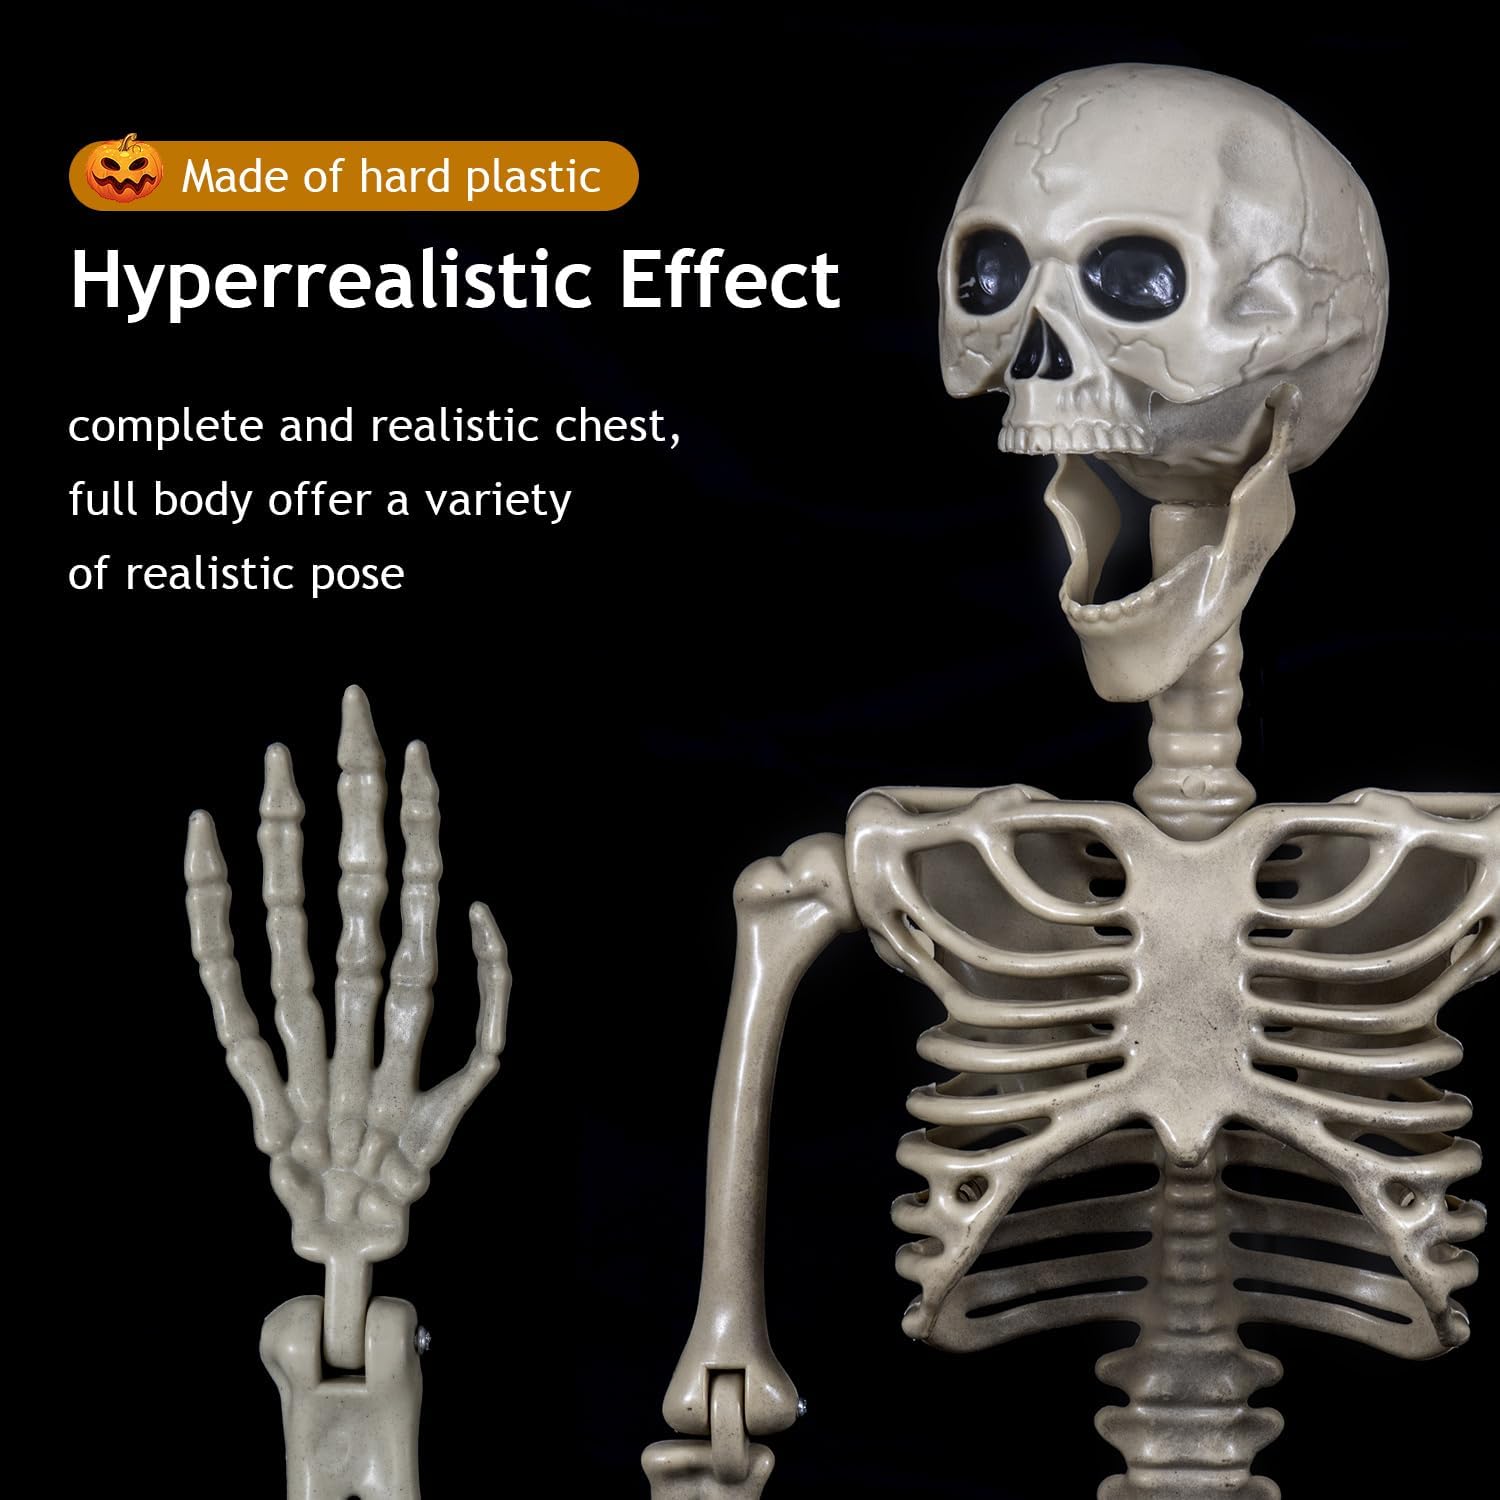
When selecting your 2-pack of 40-inch skeletons, several key features deserve careful consideration. The durability of the materials is paramount, especially if you plan on displaying them outdoors. Opt for skeletons constructed from weather-resistant plastic that can withstand rain, wind, and sun exposure. Check the thickness and density of the plastic – thinner, flimsier skeletons are more prone to cracking and breaking. Look for skeletons with reinforced joints and sturdy connections between the different body parts.
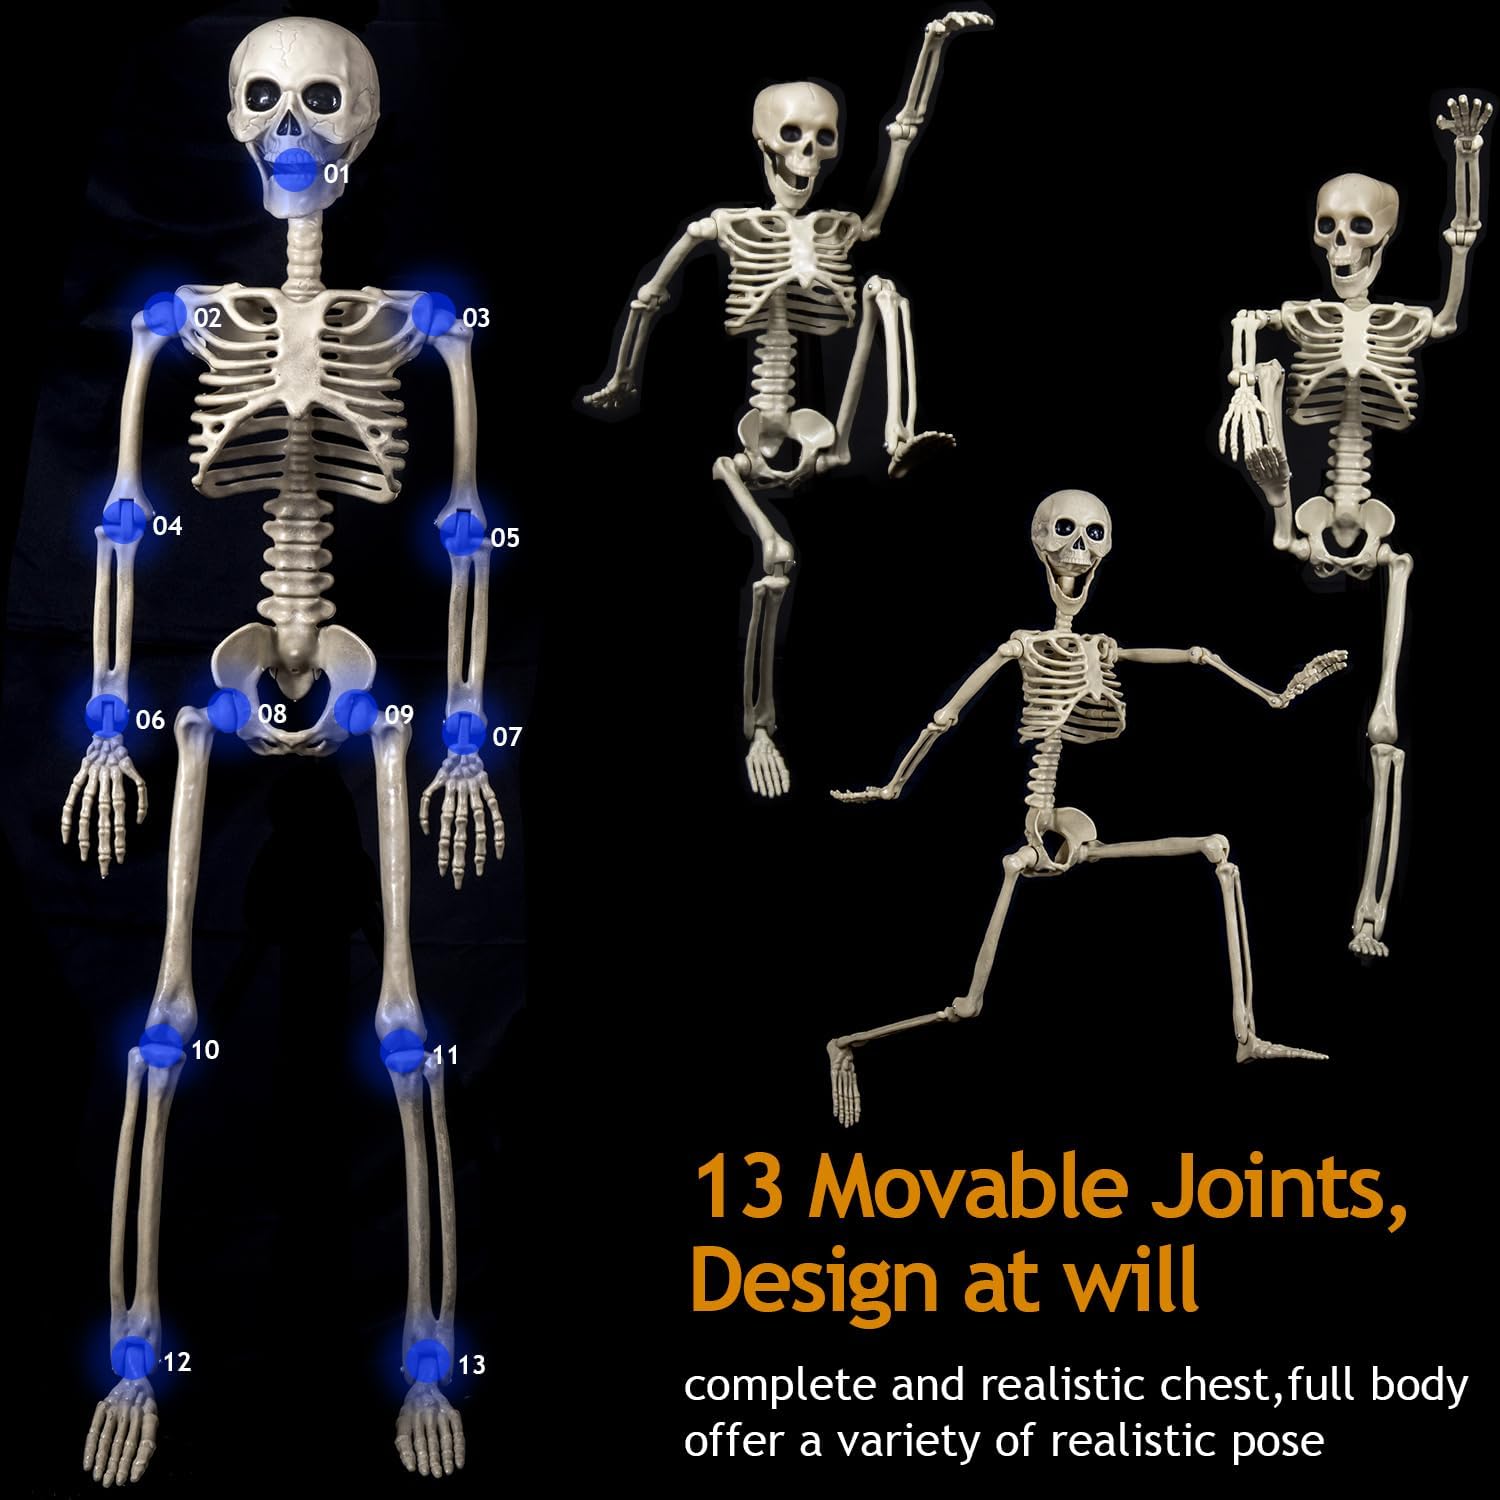
Articulation is another crucial factor. The more articulated the skeleton, the greater the range of poses you can achieve. Look for skeletons with movable joints at the shoulders, elbows, wrists, hips, knees, and ankles. Some skeletons even feature articulated jaws and rib cages, adding an extra layer of realism. Consider the range of motion at each joint. Can the arms be fully extended and rotated? Can the legs be bent at a 90-degree angle? The more flexibility, the more creative you can get with your displays.
Finally, assess the realism of the design. While some people prefer cartoonish skeletons, others prefer a more anatomically accurate representation. Look for skeletons with detailed bone structures, textured surfaces, and realistic proportions. Pay attention to the skull – is it accurately shaped and proportioned? Do the ribs have a natural curve? Are the bones appropriately sized and positioned? The more realistic the design, the more impactful your Halloween display will be.
Here’s a table comparing different features you might find in a 2-pack of 40-inch Halloween Skeletons:
| Feature | Low-End Skeletons | Mid-Range Skeletons | High-End Skeletons |
|---|---|---|---|
| Material | Thin, brittle plastic | Durable, weather-resistant plastic | High-density, UV-protected plastic |
| Articulation | Limited joint movement | Full range of motion in major joints | Fully articulated with pose-holding mechanisms |
| Realism | Simple, cartoonish design | Detailed bone structure | Anatomically accurate with realistic textures |
| Durability | Prone to cracking and breaking | Withstands moderate weather conditions | Highly durable and weather-resistant |
| Price | $20 – $40 | $40 – $80 | $80+ |
When considering these features, think about your specific needs and budget. If you live in an area with harsh weather conditions, investing in a more durable skeleton is a wise choice. If you’re planning on creating elaborate poses, prioritize articulation. And if you’re aiming for a truly spooky and realistic display, opt for skeletons with a detailed and anatomically accurate design. Don’t be afraid to read online reviews and compare different models before making your final decision. A well-chosen Halloween Skeleton is a lasting investment that will enhance your Halloween celebrations for years to come.
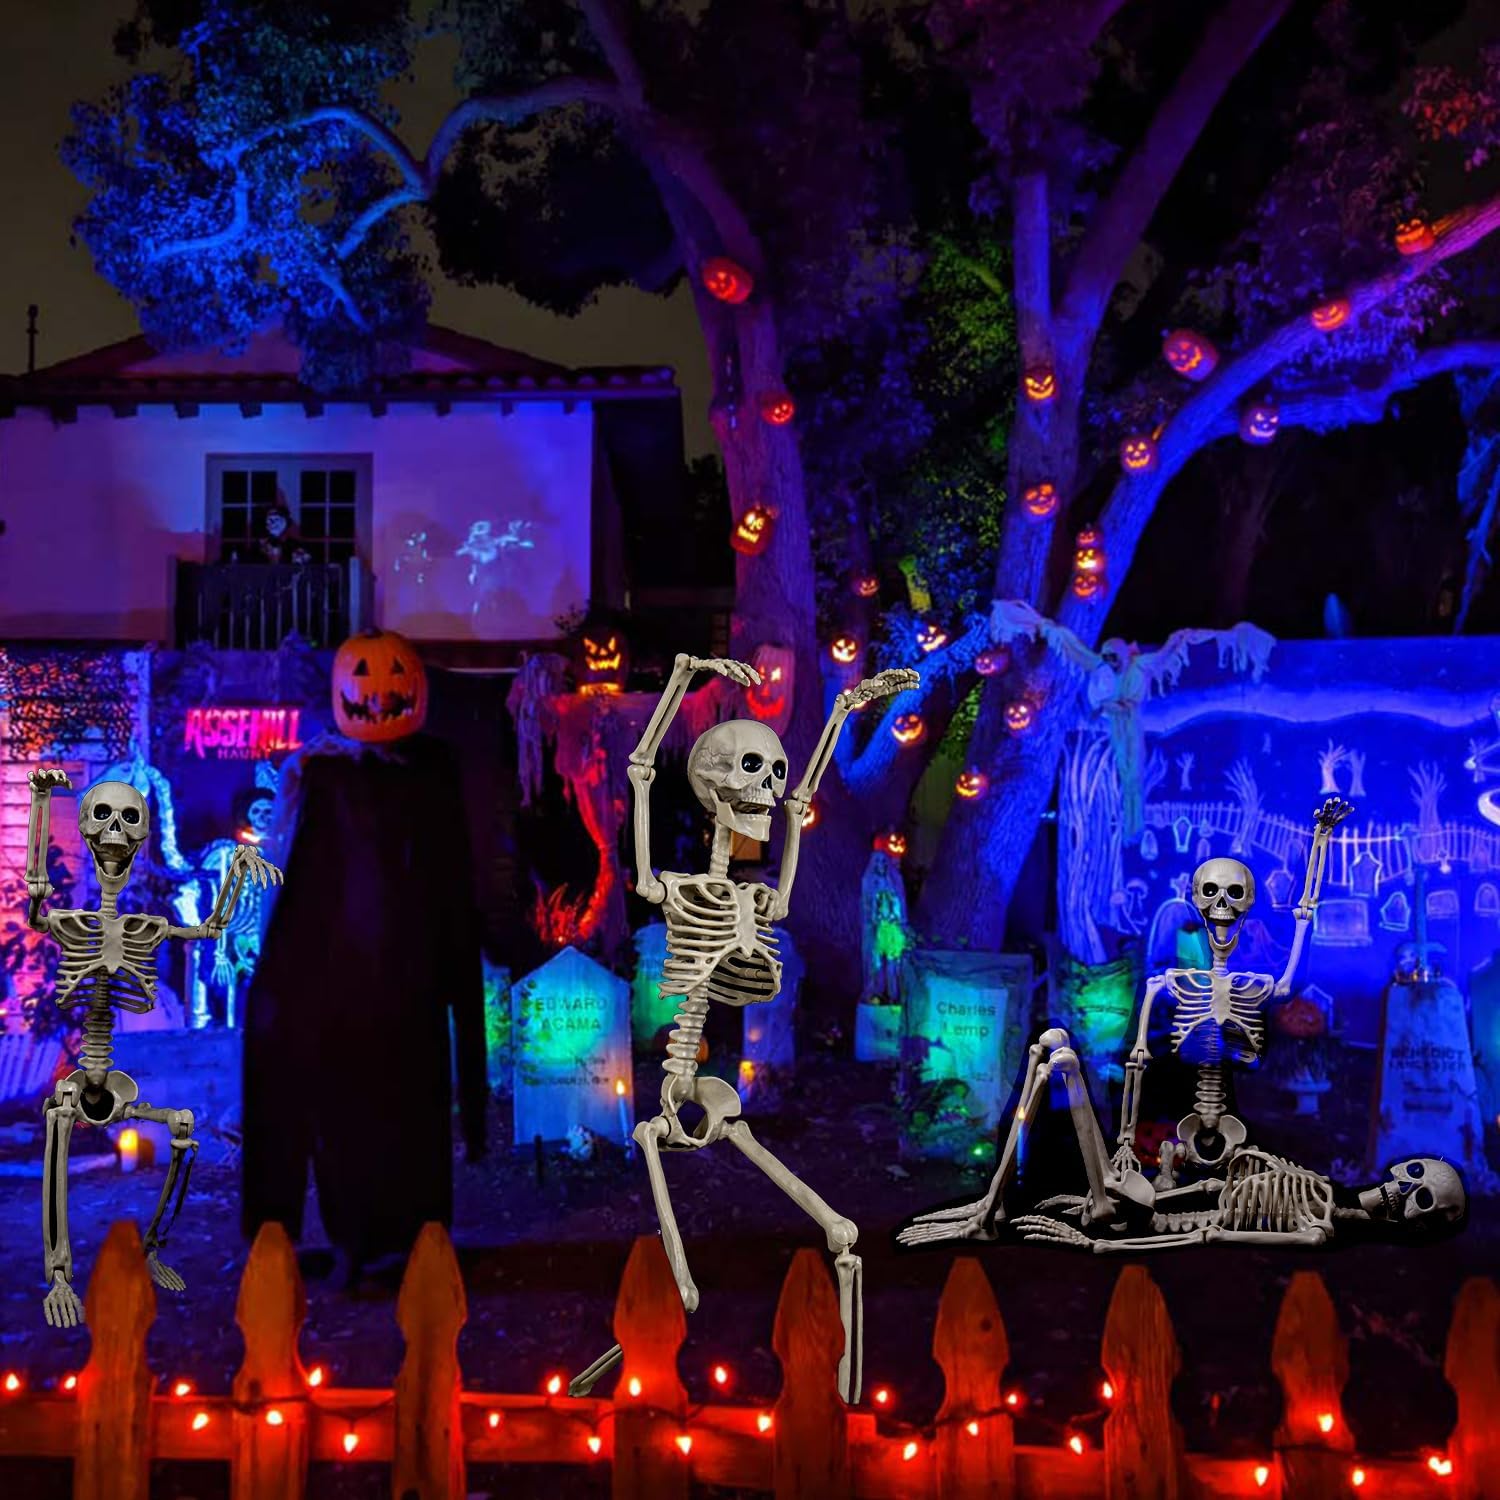
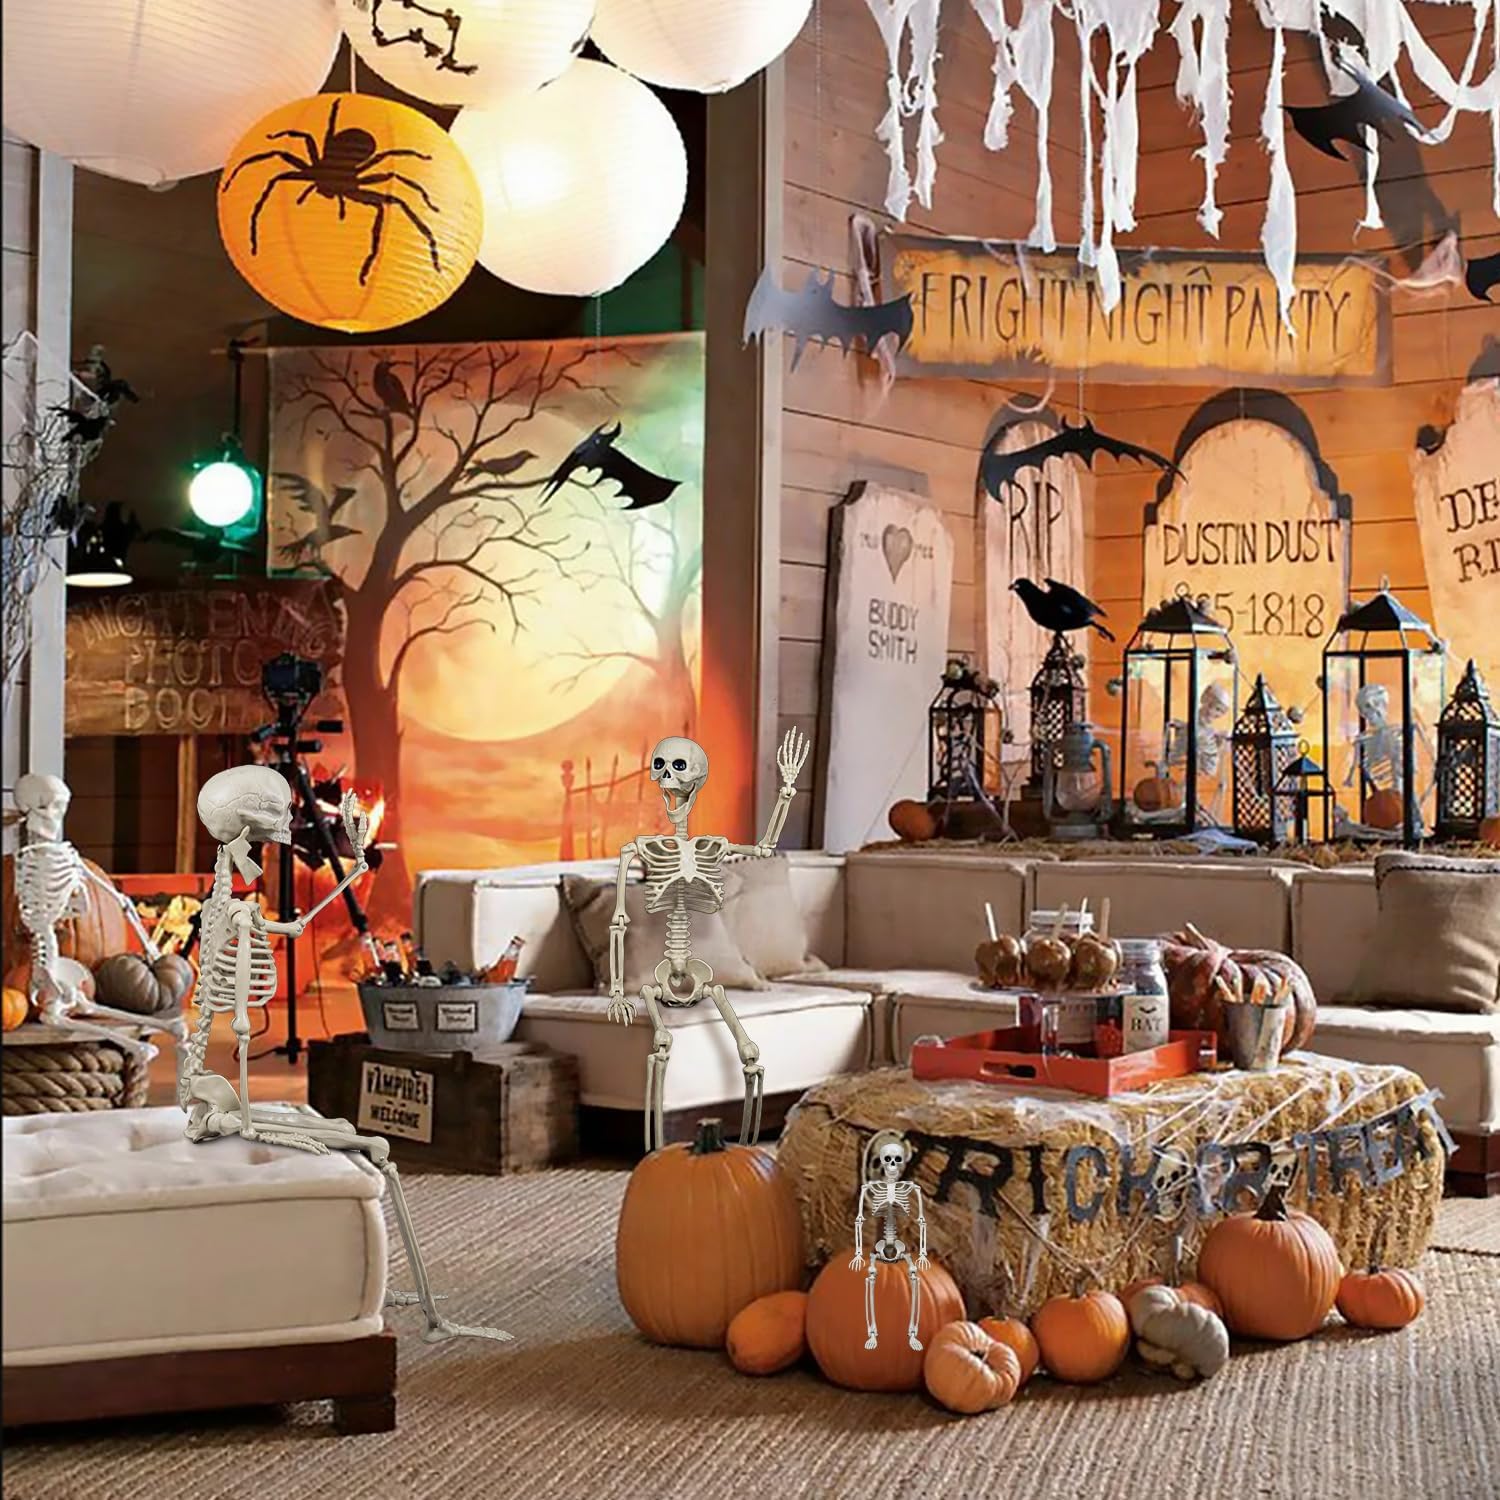
Creative Display Ideas: Beyond the Basic Bone Structure
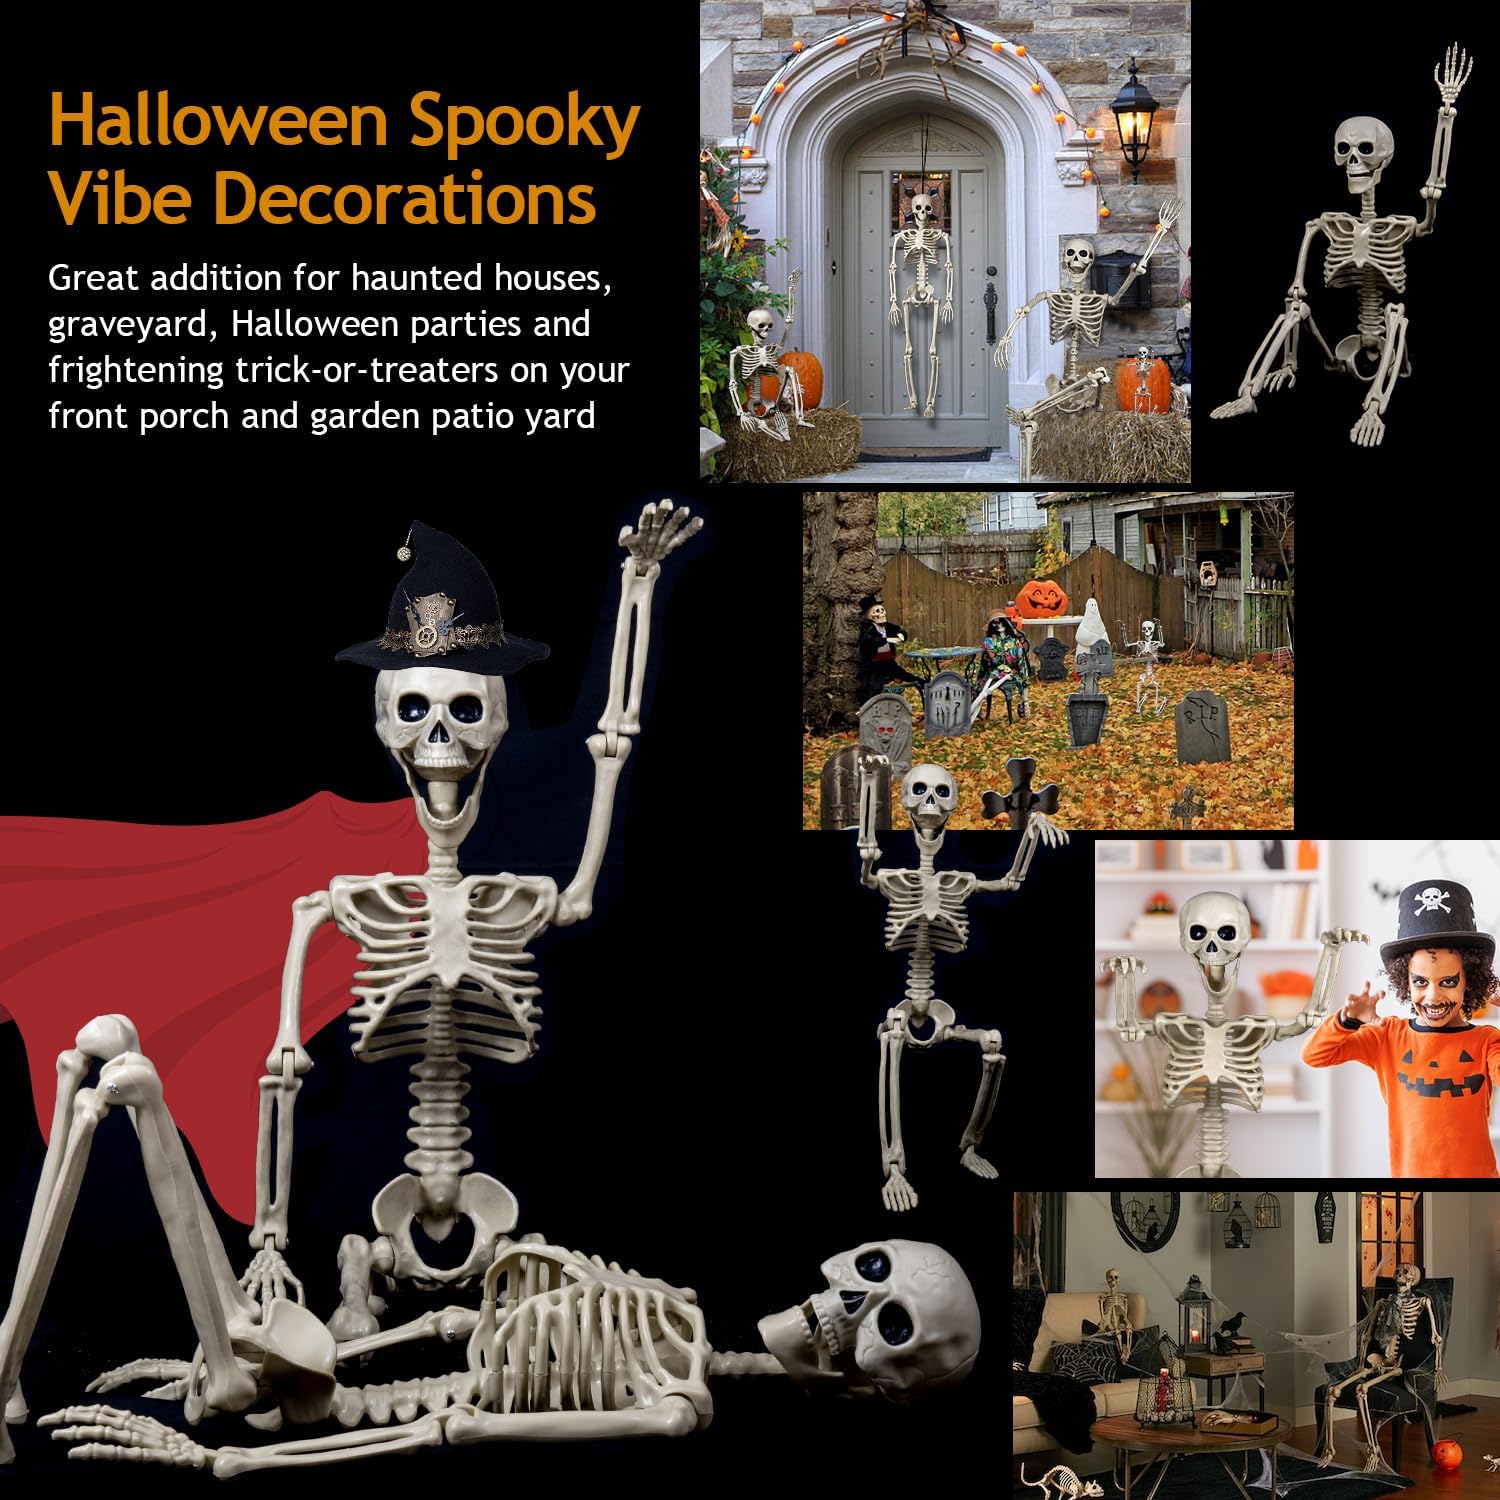
Once you’ve acquired your 2-pack of 40-inch Halloween skeletons, the real fun begins: bringing them to life in your Halloween display. The possibilities are endless, limited only by your imagination. Think beyond simply propping them up on your porch or hanging them from a tree. Consider creating entire scenes that tell a story. Imagine one skeleton pushing a wheelbarrow filled with skulls, while the other stands guard with a scythe. Or perhaps a skeletal pirate crew guarding a treasure chest overflowing with candy.
Utilize your existing decorations to enhance your skeletal scenes. Drape cobwebs over the skeletons, scatter fake leaves around their feet, and add flickering candles for a spooky ambiance. Use props like tombstones, pumpkins, and caution tape to create a more immersive and believable environment. Don’t be afraid to incorporate humor into your display. Pose the skeletons in funny or unexpected situations. Maybe one skeleton is fishing in a kiddie pool, while the other is trying to play the guitar.
Consider the lighting. Uplighting can create dramatic shadows and highlight the skeletons’ features. Use colored spotlights to add a spooky glow. String lights can be draped around the skeletons to create a festive atmosphere. Experiment with different lighting techniques to see what works best for your display. Integrating sound effects can add another layer of immersion. Play spooky music, eerie soundscapes, or ghostly whispers to create a truly chilling atmosphere. You can even find motion-activated sound effects that trigger when someone approaches the skeletons.
Here are a few specific ideas to get you started:
* **The Graveyard Gathering:** Arrange the skeletons around tombstones, creating a graveyard scene. Add cobwebs, fog, and flickering candles for a spooky atmosphere.
* **The Mad Scientist’s Lab:** Set up a “lab” in your garage or basement, with the skeletons as test subjects. Add beakers, test tubes, and bubbling potions for a mad scientist vibe.
* **The Haunted Dinner Party:** Pose the skeletons around a table set for a spooky dinner party. Add ghostly place settings, creepy food, and eerie lighting.
* **The Skeletal Band:** Equip the skeletons with musical instruments and create a skeletal band. Play spooky music in the background.
* **The Escape Artists:** Pose one skeleton trying to escape from a locked cage, while the other watches with amusement. Add chains, padlocks, and other escape-themed props.
Remember, the key to a successful Halloween display is creativity and attention to detail. Don’t be afraid to experiment with different ideas and techniques until you find something that works for you. With a little imagination, your 2-pack of 40-inch Halloween skeletons can become the centerpiece of your spooky season celebrations.
Extending the Lifespan: Proper Care and Storage of Your Halloween Skeletons
Investing in a 2-pack of 40-inch Halloween skeletons is an investment in spooky fun for years to come, but proper care and storage are crucial to extending their lifespan and ensuring they remain in good condition. Before packing them away after Halloween, take the time to clean them thoroughly. Use a mild soap and water solution to remove any dirt, dust, or cobwebs that may have accumulated. Avoid using harsh chemicals or abrasive cleaners, as these can damage the plastic.
Allow the skeletons to dry completely before storing them. Moisture can lead to mold and mildew growth, which can degrade the plastic over time. If possible, disassemble the skeletons into smaller pieces for more compact storage. This will also help prevent the joints from becoming strained or damaged. Store the skeletons in a cool, dry place, away from direct sunlight and extreme temperatures. Sunlight can cause the plastic to fade and become brittle, while extreme temperatures can warp or crack the material.
Consider using a storage container or bag to protect the skeletons from dust, dirt, and pests. A plastic storage tub with a lid is ideal, as it will keep the skeletons clean and dry. If you’re using a bag, make sure it’s made of breathable material to prevent moisture buildup. Avoid stacking heavy objects on top of the skeletons, as this can damage them. If you must stack them, place them on a sturdy shelf or platform.
Regularly inspect the skeletons for any signs of damage, such as cracks, breaks, or loose joints. Repair any damage promptly to prevent it from worsening. You can often repair minor cracks with super glue or epoxy. If a joint is loose, you may be able to tighten it with a screwdriver or pliers. By following these simple care and storage tips, you can ensure that your 2-pack of 40-inch Halloween skeletons remain in good condition for many Halloweens to come. This means you can look forward to setting up your spooky displays year after year, knowing that your skeletal companions are ready to spread some chilling cheer. Remember, a little maintenance goes a long way in preserving your investment and maximizing your enjoyment of these bone-chilling decorations. Ensuring your Halloween Skeleton decorations are cared for is a simple way to enhance the enjoyment you get out of them.
Frequently Asked Questions (FAQ)
What are the best materials for a durable Halloween skeleton?
The best materials for a durable Halloween skeleton are typically weather-resistant plastics like polypropylene or polyethylene. These plastics are known for their ability to withstand outdoor conditions, including rain, wind, and sunlight. High-density polyethylene (HDPE) is particularly robust and can handle more extreme weather without cracking or fading. When choosing a skeleton, check the product description for the type of plastic used and its weather resistance rating. Also, consider the thickness of the plastic – thicker materials are generally more durable than thinner ones. Some high-end skeletons may even incorporate UV-protective coatings to prevent sun damage. Ultimately, investing in a skeleton made from a durable, weather-resistant material will ensure that it lasts for many Halloweens to come.
How can I make my Halloween skeleton more poseable?
To enhance the poseability of your Halloween skeleton, focus on skeletons with articulated joints. These joints allow you to manipulate the skeleton into various positions, adding a dynamic element to your Halloween display. Ideally, look for skeletons with articulation at the shoulders, elbows, wrists, hips, knees, and ankles. Some advanced models might even include articulation in the spine, jaw, and rib cage.
What if my skeleton has stiff joints?
If your skeleton has stiff joints, try gently lubricating them with a silicone-based lubricant. Avoid using oil-based lubricants, as they can damage the plastic over time. Another trick is to warm the joints slightly with a hairdryer before attempting to move them. This can help soften the plastic and make it more pliable. Be careful not to overheat the plastic, as this can cause it to melt or warp. Remember, always handle the skeleton with care to avoid breaking or damaging the joints.
What is the best way to store my Halloween skeleton during the off-season?
The best way to store your Halloween skeleton during the off-season is to clean it thoroughly, disassemble it into smaller pieces if possible, and store it in a cool, dry place away from direct sunlight and extreme temperatures. Before storing, wipe down the skeleton with a mild soap and water solution to remove any dirt or debris. Allow it to dry completely before packing it away. Disassembling the skeleton can save space and prevent stress on the joints. Store the pieces in a plastic storage tub with a lid to protect them from dust, moisture, and pests. Avoid stacking heavy items on top of the storage tub, as this can damage the skeleton.
How do I fix a broken Halloween skeleton?
Fixing a broken Halloween skeleton depends on the nature and severity of the damage. For minor cracks or breaks in the plastic, you can use super glue or epoxy to reattach the broken pieces. Make sure to clean the surfaces thoroughly before applying the adhesive. For more significant breaks or missing pieces, you may need to use a plastic welding kit or a replacement part. If a joint is broken, you may be able to replace it with a similar joint from another skeleton or purchase a replacement online. If you’re not comfortable repairing the skeleton yourself, you can consider taking it to a professional repair shop or contacting the manufacturer for assistance. Always use caution when working with tools and adhesives, and follow the manufacturer’s instructions carefully.
How can I make my Halloween skeleton look more realistic?
To make your Halloween skeleton look more realistic, focus on enhancing its details and adding realistic touches. Start by applying a thin layer of acrylic paint to the bones, using shades of ivory, beige, and brown to create a more natural look. Add shadows and highlights to emphasize the bone structure. You can also use a fine-tipped brush to add subtle details like cracks, stains, and weathering effects. Consider adding realistic eyeballs to the skull to give it a more lifelike appearance. You can find realistic-looking eyeballs at most craft stores or online. Pay attention to the skeleton’s pose. A natural and believable pose can make a big difference in its overall realism. Finally, accessorize the skeleton with clothing, props, or other details that enhance its character and story.
What are some unique ways to display a Halloween skeleton?
There are countless unique ways to display a Halloween skeleton, limited only by your imagination. Consider creating a themed scene, such as a skeletal pirate ship, a mad scientist’s lab, or a haunted dinner party. Use props, lighting, and sound effects to enhance the atmosphere. You can also incorporate the skeleton into your existing Halloween decorations, such as draping it in cobwebs or posing it among tombstones. Think outside the box and come up with creative and unexpected ways to use your skeleton. Maybe you can pose it riding a bicycle, reading a book, or playing a musical instrument. The key is to have fun and let your creativity shine.
Are there any safety precautions I should take when using Halloween skeletons?
Yes, there are several safety precautions you should take when using Halloween skeletons, especially if you have children or pets. First, make sure the skeleton is securely positioned and cannot be easily knocked over. This is especially important if you’re displaying it outdoors. Avoid placing the skeleton in areas where people might trip over it. If you’re using a skeleton with small parts, keep them out of reach of young children to prevent choking hazards. Be careful when handling the skeleton, as some of the joints may be sharp or fragile. Always supervise children when they’re playing with or around the skeleton. Finally, if you’re using a skeleton with electrical components, such as lights or sound effects, make sure it’s properly grounded and protected from the elements. Always follow the manufacturer’s instructions and guidelines to ensure safe use.
Price: $29.99
(as of Sep 09, 2025 14:19:09 UTC – Details)


![Scary Stories To Tell In The Dark [DVD]](https://oemiu.com/wp-content/uploads/2025/09/1757427628_Scary-Stories-To-Tell-In-The-Dark-DVD-Review-Best-336x220.jpg)