Beetles Blooming Gel 15ml Clear Uv Led Review gel nail Buying Guide – Oemiu
Beetles Blooming Gel 15ml Clear UV LED Review & Buying Guide
The world of nail art is constantly evolving, with new techniques and products emerging regularly. One product that has gained significant popularity among both professional nail technicians and DIY enthusiasts is blooming gel, also known as blossom gel or marble gel. This innovative product allows for the creation of stunning and intricate nail designs with ease, offering a unique way to add depth and dimension to your manicures. In this comprehensive guide, we’ll delve into the specifics of Beetles Blooming Gel 15ml Clear UV LED, exploring its features, benefits, application techniques, and everything else you need to know to achieve salon-quality results at home.
Unveiling Beetles Blooming Gel: What Makes It Special?
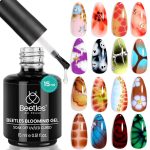
Beetles Blooming Gel is a clear, UV/LED curable gel polish specifically designed to create blooming effects on your nails. Unlike traditional gel polishes, blooming gel has a unique consistency that allows other gel polishes to spread and diffuse when applied over it. This spreading action is what creates the “blooming” or “marble” effect. The 15ml size is a generous amount, providing ample product for numerous manicures, making it a cost-effective option for both personal and professional use. The clear formula ensures that it works seamlessly with any color gel polish, offering endless possibilities for creative designs.
The versatility of Beetles Blooming Gel is one of its biggest selling points. It can be used to create a wide range of effects, from subtle watercolor washes to intricate marble patterns and abstract designs. Whether you’re a beginner just starting to explore nail art or an experienced technician looking to expand your repertoire, blooming gel offers a simple and effective way to achieve professional-looking results. Its ease of use also makes it a great option for creating unique long-tail variations of gel nail looks.
Beyond its creative potential, Beetles Blooming Gel also boasts impressive performance characteristics. The gel cures quickly and evenly under both UV and LED lamps, ensuring a durable and long-lasting manicure. Its high viscosity prevents the gel from running or pooling, allowing for precise application and controlled blooming. Furthermore, it’s compatible with a wide range of gel polish brands, making it easy to integrate into your existing nail art routine. This ease of integration and reliable performance are crucial factors in its popularity among nail enthusiasts. Creating personalized long-tail variations of gel nail styles is now more accessible with blooming gel.
Here’s a quick comparison highlighting the key features of Beetles Blooming Gel:
| Feature | Description |
|---|---|
| Formula | Clear, UV/LED curable gel |
| Volume | 15ml |
| Consistency | Viscous, designed for blooming |
| Compatibility | Works with various gel polish brands |
| Curing Time | Cures under UV/LED lamps |
| Versatility | Suitable for various nail art designs |
Mastering the Application: A Step-by-Step Guide
Achieving stunning blooming nail art with Beetles Blooming Gel requires a few key steps and techniques. Proper preparation and application are crucial for ensuring a flawless and long-lasting manicure. Here’s a detailed guide to help you master the process:
- Preparation: Start by prepping your nails. This includes cleaning, shaping, and buffing the nail surface to create a smooth base for the gel polish. Push back the cuticles and remove any excess skin. Apply a dehydrator to remove oils and moisture from the nail plate, which will improve adhesion.
- Base Coat: Apply a thin layer of base coat and cure it under a UV or LED lamp according to the manufacturer’s instructions. This layer helps protect your natural nails and provides a strong foundation for the following layers.
- Color Coat (Optional): If you want a base color, apply one or two thin coats of your chosen gel polish color and cure each layer under the lamp. A light or neutral color often works best as a background for blooming designs, but feel free to experiment with different shades.
- Blooming Gel Application: Apply a thin, even layer of Beetles Blooming Gel over the cured color coat (or directly over the base coat if you’re not using a color). Do not cure this layer yet! This is the layer that will allow the other colors to spread and bloom.
- Creating the Design: While the blooming gel is still wet, use a thin brush, dotting tool, or even a toothpick to apply small dots or lines of your desired gel polish colors onto the blooming gel layer. The colors will naturally spread and blend, creating a unique blooming effect. You can experiment with different techniques and tools to achieve various designs. For a marble effect, try dragging a thin brush through the colors. For a watercolor effect, use a light hand and apply small dots of diluted color.
- Curing: Once you’re satisfied with your design, cure the blooming gel layer under a UV or LED lamp according to the manufacturer’s instructions. The curing time may vary depending on the lamp and the thickness of the gel layers.
- Top Coat: Apply a thin layer of top coat to seal in the design and provide a glossy finish. Cure the top coat under the lamp.
- Final Touches: After curing the top coat, remove the sticky residue (inhibition layer) with a lint-free wipe and cleanser. Apply cuticle oil to moisturize your cuticles and surrounding skin.
Tips and Tricks:
- Work Quickly: The blooming gel will start to dry over time, so it’s important to apply the design colors quickly after applying the blooming gel layer.
- Use Thin Coats: Applying thin, even layers of gel polish will help ensure proper curing and prevent bubbling or lifting.
- Experiment with Colors: Don’t be afraid to experiment with different color combinations and techniques to create unique and personalized designs.
- Practice Makes Perfect: Like any nail art technique, mastering blooming gel application takes practice. Don’t get discouraged if your first attempts aren’t perfect. Keep experimenting and refining your technique until you achieve the desired results.
Exploring Design Possibilities: Unleashing Your Creativity
The true beauty of Beetles Blooming Gel lies in its ability to unlock a world of creative possibilities. From simple and elegant designs to intricate and elaborate patterns, blooming gel offers endless opportunities to express your personal style and create unique nail art looks. One of the best ways to utilize this blooming gel is by experimenting with long-tail variations of gel nail art, allowing for a personalized touch to any manicure.
Marble Effect: This classic design is achieved by applying small dots or lines of different gel polish colors onto the wet blooming gel layer and then dragging a thin brush through the colors to create a marble-like pattern. Experiment with different color combinations and brushstrokes to achieve various marble effects. Consider using metallic gel polishes for a luxurious touch.
Watercolor Effect: For a delicate and ethereal look, try creating a watercolor effect. Dilute your chosen gel polish colors with a small amount of clear gel or alcohol and then apply small dots or washes of the diluted colors onto the wet blooming gel layer. The colors will blend and diffuse, creating a soft and dreamy effect. Pastels and nude shades work particularly well for this technique.
Abstract Designs: Let your imagination run wild and create abstract designs by applying random dots, lines, and shapes of different gel polish colors onto the wet blooming gel layer. The blooming gel will create interesting and unpredictable patterns, resulting in a truly unique and eye-catching manicure. Try using different tools, such as dotting tools, brushes, and even toothpicks, to create various textures and effects.
Floral Designs: Create beautiful floral designs by using a thin brush to paint small flowers, leaves, and vines onto the wet blooming gel layer. The blooming gel will soften the edges of the designs, creating a more realistic and organic look. Practice painting different types of flowers and experiment with different color combinations to create stunning floral nail art. You can also add glitter or rhinestones for extra sparkle.
Ombre Effect: While typically done with sponges, blooming gel can assist with a softer ombre transition. After curing your base ombre color, apply a thin layer of blooming gel and then lightly apply the second ombre color. The blooming gel will help the two colors blend seamlessly for a softer transition. Create unique long-tail variations of gel nail ombre styles with this technique.
Geometric Patterns: Use striping tape or stencils to create geometric patterns on your nails, and then fill in the shapes with gel polish and blooming gel. This technique allows you to create precise and symmetrical designs with a unique blooming effect. Try using contrasting colors for a bold and graphic look.
Pros and Cons: Is Beetles Blooming Gel Right for You?
Like any product, Beetles Blooming Gel has its own set of advantages and disadvantages. Before making a purchase, it’s important to weigh the pros and cons to determine if it’s the right choice for your needs and preferences.
Pros:
- Easy to Use: Blooming gel is relatively easy to use, even for beginners. The simple application process and forgiving nature of the gel make it a great option for creating stunning nail art designs without requiring advanced skills.
- Versatile: Beetles Blooming Gel can be used to create a wide range of nail art designs, from simple marble effects to intricate floral patterns. Its versatility makes it a valuable addition to any nail art collection.
- Compatible: It is compatible with most gel polish brands, allowing for seamless integration into existing nail art routines.
- Long-Lasting: When applied and cured properly, Beetles Blooming Gel provides a durable and long-lasting manicure that can withstand daily wear and tear.
- Affordable: Beetles products are generally known for being budget-friendly, making the blooming gel accessible to a wide range of consumers.
Cons:
- Curing Required: Blooming gel requires a UV or LED lamp for curing, which may not be accessible to everyone.
- Learning Curve: While relatively easy to use, mastering the application of blooming gel and achieving consistent results may require some practice and experimentation.
- Potential for Bubbling: If applied too thickly or cured improperly, blooming gel can sometimes develop bubbles, which can affect the appearance of the manicure. This often happens when creating long-tail variations of gel nail designs, so caution is advised.
- Limited Color Options: The blooming gel itself is clear, so you’ll need to use colored gel polishes to create the designs. This may limit your color options if you don’t already have a wide range of gel polish colors.
Ultimately, whether or not Beetles Blooming Gel is right for you depends on your individual needs, preferences, and skill level. If you’re looking for an easy-to-use and versatile product that can help you create stunning nail art designs, then it’s definitely worth considering. However, if you’re not comfortable using UV or LED lamps or if you’re looking for a product that doesn’t require any practice or experimentation, then it may not be the best choice for you. The key is to consider the pros and cons carefully and determine if the product aligns with your specific needs and goals. Experimenting with long-tail variations of gel nail designs can be a lot of fun, but it’s important to be aware of the potential challenges.
Pricing and Availability: Where to Find Your Blooming Gel
Beetles Blooming Gel is readily available through various online retailers, including Seller, the official Beetles website, and other e-commerce platforms that specialize in nail art supplies. Its widespread availability makes it easy to purchase and incorporate into your nail art collection. Regarding the pricing, the 15ml bottle of Beetles Blooming Gel typically falls within a budget-friendly range, making it an affordable option for both professionals and DIY enthusiasts. However, prices may vary slightly depending on the retailer and any ongoing promotions or discounts.
When purchasing Beetles Blooming Gel, it’s always a good idea to compare prices across different retailers to ensure that you’re getting the best deal. You can also check for customer reviews and ratings to get a better understanding of the product’s quality and performance. Additionally, it’s important to purchase from reputable retailers to avoid counterfeit products or scams.
Here’s a general price range (subject to change):
| Retailer | Estimated Price |
|---|---|
| Seller | $7 – $12 |
| Beetles Official Website | $6 – $10 (often with bundles or discounts) |
| Other Nail Supply Retailers | Varies, typically within the $6 – $12 range |
Beyond the individual bottle, Beetles often offers blooming gel as part of larger gel polish sets or nail art kits, which can be a more cost-effective option if you’re looking to expand your nail art supplies. These kits typically include a variety of gel polish colors, tools, and accessories, providing everything you need to create a wide range of nail art designs. Be sure to check the product descriptions carefully to ensure that the kit includes the blooming gel and other items you’re looking for. Creating long-tail variations of gel nail art is easier and more affordable with these kits.
FAQ
What exactly is blooming gel and how does it work?
Blooming gel, also known as blossom gel or marble gel, is a specialized type of gel polish designed to create unique and artistic effects on nails. Unlike traditional gel polishes that maintain their shape after application, blooming gel has a unique consistency that allows other gel polishes to spread and diffuse when applied on top of it. This spreading action creates the “blooming” or “marble” effect, resulting in stunning and intricate designs. Essentially, it acts as a canvas that allows colored gels to blend and create patterns organically. The magic lies in its chemical composition which slows down the curing process of any gel applied on top, giving the colors time to interact before being set by the UV/LED lamp. This allows for the creation of watercolor effects, marble patterns, and other abstract designs with relative ease.
How do I properly apply Beetles Blooming Gel for the best results?
The key to achieving stunning results with Beetles Blooming Gel lies in proper application. Start by prepping your nails with a base coat and, optionally, a base color. Then, apply a thin, even layer of blooming gel over the cured base color (or directly over the base coat if you’re not using a color). Do not cure this layer! While the blooming gel is still wet, use a thin brush, dotting tool, or toothpick to apply small dots or lines of your desired gel polish colors onto the blooming gel layer. The colors will naturally spread and blend, creating the blooming effect. Work quickly, as the blooming gel will start to dry over time. Once you’re satisfied with your design, cure the blooming gel layer under a UV or LED lamp. Finally, apply a top coat to seal in the design and provide a glossy finish.
Can I use any gel polish brand with Beetles Blooming Gel?
One of the advantages of Beetles Blooming Gel is its compatibility with a wide range of gel polish brands. While it’s always recommended to test the combination on a small area first to ensure compatibility, most gel polishes will work well with Beetles Blooming Gel. However, it’s important to note that some gel polishes may have a thicker or thinner consistency than others, which can affect the way they spread and bloom. Experiment with different brands and formulas to find the ones that work best for your desired effect. Using high-quality gel polishes will generally yield the best and most consistent results. Always remember to cure each layer properly to prevent any lifting or chipping.
How long does Beetles Blooming Gel last, and how can I make it last longer?
When applied and cured properly, Beetles Blooming Gel can last for up to two weeks or even longer without chipping or peeling. To maximize the longevity of your manicure, start with proper nail preparation, including cleaning, shaping, and buffing the nail surface. Apply thin, even layers of gel polish and cure each layer thoroughly under a UV or LED lamp. Seal the design with a high-quality top coat and avoid exposing your nails to harsh chemicals or excessive water. Wearing gloves when doing household chores can also help protect your manicure. Regular application of cuticle oil will keep your nails and cuticles moisturized, which can also prevent chipping and breakage.
What are some common mistakes to avoid when using blooming gel?
While Beetles Blooming Gel is relatively easy to use, there are a few common mistakes to avoid to ensure the best results. Avoid applying the blooming gel too thickly, as this can lead to bubbling or uneven curing. Work quickly when applying the design colors, as the blooming gel will start to dry over time. Ensure that each layer of gel polish is cured thoroughly under a UV or LED lamp to prevent lifting or chipping. Avoid using low-quality or expired gel polishes, as these may not spread or bloom properly. Finally, don’t be afraid to experiment with different techniques and color combinations to find what works best for you. Practice makes perfect, so keep refining your technique until you achieve the desired results.
Is Beetles Blooming Gel safe to use on my nails?
Beetles Blooming Gel is generally considered safe to use on nails when applied and cured properly. However, like any nail product, it’s important to take certain precautions to minimize the risk of allergic reactions or other adverse effects. Always follow the manufacturer’s instructions carefully and avoid contact with the skin. If you experience any irritation or allergic reaction, discontinue use immediately and consult a doctor. Ensure that you’re using a UV or LED lamp that is compatible with the gel polish and that you’re curing each layer for the recommended amount of time. Overexposure to UV light can be harmful, so limit the duration of each curing session. If you’re concerned about the safety of gel polish, consider consulting with a dermatologist or nail technician.
How can I remove Beetles Blooming Gel without damaging my natural nails?
Removing gel polish, including Beetles Blooming Gel, requires a specific process to avoid damaging your natural nails. The most common and recommended method involves soaking your nails in acetone. Gently file the top coat to break the seal. Soak cotton balls in acetone and place them on each nail, securing them with foil. Allow the acetone to soak for 10-15 minutes. The gel polish should start to lift and soften. Gently remove the softened gel polish with a cuticle pusher or orange wood stick. Avoid scraping or forcing the gel off, as this can damage the nail surface. After removing the gel polish, apply cuticle oil to moisturize your nails and surrounding skin. Alternatively, you can use a gel polish remover that is specifically formulated for removing gel polish without acetone. Always be gentle and patient during the removal process to minimize the risk of damage.
![]()
![]()
![]()
![]()
![]()
![]()
![]()
Price: $8.49
(as of Sep 05, 2025 06:41:39 UTC – Details)


