Acrylic Nail Kit for Beginners: Clear Review nails acrylic Buying Guide – Oemiu
Acrylic Nail Kit for Beginners: Your Path to Perfect Nails
The allure of perfectly sculpted, long-lasting nails is undeniable. Acrylic nails offer a durable and versatile canvas for expressing your personal style, from elegant nude tones to bold, eye-catching designs. But diving into the world of acrylics can seem daunting, especially for beginners. This comprehensive guide will walk you through everything you need to know to choose the right acrylic nail kit, master the application process, and achieve salon-worthy results from the comfort of your own home. We’ll explore the essential components of a beginner’s kit, break down the application steps, offer tips for avoiding common mistakes, and ultimately empower you to create beautiful, durable acrylic nails yourself.
Understanding the Essentials of an Acrylic Nail Kit
Choosing the right acrylic nail kit is the first crucial step on your nail artistry journey. Not all kits are created equal, and selecting one tailored for beginners can significantly impact your success and confidence. A good beginner kit should include all the necessary components for applying acrylic nails, along with clear instructions and user-friendly tools. Let’s break down the key elements you’ll find in a typical acrylic nail kit and what to look for in each.
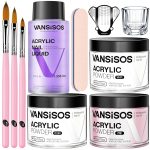
First, you’ll need acrylic powder. This comes in various colors, but for beginners, a clear or natural pink powder is recommended. These colors are forgiving and allow you to focus on mastering the application technique without the added complexity of color matching. Look for powders with a fine consistency, as they tend to be easier to work with and result in a smoother finish. Cheaper powders can sometimes be gritty, making them harder to sculpt and prone to lifting.
Next is the acrylic liquid monomer. This is the magic ingredient that activates the acrylic powder and allows it to harden into a durable nail enhancement. The monomer should have a relatively low odor (low-odor monomers are available) and a good curing time. Curing time refers to how long it takes for the acrylic to harden. A monomer that cures too quickly can be difficult to work with, especially for beginners, while one that cures too slowly can lead to a messy application. Read reviews and look for monomers specifically designed for beginners.
Acrylic nail brushes are essential for applying and sculpting the acrylic mixture. Opt for a good quality brush made of natural kolinsky sable hair. These brushes hold the monomer well and allow for precise application and shaping. While synthetic brushes are cheaper, they don’t hold the monomer as effectively and can make the application process more challenging. A size 8 or 10 brush is a good starting point for beginners. Remember to clean your brush thoroughly after each use with brush cleaner to prevent it from hardening and becoming unusable.
You’ll also need nail tips or forms. Nail tips are pre-shaped extensions that are glued onto your natural nails, providing the length and shape you desire. Forms are stickers that attach to your natural nails, providing a guide for sculpting the acrylic extension directly. For beginners, nail tips are generally easier to work with, as they eliminate the need for precise sculpting from scratch. Choose tips that are the correct size and shape for your nails to ensure a natural and comfortable fit. There are different shapes of tips, like square, stiletto, coffin, and almond. Forms require more skill but allow for greater customization of nail shape and length.
Nail glue is required to adhere the tips to your natural nails. Ensure you purchase a high-quality nail glue that provides a strong and durable bond. Apply a thin, even layer of glue to both the tip and your natural nail to ensure proper adhesion. Avoid using excessive glue, as this can cause the tips to lift or separate from your natural nails.
Other essential tools include a nail file, a buffer, a cuticle pusher, and a cuticle oil. A nail file is used to shape and refine the acrylic nails, while a buffer smooths the surface and prepares it for polish. A cuticle pusher is used to gently push back the cuticles, creating a clean and even base for the acrylic application. Cuticle oil is essential for keeping your cuticles moisturized and healthy. Some kits will include these, while others you will have to purchase separately.
Finally, a dappen dish is a small glass or ceramic dish used to hold the acrylic liquid monomer. This prevents contamination of the monomer bottle and makes it easier to dip your brush into the liquid. You may also want to invest in a dust brush to remove any filings.
By carefully considering these essential components, you can choose an acrylic nail kit that is well-suited for your skill level and provides you with everything you need to start creating beautiful acrylic nails. Always remember to prioritize quality over price, as using high-quality products will lead to better results and a more enjoyable experience. It’s worth carefully considering where you get your nails acrylic.
A Step-by-Step Guide to Acrylic Nail Application
Applying acrylic nails can seem intimidating at first, but with patience and practice, you can master the process and achieve professional-looking results. This step-by-step guide will break down the application process into manageable steps, providing you with clear instructions and helpful tips along the way. Remember to work in a well-ventilated area and take your time to ensure each step is performed correctly.
Step 1: Preparation is Key. Start by thoroughly cleaning your hands and nails. Remove any existing polish or oils from your nails using a nail polish remover and a cotton pad. Push back your cuticles gently using a cuticle pusher. This creates a clean and even base for the acrylic application and helps prevent lifting. Lightly buff the surface of your natural nails to remove any shine and create a slightly rough texture. This will help the acrylic adhere better to your nails. Be careful not to over-buff, as this can weaken your natural nails.
Step 2: Applying the Nail Tips (if using). Select the appropriate size nail tips for each of your nails. The tip should fit snugly from sidewall to sidewall without being too tight or too loose. If necessary, you can file the sides of the tips to achieve a perfect fit. Apply a thin, even layer of nail glue to both the tip and your natural nail. Align the tip with the edge of your natural nail and press down firmly for several seconds until the glue dries and the tip is securely attached. Use a nail clipper to trim the tips to your desired length. Use a nail file to blend the tips seamlessly with your natural nails. The goal is to create a smooth and even transition between the tip and your natural nail.
Step 3: Mixing the Acrylic. Pour a small amount of acrylic liquid monomer into a dappen dish. Dip your acrylic brush into the monomer, ensuring it is fully saturated. Wipe off any excess monomer on the side of the dappen dish. Dip the brush into the acrylic powder, picking up a small bead of acrylic. The bead should be slightly wet but not runny. If the bead is too wet, it will be difficult to control. If it is too dry, it will not adhere properly to your nail. Practice finding the right ratio of monomer to powder until you achieve a smooth and workable consistency. Move the bead around in your acrylic nail kit until you get a sense of how it reacts.
Step 4: Applying the Acrylic. Place the bead of acrylic near the cuticle area of your nail. Gently pat and press the acrylic into place, blending it smoothly with your natural nail and the tip (if using). Use the tip of your brush to sculpt the acrylic into the desired shape. Work quickly but carefully, as the acrylic will begin to harden within a few minutes. Repeat this process, applying additional beads of acrylic to cover the entire nail surface. Ensure the acrylic is evenly distributed and that there are no gaps or bumps. The apex, or the highest point of the nail, should be located in the center of the nail for optimal strength and durability.
Step 5: Shaping and Refining. Once the acrylic has fully hardened, use a nail file to shape the nails to your desired shape. Start with a coarse file to remove any excess acrylic and create the overall shape. Then, switch to a finer file to refine the shape and smooth any rough edges. Use a buffer to smooth the surface of the acrylic nails and prepare them for polish. Pay special attention to the cuticle area, ensuring a seamless transition between the acrylic and your natural nail. You want the nails acrylic to look as good as possible.
Step 6: Finishing Touches. Apply a thin layer of top coat to seal the acrylic and protect it from chipping or damage. Allow the top coat to dry completely. Apply cuticle oil to your cuticles to moisturize and nourish them. This will help keep your cuticles healthy and prevent them from drying out and cracking. Admire your beautiful, newly sculpted acrylic nails!
Troubleshooting Common Acrylic Nail Problems
Even with careful application, you may encounter some common problems when applying acrylic nails. Understanding these issues and how to address them can save you time and frustration and help you achieve flawless results.
Lifting. Lifting occurs when the acrylic separates from the natural nail. This can be caused by several factors, including improper nail preparation, using low-quality products, or applying the acrylic too thickly. To prevent lifting, ensure you thoroughly clean and buff your nails before applying the acrylic. Use a good quality primer to improve adhesion. Avoid getting monomer on the surrounding skin. If lifting occurs, gently file away the lifted area and reapply the acrylic, ensuring proper preparation and application.
Bubbles. Bubbles in the acrylic can be caused by air trapped in the powder or monomer, or by improper mixing techniques. To prevent bubbles, tap the powder container gently before dipping your brush into it to release any trapped air. Avoid stirring the acrylic mixture too vigorously. When applying the acrylic, pat and press it firmly into place to release any air bubbles. If you notice bubbles after the acrylic has hardened, you can file them away.
Yellowing. Yellowing of the acrylic can be caused by exposure to UV light or by using low-quality products. To prevent yellowing, apply a UV-protective top coat to your acrylic nails. Use high-quality acrylic powder and monomer that are formulated to resist yellowing. Avoid prolonged exposure to sunlight or tanning beds.
Cracking. Cracking can be caused by applying the acrylic too thinly, by using low-quality products, or by subjecting the nails to excessive stress or impact. To prevent cracking, ensure you apply a sufficient amount of acrylic to provide adequate strength and durability. Use high-quality acrylic powder and monomer. Avoid using your nails as tools. If cracking occurs, you may need to reapply the acrylic to the affected area.
Inconsistent Bead Size. Having an inconsistent bead size can lead to an uneven application and difficulty shaping the nails. Practice consistently picking up the same amount of powder and monomer. Use a consistent dipping technique. Monitor the consistency of the bead as you mix it and adjust the amount of monomer or powder accordingly. With practice, you’ll be able to create consistent, workable beads every time. The correct bead size will help your nails acrylic look their best.
Flooding the Cuticles. Flooding the cuticles with acrylic can lead to lifting and irritation. Be careful to avoid getting acrylic on the surrounding skin. Use a small, pointed brush to apply the acrylic near the cuticle area. If you accidentally flood the cuticles, use a clean brush or a wooden stick to remove the excess acrylic before it hardens.
By understanding these common problems and implementing the preventative measures outlined above, you can troubleshoot any issues you encounter and achieve beautiful, long-lasting acrylic nails. Practice makes perfect, so don’t be discouraged if you don’t get it right the first time. Keep practicing, and you’ll be creating salon-worthy acrylic nails in no time.
Maintaining Your Acrylic Nails for Longevity
Once you’ve achieved your perfect set of acrylic nails, proper maintenance is crucial to keep them looking their best and prevent damage to your natural nails. Regular maintenance not only extends the lifespan of your acrylics but also promotes healthy nail growth and prevents infections.
Regular Fills. As your natural nails grow, a gap will appear between the acrylic and your cuticle. This gap can become a breeding ground for bacteria and can also weaken the acrylic, making it more prone to lifting or breaking. Regular fills, typically every 2-3 weeks, are essential to fill in this gap and maintain the integrity of your acrylic nails. During a fill, the technician will file down the existing acrylic, clean and prepare the exposed natural nail, and then apply fresh acrylic to fill in the gap. This process restores the smooth, seamless look of your acrylics and prevents lifting.
Proper Cleaning. Keeping your acrylic nails clean is essential for preventing infections and maintaining their appearance. Wash your hands regularly with soap and water, paying special attention to the area under your nails. Use a nail brush to gently scrub away any dirt or debris. Avoid using harsh chemicals or abrasive cleaners, as these can damage the acrylic and cause it to become brittle or discolored. After washing your hands, dry them thoroughly, especially under the nails, to prevent moisture buildup.
Moisturize Regularly. Acrylic nails can dry out your natural nails and cuticles, leading to brittleness and cracking. To combat this, apply cuticle oil to your cuticles and the surrounding skin several times a day. Cuticle oil helps to nourish and hydrate the skin, promoting healthy nail growth and preventing dryness. You can also use a hand cream to moisturize your hands and nails. Look for hand creams that contain ingredients like shea butter, glycerin, or vitamin E.
Avoid Harsh Chemicals and Activities. Exposure to harsh chemicals, such as cleaning products or solvents, can damage your acrylic nails and cause them to become brittle or discolored. Wear gloves when handling these chemicals to protect your acrylics. Avoid using your nails as tools to open cans, scrape off stickers, or perform other tasks that can put excessive stress on them. These activities can lead to cracking or breakage.
Gentle Filing and Shaping. If you need to file or shape your acrylic nails, use a fine-grit file and work gently. Avoid filing too aggressively, as this can weaken the acrylic and cause it to crack. File in one direction to prevent splitting or fraying. If you’re unsure how to properly file or shape your acrylic nails, consult with a professional nail technician.
Professional Removal. Removing acrylic nails improperly can cause significant damage to your natural nails. Avoid picking or peeling off your acrylics, as this can remove layers of your natural nail and leave them thin and weak. The best way to ensure the health of your nails acrylic is to have them professionally removed by a qualified nail technician. This typically involves soaking the nails in acetone for a prolonged period to soften the acrylic, followed by gentle filing and buffing to remove any remaining residue.
By following these simple maintenance tips, you can keep your acrylic nails looking beautiful and healthy for weeks to come. Regular fills, proper cleaning, moisturizing, and avoiding harsh chemicals and activities will help to extend the lifespan of your acrylics and protect your natural nails from damage. Remember to always prioritize the health of your natural nails, even when wearing acrylics.
Choosing the Right Acrylic Nail Kit: A Comparison Table
Selecting the best acrylic nail kit can feel overwhelming with so many options available. Here’s a comparison table of hypothetical kits to help you evaluate different features and find one that suits your needs and budget:
| Kit Name | Price | Acrylic Powder | Acrylic Liquid Monomer | Brush Quality | Nail Tips/Forms | Additional Tools | Skill Level |
|---|---|---|---|---|---|---|---|
| Beginner’s Bliss Acrylic Kit | $39.99 | Clear, Pink | Low-Odor Monomer | Synthetic | 100 Assorted Tips | File, Buffer, Cuticle Pusher | Beginner |
| Salon Pro Acrylic Kit | $79.99 | Clear, White, Pink | Standard Monomer | Kolinsky Sable | 100 Assorted Tips, 50 Forms | File, Buffer, Cuticle Pusher, Dappen Dish | Intermediate |
| Advanced Artistry Acrylic Kit | $129.99 | Extensive Color Range | Fast-Curing Monomer | Premium Kolinsky Sable | Forms Only | Extensive Tool Set, Practice Hand | Advanced |
| Budget Beauty Acrylic Set | $24.99 | Clear Only | Standard Monomer | Basic Synthetic | 50 Assorted Tips | File Only | Beginner |
Frequently Asked Questions (FAQ)
Is it safe to do acrylic nails at home?
Yes, it is generally safe to do acrylic nails at home, but it’s crucial to take necessary precautions and follow instructions carefully. The safety of at-home acrylic nail application depends heavily on your knowledge of the process, the quality of the products you use, and your adherence to hygiene standards. Ensure you work in a well-ventilated area to minimize exposure to the fumes from the acrylic liquid monomer, which can be irritating. Always use high-quality products from reputable brands to avoid allergic reactions or infections. Proper preparation of your natural nails is essential to prevent damage and promote adhesion. If you’re new to acrylics, start with a basic kit and practice on a few nails before attempting a full set. If you experience any adverse reactions, such as skin irritation or nail damage, discontinue use and consult a professional.
What are the potential risks of using acrylic nails?
While acrylic nails can enhance your appearance, they do come with potential risks. One of the most common risks is damage to the natural nails. Improper application or removal can weaken, thin, and dehydrate the natural nail plate. Allergic reactions to the chemicals in acrylic products, such as the monomer, can occur, leading to skin irritation, redness, and swelling. Infections are another concern, particularly if the acrylic nails lift and create a space for bacteria to grow. This can result in fungal or bacterial infections of the nail bed. Additionally, frequent use of acrylics can make the natural nails brittle and prone to breakage. It’s essential to take breaks from acrylics to allow your natural nails to recover.
How can I prevent damage to my natural nails when using acrylics?
Preventing damage to your natural nails while using acrylics involves a combination of proper application, maintenance, and removal techniques. Start by ensuring your natural nails are healthy before applying acrylics. Avoid applying acrylics to damaged or infected nails. During application, be gentle and avoid over-buffing the natural nail, as this can weaken it. Use a primer to improve adhesion and reduce the risk of lifting. Regularly moisturize your cuticles and nails with cuticle oil to prevent dryness and brittleness. Get regular fills to prevent lifting. When it’s time to remove the acrylics, have them professionally removed to minimize damage. After removal, give your natural nails a break and use nourishing treatments to help them recover.
How do I remove acrylic nails safely at home?
Removing acrylic nails safely at home requires patience and gentle techniques to minimize damage to your natural nails. Start by filing down the surface of the acrylics to break the seal. Then, soak cotton balls in pure acetone and place them on each nail. Wrap each finger with aluminum foil to hold the cotton balls in place and trap the acetone. Allow the nails to soak for 20-30 minutes, checking periodically to see if the acrylic is softening. Once the acrylic has softened, gently push it off your natural nails using a cuticle pusher. If the acrylic is resistant, re-soak for a few more minutes. After removing the acrylic, gently buff your natural nails to smooth out any remaining residue. Apply cuticle oil to rehydrate your nails and cuticles. Avoid picking or peeling off the acrylic, as this can remove layers of your natural nail and cause significant damage.
What are some alternative options to acrylic nails?
If you’re looking for alternatives to acrylic nails, there are several options that can provide similar aesthetic results with potentially less risk to your natural nails. Gel nails are a popular choice, offering a durable and long-lasting finish that is typically less damaging than acrylics. Dip powder nails are another alternative, providing a strong and durable coating that is easy to apply and remove. Press-on nails are a convenient option for a temporary enhancement, offering a variety of styles and designs that can be easily applied and removed at home. Finally, simply focusing on maintaining healthy and well-groomed natural nails can be a beautiful and sustainable option. Using nail strengtheners, cuticle oils, and regular manicures can keep your natural nails looking their best.
How much does an acrylic nail kit for beginners typically cost?
The cost of an acrylic nail kit for beginners can vary depending on the quality of the products included and the number of items in the kit. On average, you can expect to spend between $20 and $50 for a basic beginner’s kit. Cheaper kits may contain lower-quality products that can be more difficult to work with and may not provide the best results. More expensive kits typically include higher-quality acrylic powders, monomers, and brushes, as well as additional tools like nail files, buffers, and cuticle pushers. Consider your budget and skill level when choosing a kit. It’s often better to invest in a slightly more expensive kit with better quality products to ensure a more enjoyable and successful experience. Also, consider the value you will get out of your nails acrylic.
How can I practice applying acrylic nails before doing a full set?
Practicing before attempting a full set of acrylic nails is highly recommended, especially for beginners. One effective method is to use a practice hand, which is a mannequin hand with artificial nails that you can use to practice your application techniques. You can also practice on individual nail tips that are attached to a stand. This allows you to focus on specific techniques, such as bead application and shaping, without the pressure of working on your own nails. Another option is to practice on a friend or family member who is willing to be a model. Start with just one or two nails to get a feel for the process before attempting a full set. Remember to take your time, be patient, and focus on perfecting your technique.
![]()
![]()
![]()
![]()
![]()
![]()
![]()
Price: $41.99 - $9.99
(as of Sep 08, 2025 09:51:08 UTC – Details)


