bareMinerals Mineral Veil Translucent Review blush Buying Guide – Oemiu
Unveiling the Magic: A Deep Dive into bareMinerals Mineral Veil and Finding Your Perfect Blush
Imagine a world where your makeup stays put all day, where your skin looks naturally radiant, and where you can confidently step out knowing you look your best. This dream can become a reality with the right combination of products. Two essential components of achieving this are a reliable finishing powder and a complementary blush. We’re here to explore the iconic bareMinerals Mineral Veil Translucent Setting Powder and how to choose the best blush to pair with it, ensuring a flawless, long-lasting finish.
The Allure of bareMinerals Mineral Veil: More Than Just a Powder
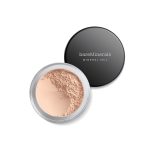
The bareMinerals Mineral Veil Translucent Setting Powder isn’t just another face powder; it’s a cult favorite for a reason. Its finely milled texture and mineral-based formula create a soft-focus effect, blurring imperfections and leaving your skin looking naturally luminous. Unlike some setting powders that can appear heavy or cakey, the Mineral Veil is incredibly lightweight, allowing your skin to breathe while controlling shine. The key lies in its minimalist ingredient list, primarily consisting of corn starch, minerals, and iron oxides. This simplicity makes it suitable for a wide range of skin types, including sensitive skin, as it’s less likely to cause irritation or breakouts.
But what exactly does the Mineral Veil do? It primarily functions as a setting powder, which means it’s applied after your foundation and concealer to lock everything in place. This helps to extend the wear time of your makeup and prevent it from creasing or fading throughout the day. The translucent formula works on almost all skin tones without adding any noticeable color, ensuring it won’t alter the shade of your foundation. Beyond setting makeup, the Mineral Veil also helps to absorb excess oil, keeping your skin looking fresh and matte without appearing dry. It achieves this balance through its unique blend of minerals that naturally control shine while maintaining skin’s hydration.
One of the biggest advantages of the bareMinerals Mineral Veil is its versatility. It can be used in several ways: as an all-over setting powder, as a targeted shine control powder for the T-zone, or even as a primer to create a smooth canvas for makeup application. Many people with oily skin find it particularly beneficial as a touch-up powder throughout the day to combat midday shine. Furthermore, the Mineral Veil is often lauded for its ability to minimize the appearance of pores and fine lines, giving the skin a smoother, more youthful appearance. Its light-reflecting properties subtly diffuse light, creating a soft-focus effect that reduces the visibility of imperfections. This makes it an excellent choice for both everyday wear and special occasions. The “invisible look” of this powder makes it a go-to for people searching for a natural looking setting powder.
The application method is also a crucial factor in achieving the best results. Using a fluffy brush, gently swirl it in the Mineral Veil, tap off any excess, and then apply it to your face in light, circular motions. Focus on areas prone to shine, such as the forehead, nose, and chin. Remember, a little goes a long way, so avoid applying too much product, which can lead to a cakey appearance. By mastering the application technique, you can unlock the full potential of the bareMinerals Mineral Veil and enjoy a flawless, long-lasting makeup look.
Choosing the Perfect Blush: Complementing Your Mineral Veil Base
Finding the right blush to pair with your bareMinerals Mineral Veil is essential for creating a balanced and harmonious makeup look. The Mineral Veil provides a flawless base, so the blush you choose should enhance your natural complexion and add a touch of radiance. Several factors come into play when selecting the perfect blush, including your skin tone, skin type, and personal preferences regarding color and finish.
First and foremost, consider your skin tone. Fair skin tones generally look best with light pinks, peaches, and apricot shades. These colors provide a subtle flush of color without overpowering the complexion. Medium skin tones can handle a wider range of blush shades, including rosy pinks, mauves, and berry tones. Darker skin tones can rock bolder, more vibrant colors such as fuchsia, coral, and deep reds. These shades add warmth and definition to the face without appearing ashy.
Skin type is another important consideration. If you have dry skin, opt for cream or liquid blushes, as they tend to be more hydrating and provide a dewy finish. These formulas will help to prevent your skin from looking dry or flaky. For oily skin, powder blushes are generally a better choice, as they help to absorb excess oil and keep your skin looking matte. Mineral blushes are also an excellent option for oily skin, as they are lightweight and non-comedogenic. If you have combination skin, you can experiment with both cream and powder blushes to see which one works best for you.
Beyond skin tone and skin type, consider the finish of the blush. Matte blushes provide a natural, subtle flush of color without any shimmer or sheen. They are a great choice for everyday wear or for those who prefer a more understated look. Shimmer blushes contain light-reflecting particles that add radiance and luminosity to the skin. They are perfect for special occasions or for those who want to add a touch of glam to their makeup look. Satin blushes offer a balance between matte and shimmer, providing a subtle glow without being overly shimmery. They are a versatile option that can be worn for both day and night. Finding the right luminous blush for your needs will really make a difference.
Consider the undertone of your skin. Warm undertones (yellow or golden) typically look best with warm blush shades such as peach, coral, and bronze. Cool undertones (pink or blue) complement cool blush shades such as pink, berry, and mauve. Neutral undertones can wear a wider range of blush shades, but generally look best with peachy-pink or rosy-beige colors.
Ultimately, the best way to find the perfect blush is to experiment and see what works best for you. Don’t be afraid to try different shades and finishes until you find one that you love. Consider what colors your skin naturally produces when it flushes. This is usually a very complimentary color for you. Remember, the goal is to enhance your natural beauty and add a touch of radiance to your complexion.
Application Techniques: Achieving a Seamless Blush Finish with Mineral Veil
Applying blush correctly is just as important as choosing the right shade. The key is to achieve a seamless, natural-looking finish that complements your overall makeup look. When you’re working with the bareMinerals Mineral Veil as your base, understanding how blush interacts with the powder is crucial for a flawless application.
Start by ensuring your Mineral Veil is properly applied and has settled into your skin. This usually takes a few minutes. Applying blush immediately after the Mineral Veil can sometimes result in patchiness or uneven application if the powder hasn’t fully set. Use a blush brush that is the right size and shape for your face. A smaller, more tapered brush is ideal for precise application, while a larger, fluffier brush is better for a softer, more diffused look. Consider the type of blush you’re using. Powder blushes work best with a dry brush, while cream or liquid blushes can be applied with a brush, sponge, or even your fingertips.
For powder blush, gently tap the brush into the product and tap off any excess. This prevents you from applying too much blush at once, which can be difficult to blend out. Smile slightly to identify the apples of your cheeks, which is where you should start applying the blush. Use light, circular motions to blend the blush onto your cheeks, working outwards towards your temples. Avoid applying blush too close to your nose, as this can make your face look wider. For a more sculpted look, you can also apply a small amount of blush to the hollows of your cheeks, just below your cheekbones. This will create definition and contour your face.
If you’re using a cream or liquid blush, apply a small amount to the back of your hand and then dab it onto your cheeks with your fingertips or a brush. Blend the blush outwards towards your temples, using gentle tapping motions. Cream and liquid blushes tend to be more pigmented than powder blushes, so start with a small amount and build up the color as needed. If you accidentally apply too much blush, you can use a clean brush or sponge to blend it out. Another trick is to gently pat the area with a tissue to absorb some of the excess product.
The placement of blush can also affect the overall look of your makeup. For a youthful, lifted effect, apply blush to the apples of your cheeks and blend it upwards towards your temples. For a more sophisticated look, apply blush to the hollows of your cheeks and blend it outwards towards your ears. Avoid applying blush too low on your face, as this can make your face look droopy. When using a highly pigmented blush, it’s wise to start with the blush on the back of your hand and slowly work it into the brush. This allows more control over the amount of product being applied to the face.
Remember, the goal is to create a natural, seamless finish that enhances your complexion. Don’t be afraid to experiment with different application techniques until you find one that works best for you. With practice, you’ll be able to achieve a flawless blush application every time.
Budget-Friendly Options: Affordable Blushes that Deliver Quality
Achieving a flawless makeup look doesn’t have to break the bank. There are many affordable blush options that offer excellent quality and performance, allowing you to create a beautiful, radiant complexion without spending a fortune. When searching for budget-friendly blushes, focus on brands known for their quality formulations, good pigmentation, and long-lasting wear. Several drugstore brands offer exceptional blushes that rival their high-end counterparts.
One key aspect to consider is the pigmentation of the blush. A well-pigmented blush requires less product to achieve the desired color payoff, making it last longer and providing better value for money. Look for blushes that offer buildable coverage, allowing you to customize the intensity of the color to suit your preferences.
Another important factor is the texture of the blush. A smooth, finely milled texture ensures that the blush blends seamlessly into the skin without looking chalky or patchy. Avoid blushes that feel gritty or have a lot of fallout, as these can be difficult to work with and may not last as long. Staying away from shimmery blush if you are trying to blur texture is always a good idea.
Here are a few budget-friendly blush options that consistently receive rave reviews:
* **Milani Baked Blush:** These blushes are known for their beautiful shimmery finish and long-lasting wear. They come in a wide range of shades to suit all skin tones.
* **Wet n Wild Color Icon Blush:** These blushes are incredibly affordable and offer impressive pigmentation. They have a smooth, blendable formula and come in a variety of matte and shimmer finishes.
* **E.L.F. Cosmetics Powder Blush Palette:** E.L.F. offers very affordable options and their blush palettes give you several colors to choose from and mix.
When shopping for affordable blushes, pay attention to online reviews and swatches to get a better idea of the color and texture. Many beauty bloggers and YouTubers provide honest reviews and comparisons of drugstore blushes, which can help you make an informed decision.
Don’t underestimate the power of a good drugstore blush. With a little research, you can find high-quality options that rival their high-end counterparts, allowing you to achieve a beautiful, radiant complexion without breaking the bank. Consider what type of blush is best for your specific face shape. Using the best long-lasting blush for your face will make all the difference.
| Blush Brand | Price Range | Finish Options | Pigmentation | Longevity |
|---|---|---|---|---|
| Milani Baked Blush | $8-$10 | Shimmer | High | Long-lasting |
| Wet n Wild Color Icon Blush | $3-$5 | Matte, Shimmer | Medium to High | Medium |
| E.L.F. Cosmetics Powder Blush Palette | $10-$12 | Matte | Medium | Medium |
High-End Indulgences: Splurging on Luxurious Blush Options
While affordable blushes offer excellent value, sometimes it’s worth indulging in a high-end blush for its superior formulation, exquisite packaging, and luxurious feel. High-end blushes often contain higher-quality ingredients, resulting in a smoother texture, better pigmentation, and longer-lasting wear. They may also offer unique shades and finishes that are not readily available in drugstore brands.
One of the key differences between high-end and drugstore blushes is the level of refinement in the formulation. High-end blushes tend to be more finely milled, which means they blend more seamlessly into the skin and provide a more natural-looking finish. They also often contain ingredients that help to improve the texture and appearance of the skin.
Another factor to consider is the packaging. High-end blushes often come in sleek, luxurious packaging that adds to the overall experience of using the product. The packaging may also include features such as a mirror or a high-quality brush.
Here are a few high-end blush options that are worth the splurge:
* **NARS Blush:** NARS blushes are legendary for their iconic shades, excellent pigmentation, and long-lasting wear. They come in a variety of finishes, from matte to shimmer.
* **Charlotte Tilbury Cheek to Chic Blush:** These blushes feature a unique two-tone design that allows you to create a custom blush look. They are known for their soft, blendable formula and luminous finish.
* **Dior Rouge Blush:** Dior blushes are renowned for their luxurious formulation, exquisite packaging, and wide range of shades. They provide a natural-looking flush of color that lasts all day.
* **Hourglass Ambient Lighting Blush:** These blushes are infused with Hourglass’ signature Ambient Lighting Powder, which creates a soft-focus effect and enhances the skin’s radiance.
When investing in a high-end blush, consider your skin tone and personal preferences to choose a shade that will complement your complexion and enhance your overall makeup look. Look for blushes that offer a unique finish or a shade that you can’t find in drugstore brands.
Ultimately, the decision of whether to splurge on a high-end blush is a personal one. While affordable blushes can provide excellent results, high-end blushes offer a luxurious experience and superior performance that may be worth the investment for some.
Mineral Veil Alternatives and Blush Pairings: Expanding Your Options
While the bareMinerals Mineral Veil is a beloved setting powder, there are several alternatives that offer similar benefits and may be a better fit for certain skin types or preferences. Exploring these alternatives can open up new possibilities for creating a flawless makeup base.
* **Laura Mercier Translucent Loose Setting Powder:** This setting powder is a classic choice known for its finely milled texture and ability to blur imperfections. It provides a matte finish and helps to control shine.
* **Coty Airspun Loose Face Powder:** This affordable setting powder has been a favorite for generations. It provides a soft-focus effect and helps to set makeup for long-lasting wear.
* **RCMA No-Color Powder:** This setting powder is a staple in the makeup artist community. It’s completely translucent and won’t alter the color of your foundation.
* **Fenty Beauty Pro Filt’r Instant Retouch Setting Powder:** This setting powder is designed to blur pores and create a smooth, matte finish. It’s available in a range of shades to suit different skin tones.
Pairing these alternatives with the right blush is key to achieving a balanced and harmonious makeup look. Here are some blush recommendations based on the finish of the setting powder:
* **Matte Setting Powder:** If you’re using a matte setting powder, you can pair it with a shimmer or satin blush to add radiance and luminosity to the skin. A shimmery cheek color can help to brighten the complexion and prevent the makeup from looking flat.
* **Luminous Setting Powder:** If you’re using a luminous setting powder, you can pair it with a matte blush to create a more natural-looking finish. A matte blush will help to define the cheeks without adding too much shimmer or shine.
* **Translucent Setting Powder:** If you’re using a translucent setting powder, you can pair it with any type of blush, depending on your personal preferences. Experiment with different finishes and shades to find what works best for your skin tone and desired look.
Ultimately, the best way to find the perfect setting powder and blush combination is to experiment and see what works best for your skin type and preferences. Don’t be afraid to try new products and techniques until you find a routine that you love.
FAQ: All About Mineral Veil and Blush Selection
What is the best way to apply bareMinerals Mineral Veil for optimal results?
The key to achieving optimal results with bareMinerals Mineral Veil lies in the application technique. First, ensure your skin is properly prepped and your foundation and concealer are applied. Then, using a fluffy brush, gently swirl it in the Mineral Veil, tap off any excess powder – this is crucial to prevent caking. Apply the powder to your face in light, circular motions, focusing on areas prone to shine, such as the forehead, nose, and chin. Avoid applying too much product, as a little goes a long way. For best results, use a pressing motion rather than sweeping, which helps the powder meld into the skin and blur imperfections. Wait a few minutes for the powder to set before applying other makeup products, like blush. Regularly cleaning your application brush is also important to prevent buildup and maintain even application.
How do I choose the right blush shade for my skin tone when using Mineral Veil?
Choosing the right blush shade involves considering your skin tone and undertones. For fair skin, light pinks, peaches, and apricot shades work well, providing a subtle flush of color. Medium skin tones can handle a wider range, including rosy pinks, mauves, and berry tones. Darker skin tones can pull off bolder, more vibrant colors like fuchsia, coral, and deep reds. Understanding your undertone – warm, cool, or neutral – is also important. Warm undertones look great with peach, coral, and bronze blushes, while cool undertones complement pink, berry, and mauve shades. Neutral undertones can experiment with a variety of shades. Always test the blush in natural light to ensure it complements your skin tone. Consider the occasion, as well; a subtle blush might be ideal for daytime, while a bolder shade is perfect for evening.
Can I use cream blush with bareMinerals Mineral Veil? If so, how?
Yes, you can absolutely use cream blush with bareMinerals Mineral Veil, but the application requires a slightly different approach. Apply the cream blush *before* setting with the Mineral Veil. Use your fingertips or a damp sponge to gently dab and blend the cream blush onto your cheeks. Ensure the blush is evenly distributed and blended seamlessly into your foundation. Allow the cream blush to set slightly before applying the Mineral Veil. The Mineral Veil will help to set the cream blush and prevent it from creasing or fading throughout the day. Use a light hand when applying the Mineral Veil over cream blush to avoid disturbing the product underneath. Cream blushes often provide a dewy finish, which can be beautifully balanced by the slightly mattifying effect of the Mineral Veil.
What are the key differences between mineral blush and powder blush?
Mineral blush and powder blush share similarities but have distinct differences. Mineral blush typically contains fewer ingredients, often derived from natural minerals. This makes it suitable for sensitive skin as it’s less likely to cause irritation. Mineral blush usually provides a more natural, buildable finish, allowing you to control the intensity of the color. Powder blush, on the other hand, can contain a wider variety of ingredients, including synthetic dyes and fragrances. Powder blush often offers more intense pigmentation and a wider range of finishes, including matte, shimmer, and satin. Mineral blush is generally loose or pressed and has a smoother, more finely milled texture. Powder blush can be either pressed or loose. Mineral blush tends to be more long-wearing on oily skin due to its oil-absorbing properties, while powder blush may require more frequent touch-ups.
How do I prevent blush from looking patchy or uneven when applied over Mineral Veil?
Patchy blush application over Mineral Veil can be avoided with proper technique. The most common cause is applying too much powder or blush at once. Lightly tap off any excess powder from your brush before applying either the Mineral Veil or the blush. Use a fluffy brush for a soft, diffused application. Build up the color gradually, layering the blush until you achieve the desired intensity. Ensure the Mineral Veil is fully set before applying blush. If the powder is still slightly damp, the blush can grab onto certain areas, creating patchiness. Using circular motions to blend the blush can also help to prevent patchiness. Consider the texture of your blush and choose one that is finely milled and easily blendable. If you still find the application patchy, try using a damp beauty sponge to gently blend the blush into the skin.
What are some good alternatives to Mineral Veil if I have dry skin?
If you have dry skin, the bareMinerals Mineral Veil might not be the best choice, as its oil-absorbing properties can sometimes accentuate dryness. A great alternative is a hydrating setting spray, which will set your makeup without drying out your skin. Another option is a hydrating primer, which can create a smooth, moisturized base for your makeup. Look for setting powders specifically formulated for dry skin, which often contain hydrating ingredients like hyaluronic acid or glycerin. Some examples include the Hourglass Veil Translucent Setting Powder, known for its light-reflecting particles that blur imperfections without drying, or the Laura Mercier Translucent Loose Setting Powder Glow, which provides a subtle radiance. Using a facial oil or moisturizer before applying makeup can also help to prevent dryness.
How can I make my blush last longer throughout the day when using Mineral Veil?
To extend the wear time of your blush when using Mineral Veil, start with a well-hydrated base. Properly moisturized skin will help the blush adhere better. Apply a blush primer before your foundation to create a smooth, long-lasting base for the blush. Use a cream blush as a base and then layer a powder blush on top for added longevity. The cream blush will provide a base for the powder blush to grip onto. Set your makeup with a setting spray after applying blush. Setting sprays help to lock in your makeup and prevent it from fading throughout the day. Carry a compact mirror and a small blush brush with you for touch-ups throughout the day. Gently pat on more blush as needed to maintain the color. Consider using a blush with a long-wearing formula. Many brands offer blushes specifically designed to last all day.
![]()
![]()
![]()
![]()
![]()
![]()
![]()
Price: $35.00
(as of Sep 08, 2025 06:02:02 UTC – Details)


