
Best 4 Pack Wall Mirror Full Length, 12 x 12 Review mirrors – Oemiu
A Deep Dive into the Versatility of 12×12 Inch Wall Mirrors
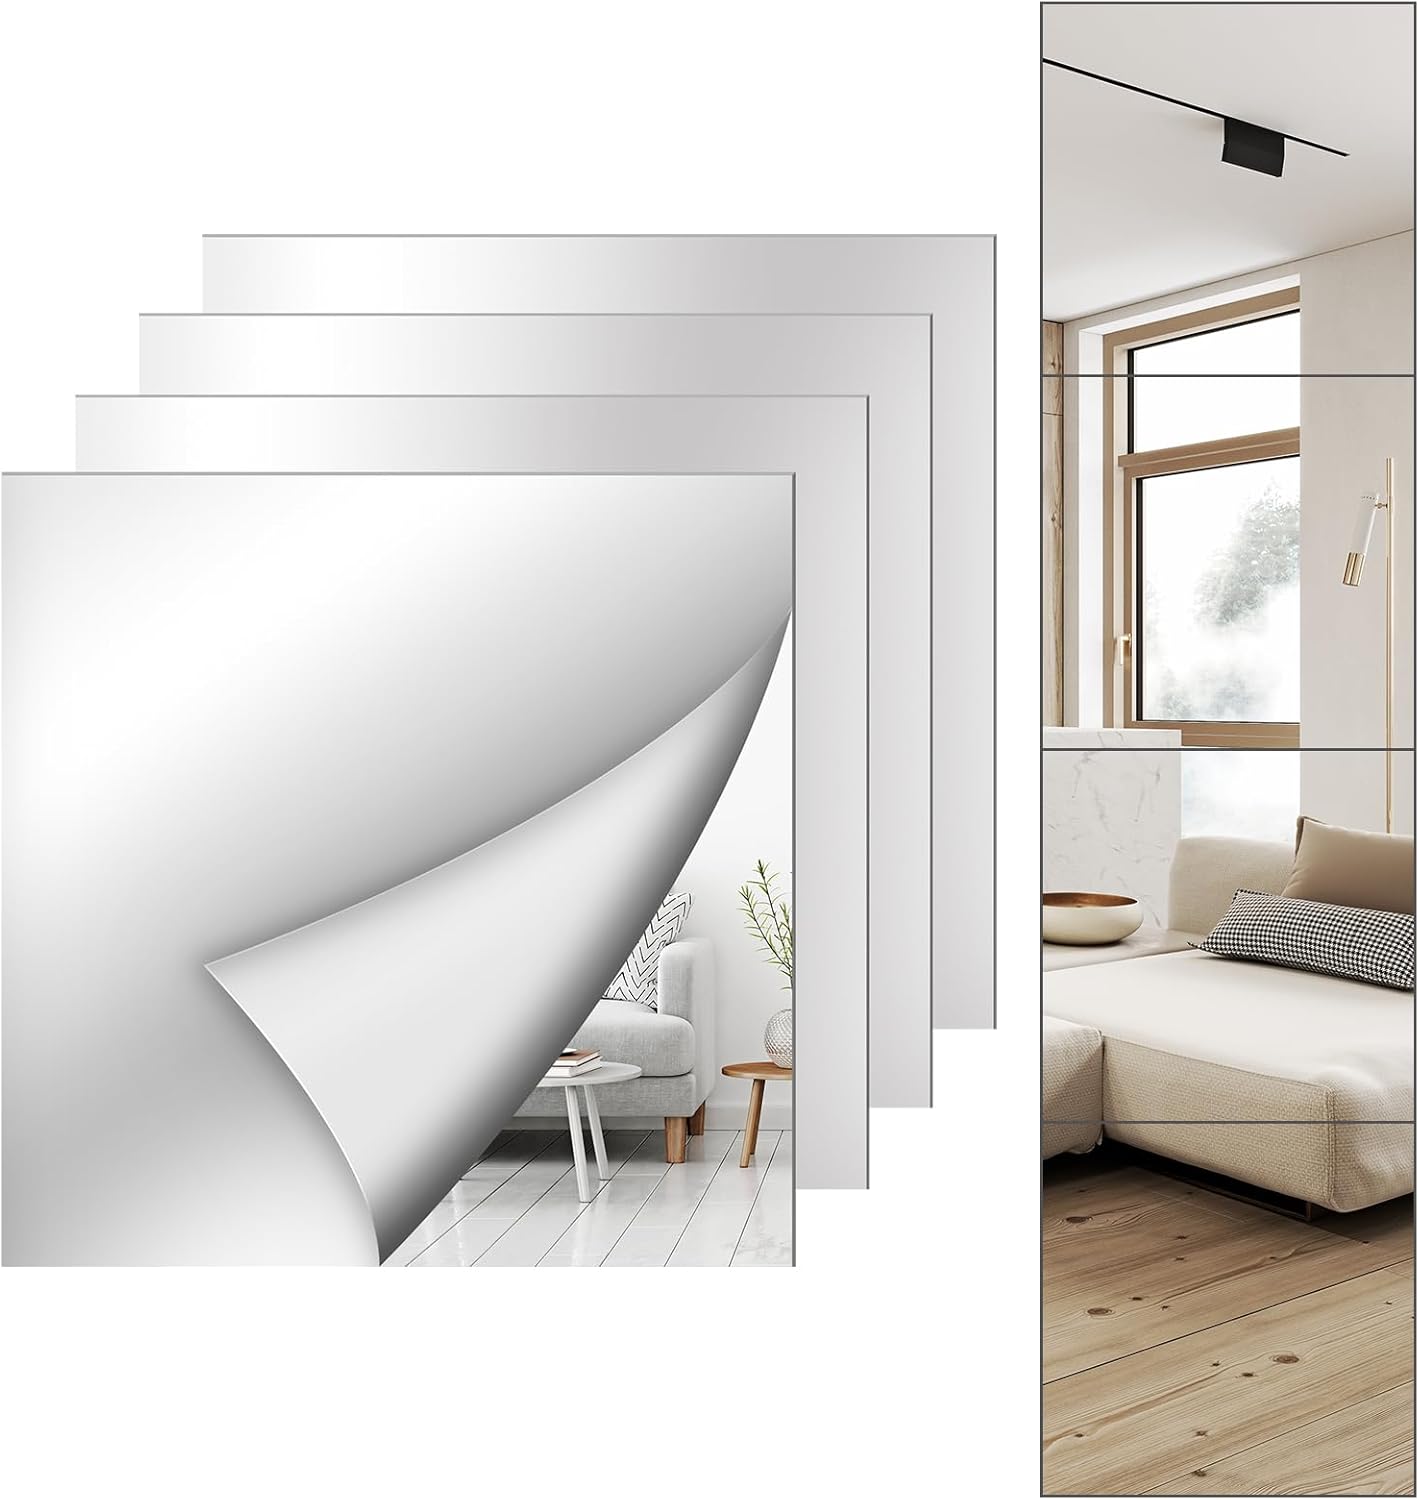
Choosing the right mirrors for your home can feel like a bigger decision than it seems. Mirrors aren’t just functional; they’re transformative. They affect how light interacts within a space, how spacious a room feels, and, ultimately, how you perceive yourself and your surroundings. The “4 Pack Wall Mirror Full Length, 12 x 12” set presents a unique proposition: a collection of smaller, versatile mirrors designed to be arranged and utilized in creative ways. This review delves into the product’s details, exploring its strengths, weaknesses, and the myriad possibilities it unlocks for home décor and personal grooming. These small mirrors are very different from a full length mirror.
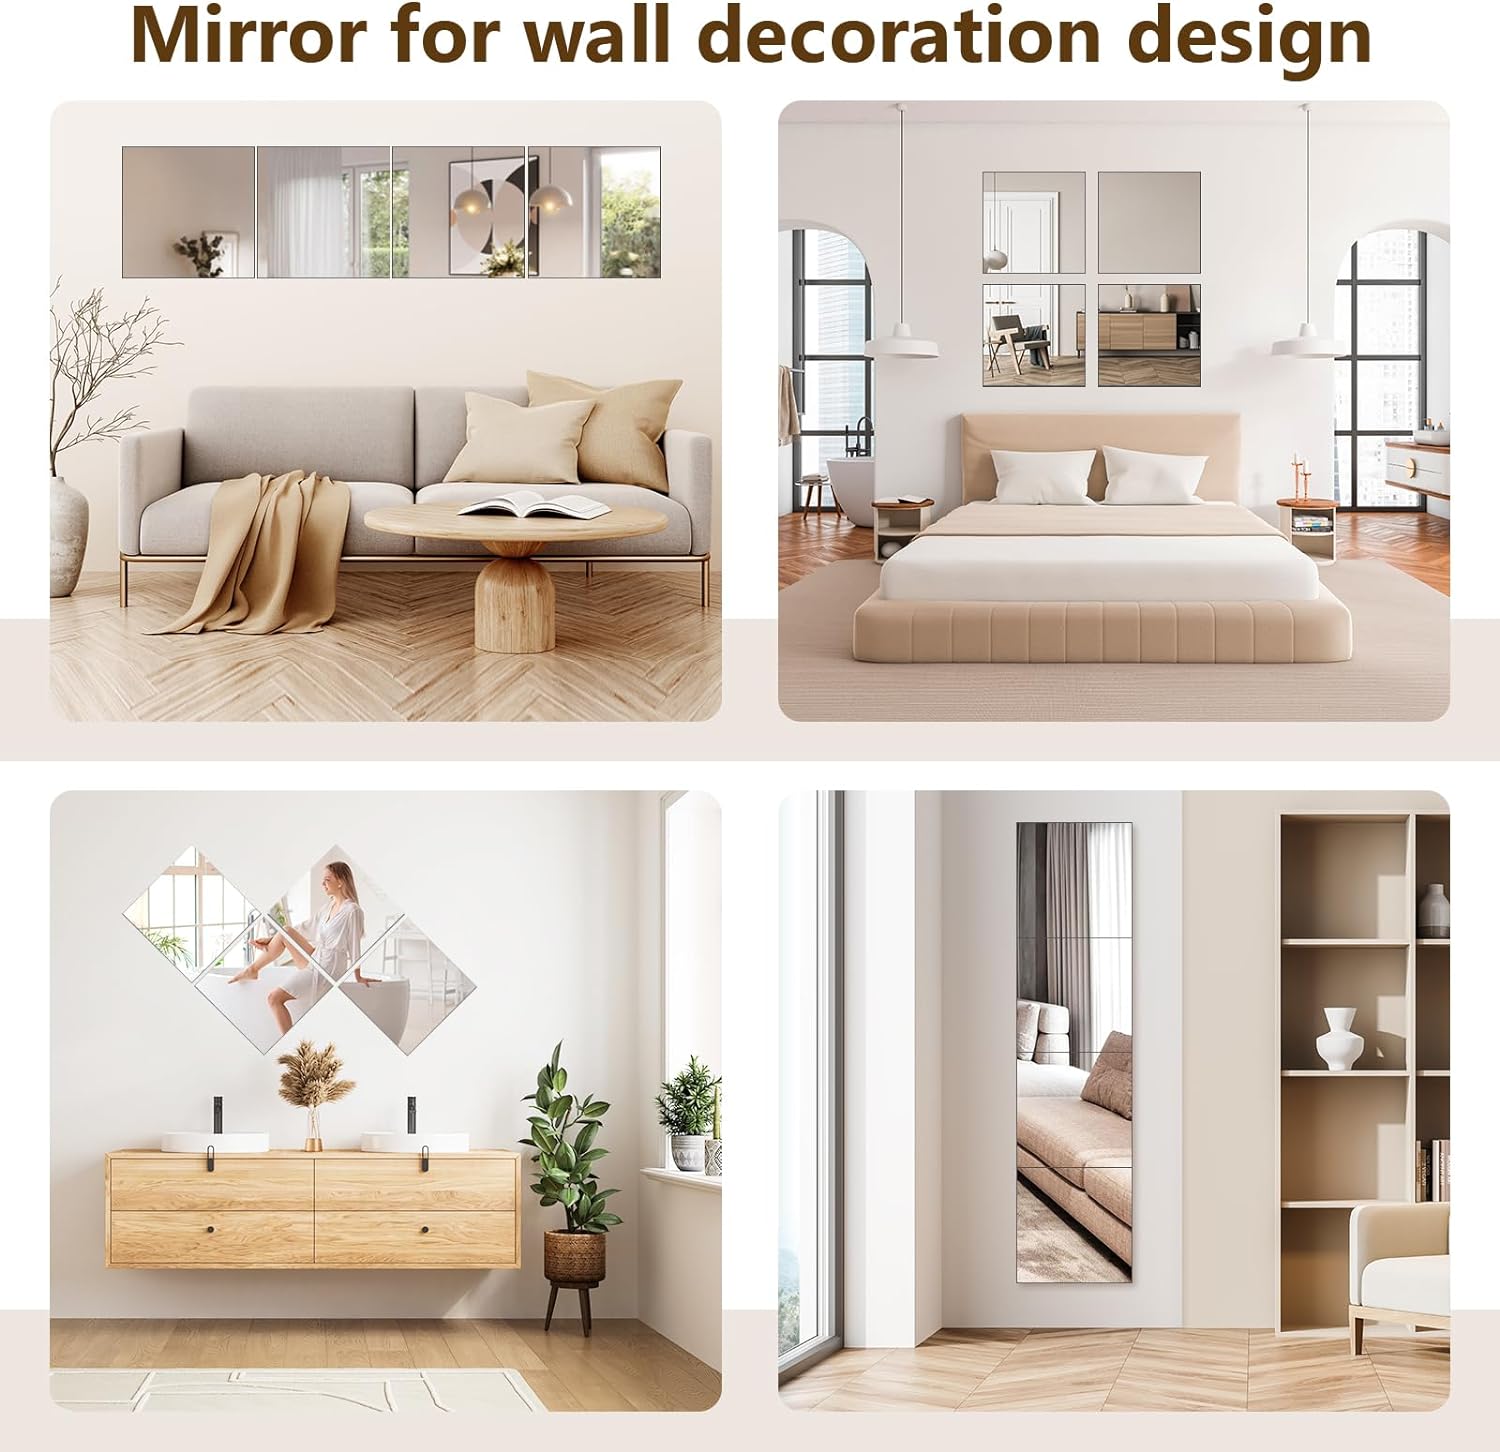
The immediate appeal lies in the modularity. Unlike a single, large mirror, these 12×12 inch squares offer unparalleled flexibility. They can be grouped together to create a larger reflective surface, scattered strategically to enhance lighting, or used individually in various smaller spaces. This adaptability makes them ideal for renters, apartment dwellers, or anyone who enjoys frequently redecorating. Imagine using them to craft a unique geometric design on a bedroom wall, brightening a dark hallway, or creating a vanity setup in a small bathroom. The possibilities are limited only by your imagination.
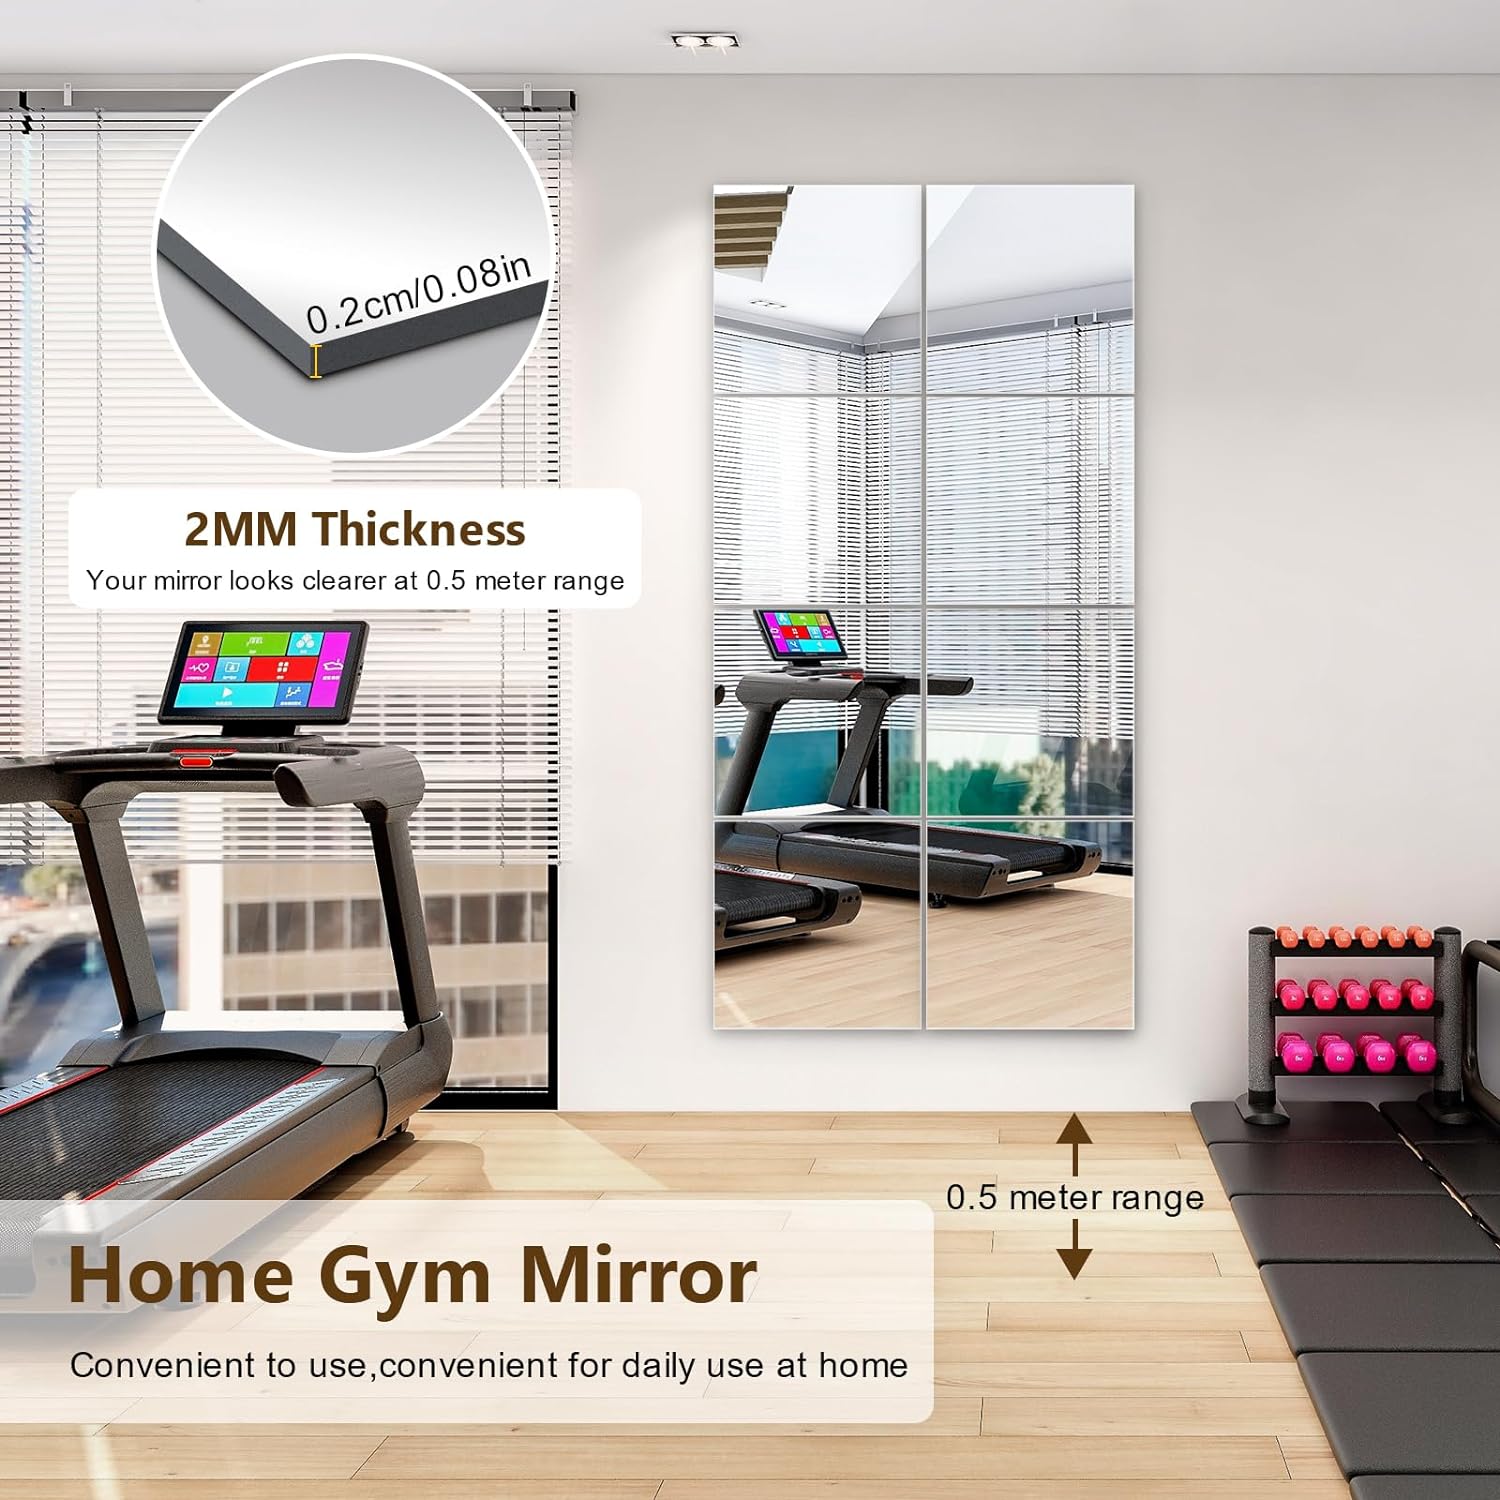
The size is also a significant factor. A 12×12 inch mirror is large enough to be functional for checking your appearance but small enough to be easily manageable and unobtrusive. This makes them perfect for detail work, such as applying makeup, styling hair, or ensuring your outfit looks just right before heading out the door. They offer a more focused reflection than a full-length mirror, allowing you to concentrate on specific areas. They’re also a great option for children’s rooms, providing a safe and accessible way for them to explore their reflections without the bulk and potential hazards of a larger mirror. Furthermore, their compact size minimizes the risk of damage during installation and transport.
However, it’s crucial to acknowledge that these mirrors are not a direct substitute for a traditional full-length mirror. While they can be arranged to create a larger reflective surface, the seams between the individual mirrors will always be visible. This might be a deal-breaker for those seeking a seamless, uninterrupted reflection for full-body viewing. Also, the smaller size means that you won’t get the same comprehensive view that a larger mirror provides. Consider your primary needs and intended uses before making a purchase. Are you looking for a decorative accent, a tool for detailed grooming, or a true full-length reflection? The answer to that question will determine whether this 4-pack set is the right choice for you.
Unboxing and Installation: Setting Up Your New Mirrors
The experience of receiving and installing these 12×12 inch wall mirrors is just as important as the product itself. Let’s break down what you can expect from the moment the package arrives at your doorstep. First impressions matter, and the packaging plays a crucial role in ensuring that the mirrors arrive safely and undamaged. Ideally, the mirrors should be individually wrapped with protective foam or bubble wrap to prevent scratches and breakage during transit. The box itself should be sturdy and adequately sized to prevent the mirrors from shifting around inside.
The unboxing experience should be straightforward and hassle-free. Clear and concise instructions for installation should be included, along with any necessary hardware. Some sets might include adhesive pads, while others might require you to purchase your own mounting supplies, such as screws or hooks. It’s always a good idea to read the instructions carefully before you begin, to ensure that you have all the necessary tools and materials.
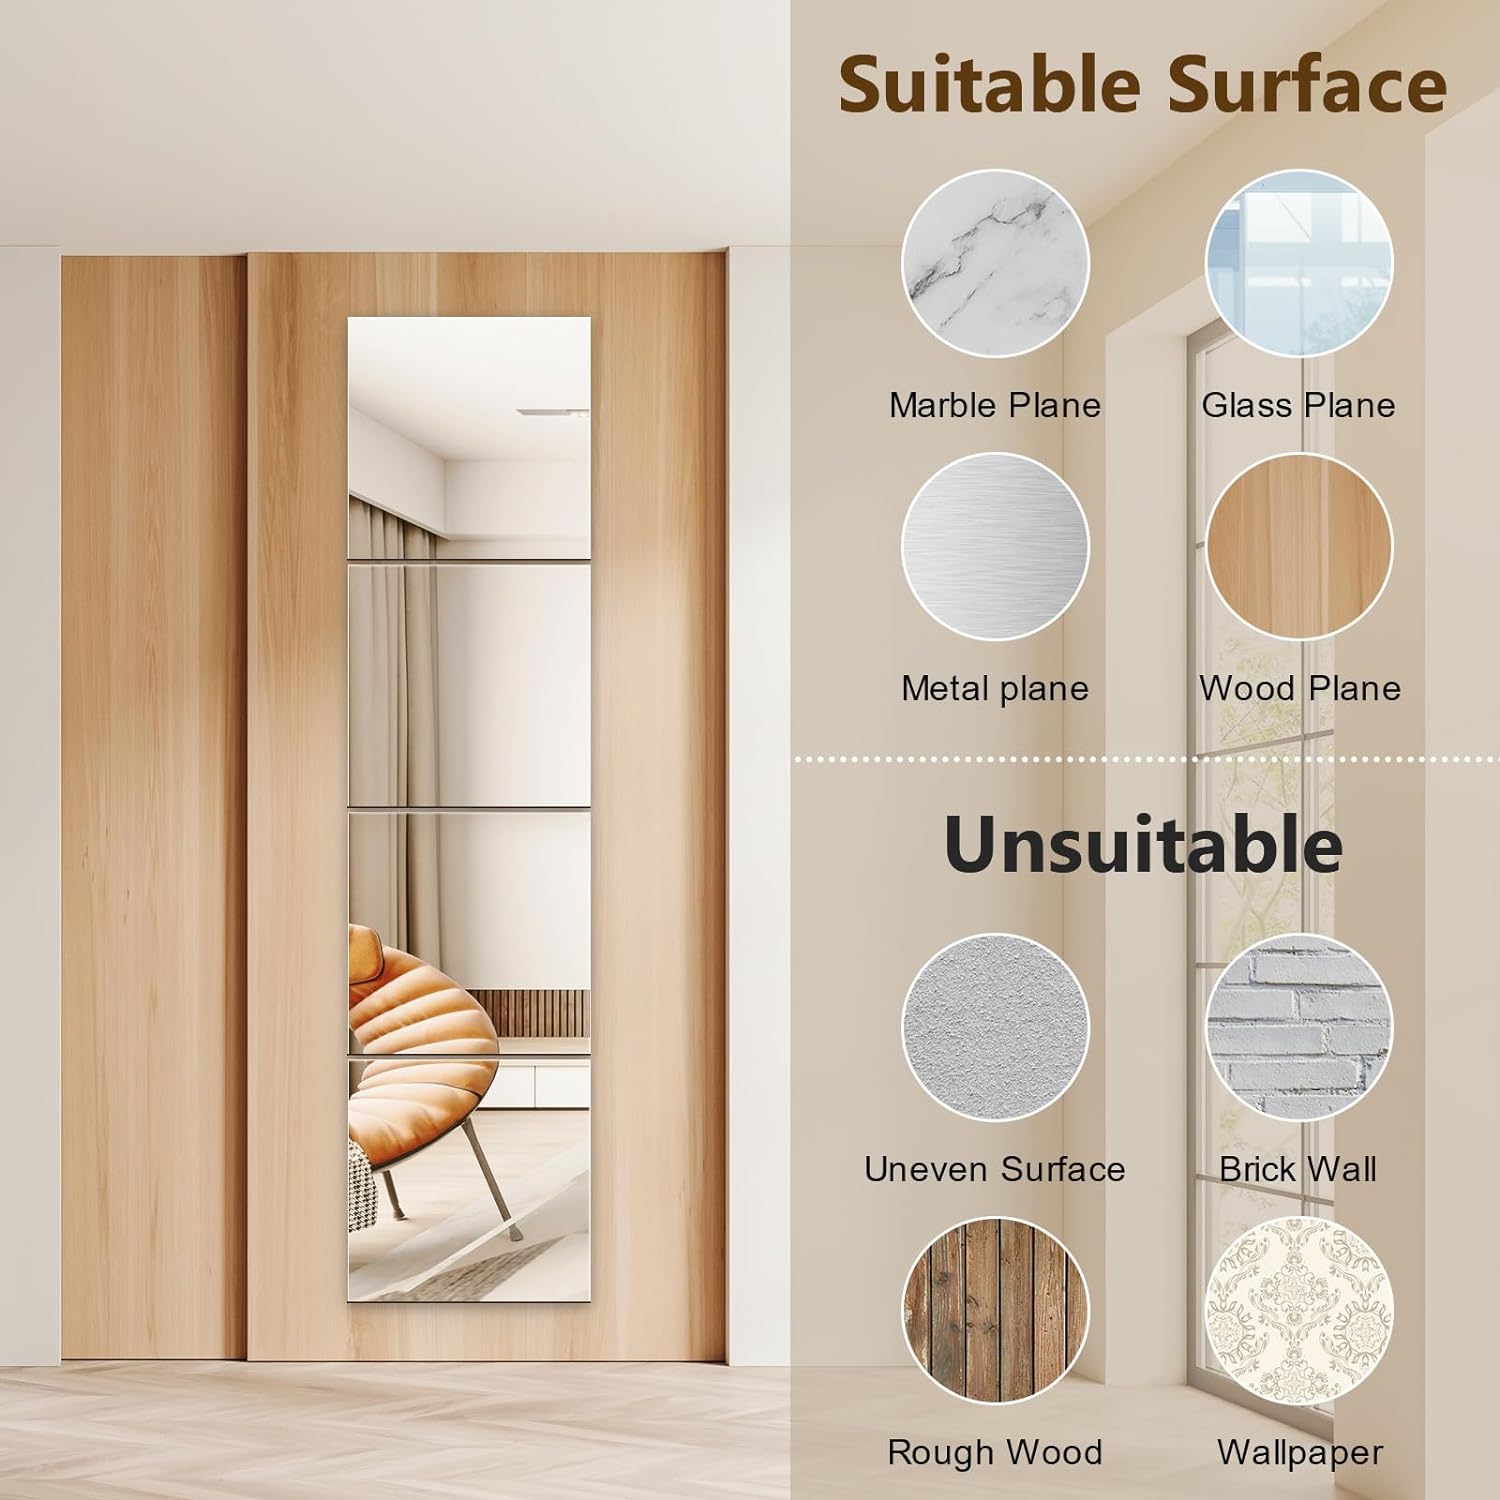
Installation is where the rubber meets the road. The ease of installation can vary depending on the mounting method and the type of wall you’re working with. Adhesive pads are generally the easiest option, requiring no drilling or special tools. However, they might not be suitable for all surfaces, and their long-term adhesion can be questionable, especially in humid environments. Screws and hooks offer a more secure and permanent solution, but they require more effort and can damage your walls.
Regardless of the mounting method you choose, it’s essential to ensure that the mirrors are level and securely attached to the wall. Use a level to ensure that the mirrors are aligned correctly, and double-check that the adhesive or screws are holding firmly. If you’re using adhesive pads, clean the wall thoroughly before applying them to ensure a strong bond. If you’re using screws, be sure to use the appropriate type of screw for your wall material. Drywall anchors are essential for securing mirrors to drywall, while masonry screws are needed for brick or concrete walls.
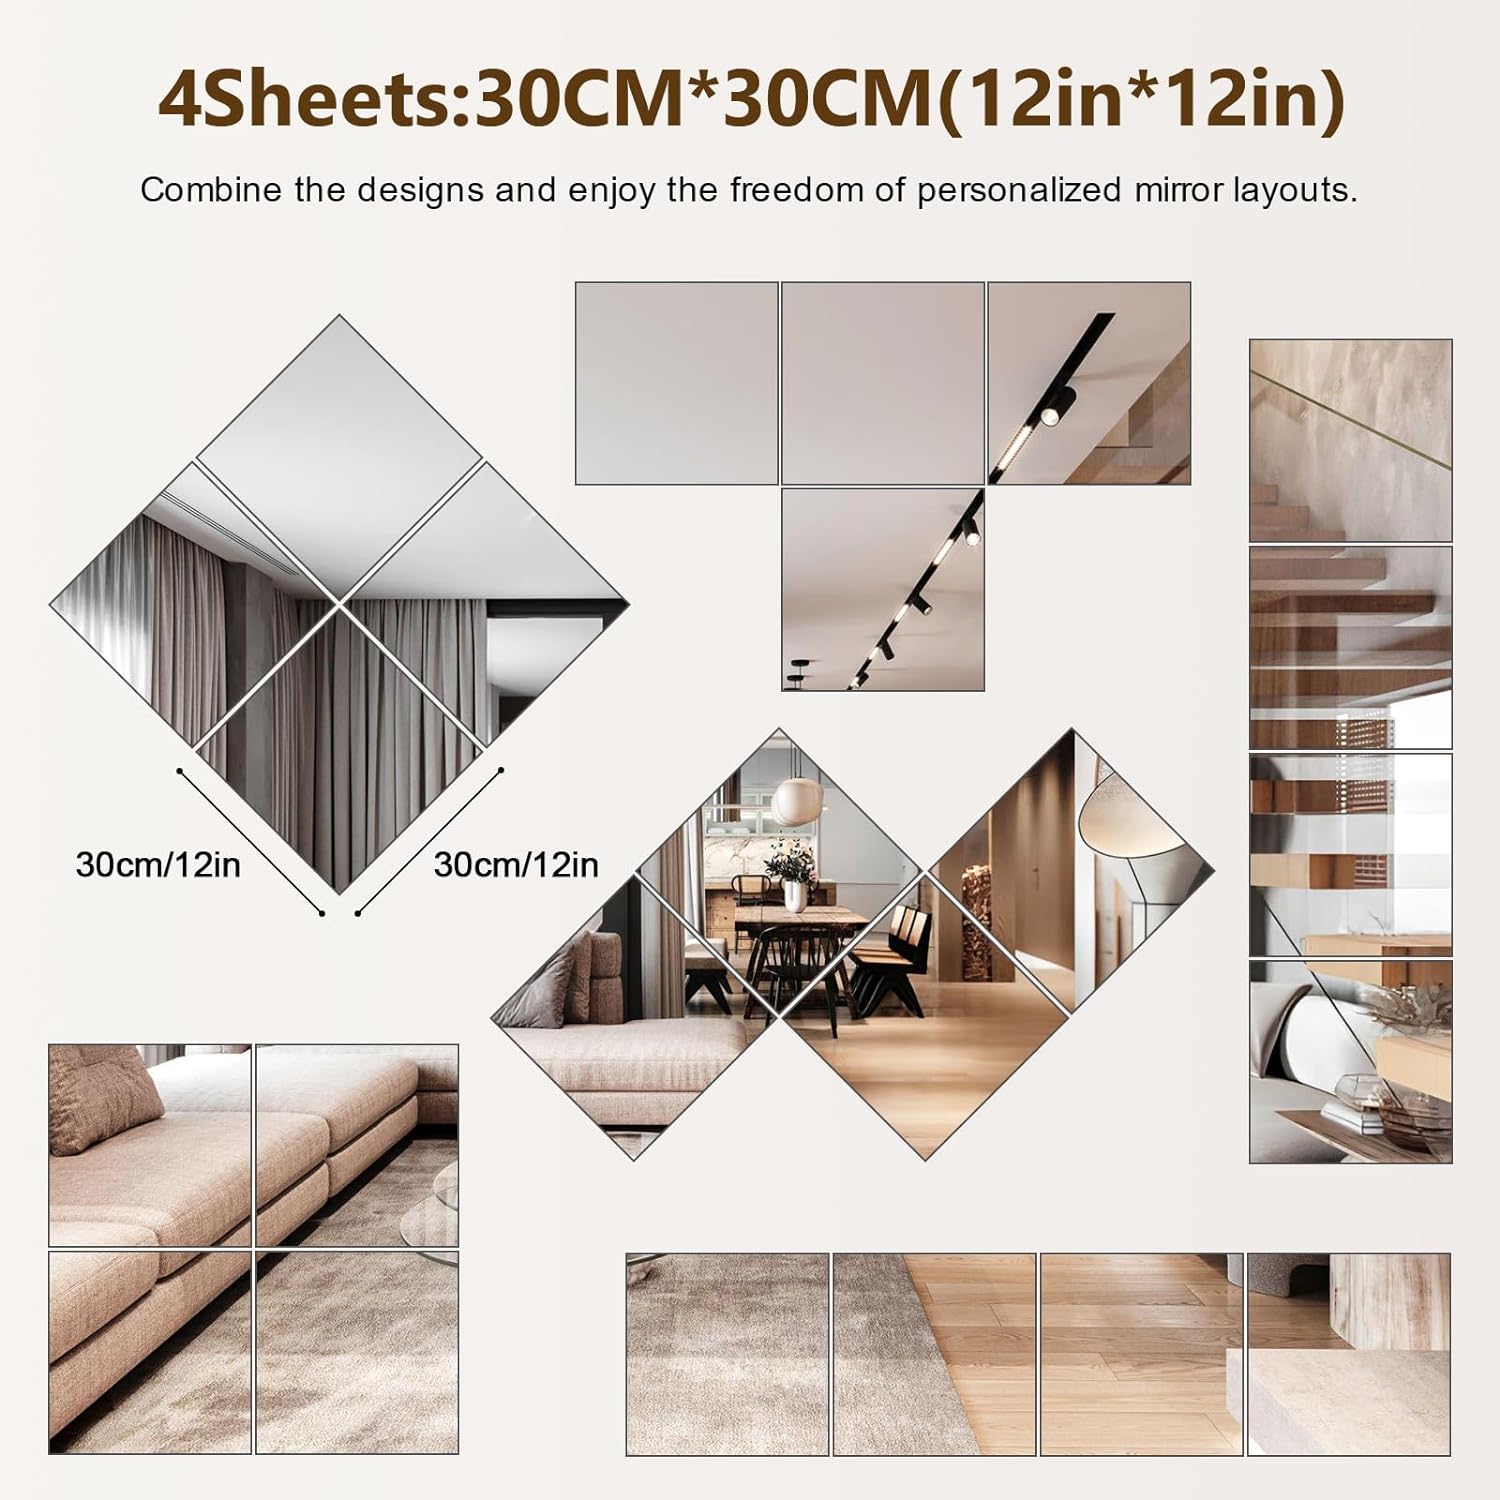
Finally, consider the arrangement of the mirrors. This is where you can get creative and personalize your space. Experiment with different layouts and configurations to find what works best for your needs and preferences. You can arrange them in a grid pattern, a staggered pattern, or a completely random pattern. You can also use them to create a focal point or to highlight a particular area of your room. Remember to step back and view your arrangement from different angles to ensure that it looks balanced and visually appealing.
Exploring Applications: Where to Use Your Square Mirror Tiles
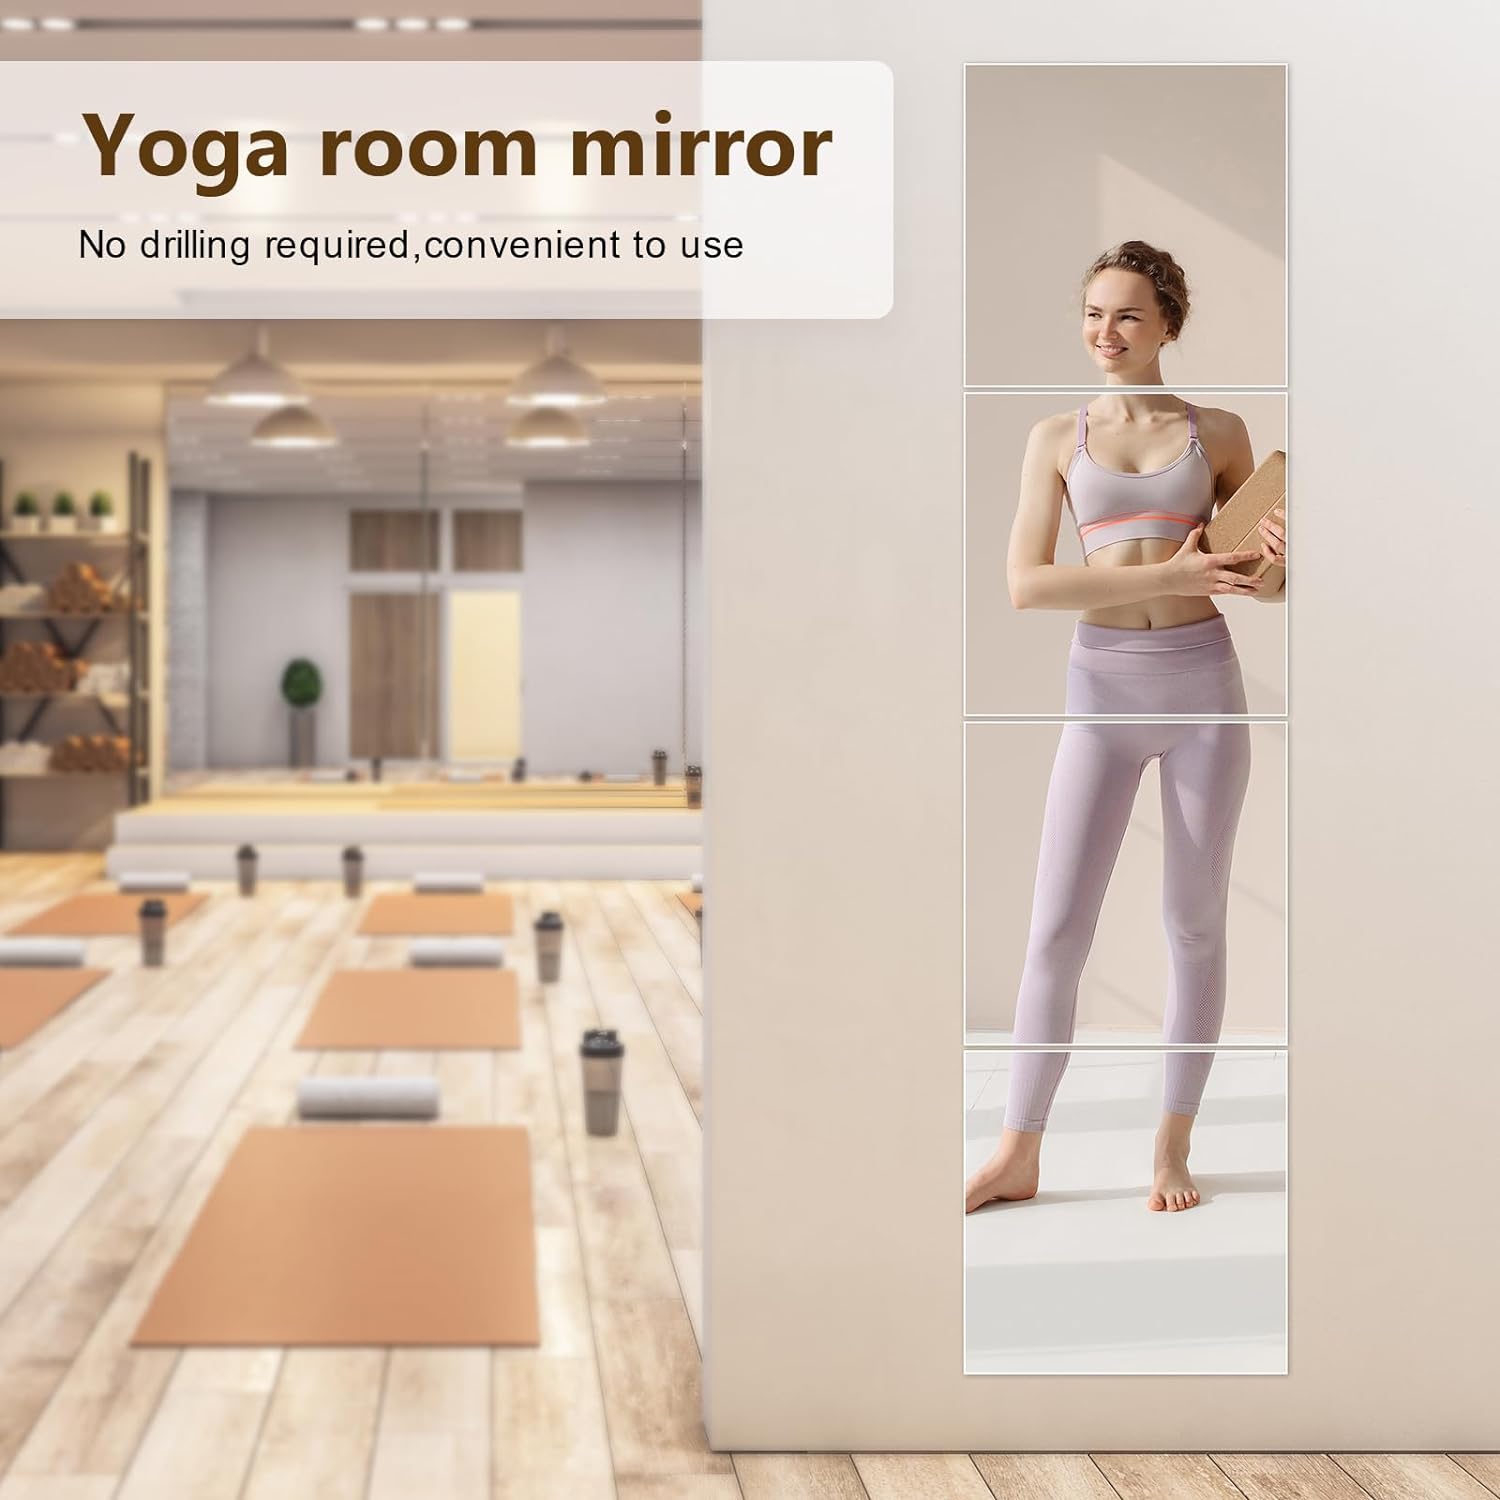
One of the biggest advantages of a 4 pack of 12×12 square mirror tiles lies in their versatility. Unlike large, fixed mirrors, these smaller squares can be deployed in a multitude of locations and for a variety of purposes. Let’s explore some specific applications and how they can enhance your living space.
Firstly, consider the bathroom. A single 12×12 inch mirror is often sufficient for a small powder room or half-bath, providing a convenient surface for quick touch-ups and grooming. Alternatively, arranging two or three mirrors above a vanity can create a more spacious and well-lit area for applying makeup or shaving. The modularity allows you to customize the arrangement to fit the specific dimensions of your vanity and your personal preferences.
Next, think about hallways and entryways. These areas are often dimly lit and can feel cramped. Strategically placing one or two mirrors in these spaces can dramatically brighten them up and create the illusion of more space. A mirror placed near the entrance can also serve as a convenient spot to check your appearance before leaving the house. Consider angling the mirror to reflect light from a nearby window or lamp, further enhancing its brightening effect.
Bedrooms offer another fertile ground for experimentation. A cluster of mirrors can be used as a decorative accent above a bed or dresser, adding visual interest and creating a focal point in the room. You can also use them to create a vanity area, providing a dedicated space for getting ready in the morning. If you have a walk-in closet, a mirror inside can be incredibly useful for coordinating outfits and ensuring that you look your best.
Beyond these common applications, consider more creative uses. Mirrors can be incorporated into DIY art projects, adding a reflective element to your creations. They can be used to create a unique and eye-catching backsplash in the kitchen or to add a touch of glamour to a home bar. You can even use them to create a mirrored tray for displaying decorative objects or serving drinks. The key is to think outside the box and explore the possibilities.
Furthermore, these square wall mirrors are fantastic for small spaces like dorm rooms or RVs where maximizing space is critical. Their lightweight design and ease of installation make them a perfect solution for adding functionality and a touch of style without overwhelming the area. They also make excellent small mirrors for craft projects.
Comparing Options: Evaluating the 4 Pack Wall Mirror Market
The market for wall mirrors, including these convenient 4 pack sets, is vast and varied. To make an informed purchasing decision, it’s essential to compare different options based on key factors such as material quality, construction, mounting methods, and price. Not all mirrors are created equal, and understanding these differences can help you find the perfect set for your needs and budget.
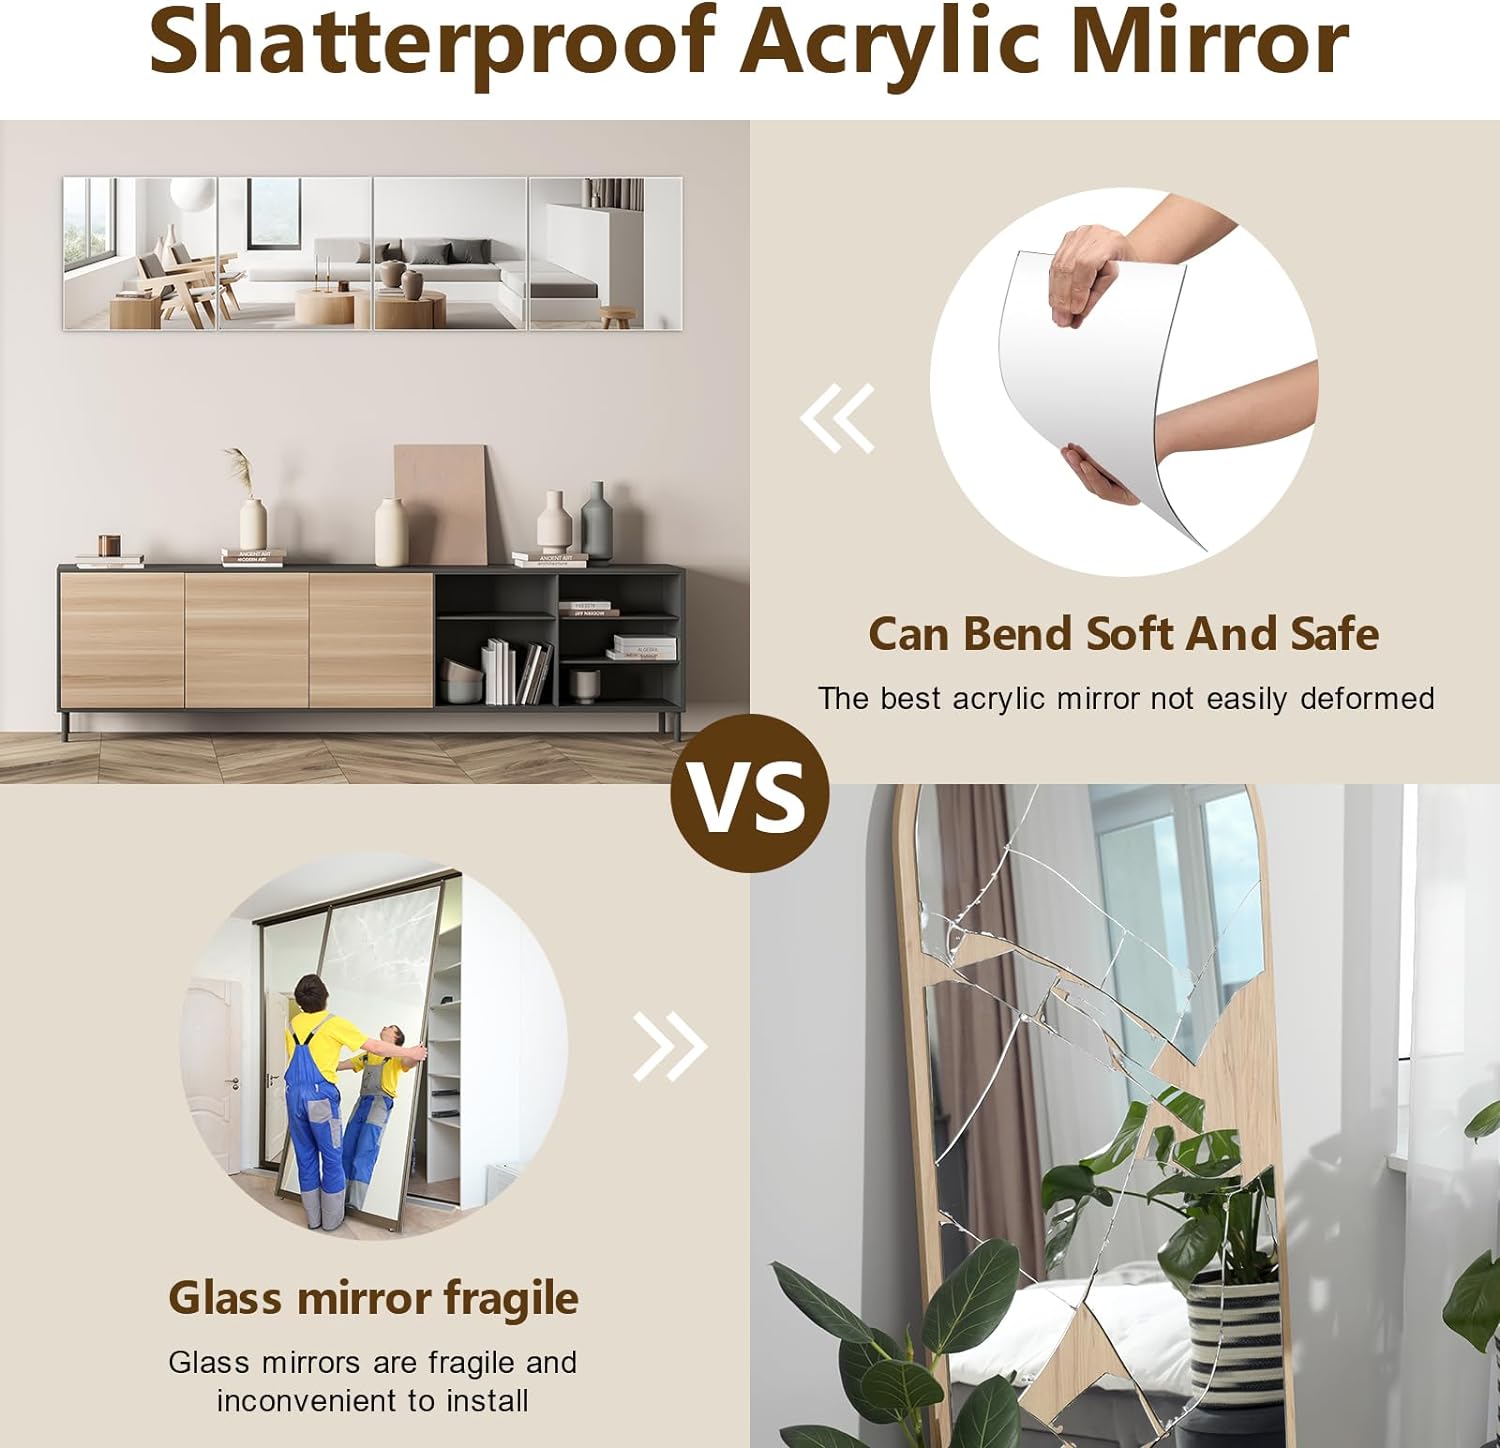
One of the most important factors to consider is the quality of the glass. Look for mirrors made from high-quality, distortion-free glass. Lower-quality glass can produce a warped or blurry reflection, which can be frustrating and even disorienting. Check customer reviews and look for mentions of distortion or clarity issues. Tempered glass is an added bonus, offering increased durability and shatter resistance.
The backing of the mirror is also crucial. A well-constructed backing will protect the glass from moisture and damage, extending the lifespan of the mirror. Look for mirrors with a sturdy, moisture-resistant backing material, such as PVC or MDF. The backing should also be securely attached to the glass, preventing it from peeling or separating over time.
Mounting options can vary significantly between different sets. Some sets come with adhesive pads, while others require you to purchase your own mounting hardware. Consider the type of wall you’ll be mounting the mirrors on and choose a mounting method that is appropriate. Adhesive pads are generally the easiest option, but they might not be suitable for all surfaces or for heavier mirrors. Screws and anchors offer a more secure and permanent solution, but they require more effort and can damage your walls.
Price is always a factor, but it’s important to consider the overall value you’re getting for your money. A cheaper set might seem appealing at first, but if the quality is poor, you might end up replacing it sooner than you would a more expensive, higher-quality set. Read customer reviews carefully to get a sense of the product’s durability and longevity.
Here’s a table that showcases the kind of things to look for when evaluating different 12×12 square mirror sets:
| Feature | Low-End Option | Mid-Range Option | High-End Option |
|---|---|---|---|
| Glass Quality | May have slight distortion | Generally clear with minimal distortion | High-quality, distortion-free glass |
| Backing Material | Thin cardboard or plastic | MDF or PVC | Moisture-resistant MDF or metal |
| Mounting Method | Adhesive pads only | Adhesive pads and/or screw holes | Adhesive pads, screw holes, and hanging hardware |
| Price | $10 – $20 | $20 – $40 | $40 – $60+ |
| Durability | Low; prone to damage | Moderate; decent durability | High; durable and long-lasting |
Finally, don’t forget to factor in your personal preferences and style. Choose a set that complements your existing décor and that you’ll enjoy looking at every day. Consider the shape, size, and finish of the mirrors and how they will fit into your overall design scheme.
FAQ: Your Questions About 12×12 Wall Mirrors Answered
Are these mirrors real glass or acrylic?
The vast majority of wall mirrors, including 12×12 inch versions, are made from real glass. Glass provides a superior reflective surface compared to acrylic, offering better clarity and less distortion. Acrylic mirrors, while lighter and more shatter-resistant, tend to have a slightly “wavy” appearance and are more prone to scratching. To confirm, always check the product description carefully. If the mirror is described as “acrylic” or “plastic,” it’s not real glass. Real glass mirrors will typically be heavier and feel more substantial than acrylic mirrors. For critical applications like makeup application or grooming, where accurate reflection is paramount, glass mirrors are generally preferred. However, acrylic mirrors might be a safer option in environments where breakage is a concern, such as children’s rooms or gyms.
How do I clean these mirrors without leaving streaks?
Cleaning mirrors without leaving streaks can be achieved with a few simple techniques. Start by dusting the mirror with a soft, dry cloth to remove any loose particles. Next, use a cleaning solution specifically designed for glass or a mixture of equal parts white vinegar and water. Spray the solution onto the mirror, being careful not to oversaturate it. Then, use a clean, lint-free microfiber cloth to wipe the mirror in a circular motion. Finally, use a dry microfiber cloth to buff the mirror until it’s streak-free. Avoid using paper towels, as they can leave lint behind. Also, ensure that the cleaning solution is not too concentrated, as this can also contribute to streaking. For stubborn stains, you can try using a small amount of rubbing alcohol on a cotton swab.
What are the best mounting options for these mirrors on different wall types?
The best mounting option depends heavily on your wall type. For drywall, adhesive pads are convenient but might not be reliable for heavier mirrors or humid environments. In those cases, use drywall anchors with screws. Drill pilot holes slightly smaller than the anchor size, insert the anchors, and then screw the mirrors into place. For plaster walls, the approach is similar to drywall, but use plaster-specific anchors. For brick or concrete, you’ll need to drill pilot holes using a masonry drill bit and then use masonry screws. Adhesive is generally not effective on these surfaces. Always ensure the anchors or screws are appropriately sized for the weight of the mirror and the wall’s material. Safety is paramount, so if unsure, consult a professional.
Can I cut these mirrors to create custom shapes?
While technically possible, cutting glass mirrors yourself is highly discouraged unless you have specialized tools and expertise. Glass cutting requires precision and safety precautions to avoid shattering the glass and causing injury. Attempting to cut a mirror with improper tools can result in a jagged, uneven cut, or worse, a complete shattering of the mirror. It’s best to purchase mirrors in the desired shape and size or to have them professionally cut by a glazier. A glazier has the necessary equipment and skills to cut glass safely and accurately, ensuring a clean and professional finish. The potential cost savings of DIY cutting are rarely worth the risk of injury and damage.
Are these mirrors suitable for use in a bathroom with high humidity?
The suitability of these mirrors for a high-humidity bathroom depends on the quality of the backing and the mounting method. Mirrors with moisture-resistant backings, such as PVC or sealed MDF, are better equipped to withstand the damp environment. Avoid mirrors with cardboard backings, as they can warp and deteriorate over time. Ensure adequate ventilation in the bathroom to reduce humidity levels. When installing, use a moisture-resistant adhesive or sealant to prevent water from seeping behind the mirror. Regularly wipe down the mirror to remove condensation and prevent water spots. By taking these precautions, you can help to prolong the lifespan of your mirrors in a humid bathroom.
What is the difference between beveled and non-beveled edge mirrors, and which is better for these square tiles?
Beveled edge mirrors have a slightly angled edge that is polished to create a decorative, framed look. Non-beveled edge mirrors have a straight, unfinished edge. For square tiles that are intended to be placed close together, non-beveled edges are generally preferred. This allows the mirrors to sit flush against each other, creating a seamless or nearly seamless appearance. Beveled edges, on the other hand, can create gaps or uneven surfaces when placed adjacent to each other. However, if you’re using the mirrors individually or with significant spacing between them, beveled edges can add a touch of elegance and sophistication. The choice ultimately depends on your aesthetic preferences and the intended use of the mirrors.
Where can I buy replacement adhesive pads if the included ones are not strong enough?
If the included adhesive pads are not strong enough, you can purchase replacement adhesive pads from various sources, including hardware stores, online retailers, and home improvement stores. Look for adhesive pads that are specifically designed for mirrors or glass. These pads typically have a stronger adhesive and are more resistant to moisture and temperature changes. Consider the weight of the mirror and choose pads that are rated to support that weight. Some popular brands include 3M Command Strips, which are designed for damage-free hanging. Be sure to clean the wall surface and the back of the mirror thoroughly before applying the adhesive pads.
Price: $149.99 - $12.99
(as of Sep 05, 2025 04:32:53 UTC – Details)


