
Best Keewah Small Halloween Cookie Cutter Review Halloween Charcuterie Board – Oemiu
Best Keewah Small Halloween Cookie Cutter Review & Halloween Charcuterie Board Guide
Halloween is a time for spooky fun, creative costumes, and, of course, delicious treats! Whether you’re planning a grand Halloween party or a cozy night in with family, the right tools can make all the difference. Today, we’ll delve into a review of the Keewah Small Halloween Cookie Cutters, perfect for creating adorable and bite-sized Halloween cookies. We’ll also explore the art of crafting a captivating Halloween charcuterie board – or a spooky snack board – that will wow your guests and tantalize their taste buds. We’ll cover everything from selecting the right ingredients to arranging them in a visually stunning and thematic way. Get ready to elevate your Halloween celebrations with these delightful additions!
Unboxing the Keewah Small Halloween Cookie Cutters: A Sweet Start to Spooky Season
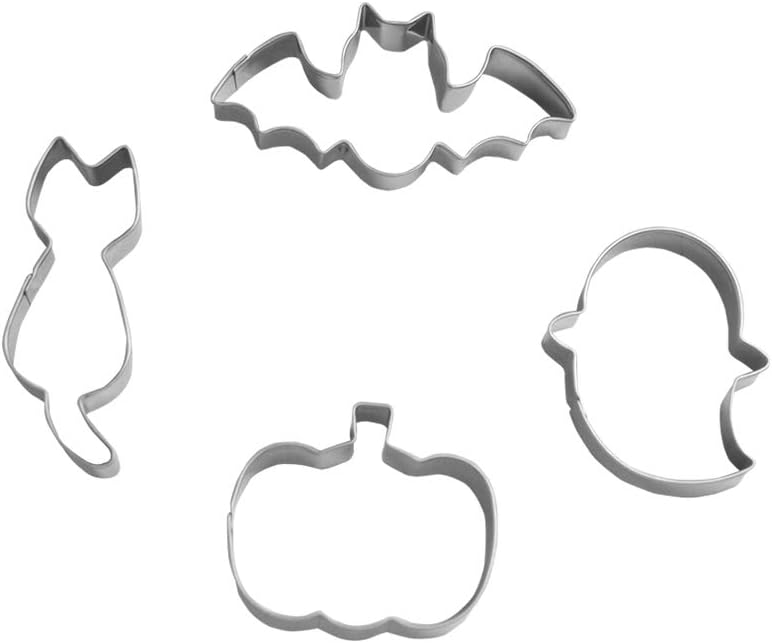
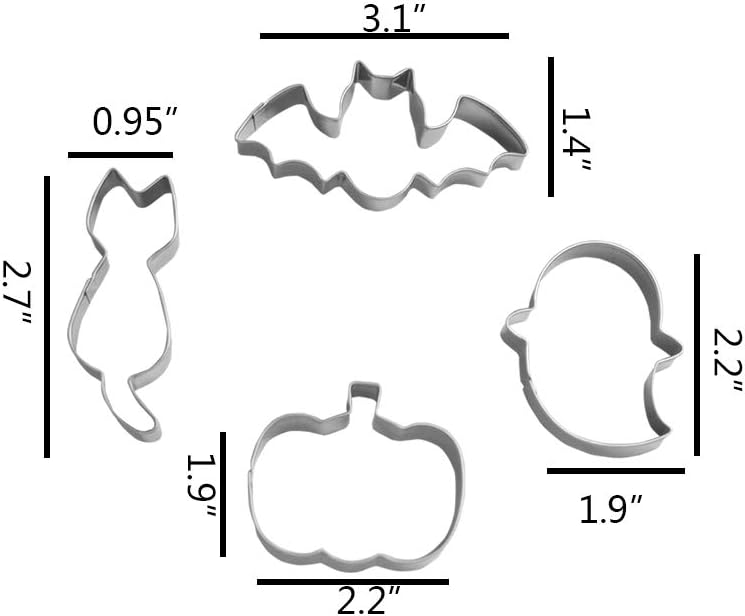
The Keewah Small Halloween Cookie Cutters set offers a delightful array of shapes perfect for creating miniature Halloween masterpieces. Forget those giant, unwieldy cookie cutters that yield massive cookies. These are designed for petite treats, ideal for snacking, decorating, or adding a touch of whimsy to your dessert table. The set typically includes classic Halloween motifs like ghosts, bats, pumpkins, cats, skulls, and sometimes even more unique shapes like witches’ hats or haunted houses. The size is a key factor here; small cookies are easier to eat, especially for children, and they bake more evenly than larger ones. This reduces the risk of burnt edges and raw centers, a common pitfall with larger cookie cutters.
Beyond the shapes, the material and construction of the cookie cutters are crucial. Most Keewah sets are made from stainless steel, a durable and rust-resistant material that can withstand repeated use. This is far superior to plastic cutters, which can bend, break, or melt under heat. Stainless steel also provides a clean, sharp edge for cutting dough, resulting in well-defined cookie shapes. The edges are usually rolled or rounded for safety, preventing cuts or scrapes during handling, which is especially important if you have children helping in the kitchen. The construction should also be seamless to prevent dough from getting stuck in crevices, making cleanup a breeze. Imagine trying to clean intricate cookie cutters with dough caked in every tiny corner – a nightmare! Keewah cutters generally avoid this pitfall, making them a user-friendly option for both novice and experienced bakers.
However, the “small” size also has its drawbacks. While perfect for bite-sized treats, these cutters may not be suitable if you’re looking to create large, statement cookies for decorating or gifting. Additionally, the detail level can be limited due to the small size; intricate designs may not translate well, resulting in less defined shapes. Therefore, it’s important to consider your intended use before purchasing. If you’re primarily interested in creating small, easy-to-eat cookies for a large gathering, these cutters are an excellent choice. But if you’re looking for something more elaborate, you might want to consider a larger set or individual cutters with more intricate details. In terms of storage, the small size makes them easy to store in a drawer or container, taking up minimal space. This is a definite advantage for those with limited kitchen storage.
Baking with Keewah: Tips and Tricks for Perfect Halloween Cookies
Using the Keewah Small Halloween Cookie Cutters is a straightforward process, but a few tips and tricks can help you achieve perfect results every time. First, ensure your cookie dough is chilled thoroughly before rolling it out. Cold dough is less sticky and easier to work with, preventing the cutters from getting clogged and ensuring clean cuts. A good rule of thumb is to chill the dough for at least 30 minutes, or even longer if you have the time. When rolling out the dough, use a lightly floured surface to prevent sticking. Avoid using too much flour, as this can make the cookies dry and crumbly. Roll the dough to a consistent thickness, usually around ¼ inch, to ensure even baking.
Once the dough is rolled out, press the cookie cutters firmly and evenly into the dough. Avoid wiggling or twisting the cutters, as this can distort the shapes. Lift the cutters carefully, using a small spatula or offset spatula to transfer the cut-out cookies to a baking sheet lined with parchment paper. Parchment paper is essential for preventing sticking and ensuring easy cleanup. Space the cookies evenly on the baking sheet, allowing for a little bit of spreading during baking. Bake the cookies according to your recipe instructions, keeping a close eye on them to prevent burning. Small cookies bake quickly, so they usually require a shorter baking time than larger cookies.
After baking, let the cookies cool on the baking sheet for a few minutes before transferring them to a wire rack to cool completely. This prevents them from breaking or crumbling. Once the cookies are completely cool, you can decorate them with icing, sprinkles, or other edible decorations. Royal icing is a popular choice for decorating sugar cookies, as it dries hard and provides a smooth surface for detailed designs. However, buttercream frosting is also a delicious option, especially for those who prefer a softer, more flavorful frosting. Get creative with your decorations and let your imagination run wild! Use different colors of icing, sprinkles, and edible markers to create unique and spooky designs. Consider using edible glitter to add a touch of sparkle and glamour to your Halloween cookies. Remember, the goal is to have fun and create delicious treats that everyone will enjoy. The Keewah Small Halloween Cookie Cutters provide the perfect canvas for your creative cookie decorating endeavors. Consider creating a variety of cookies to add to your Halloween charcuterie board as a sweet treat.
Crafting the Ultimate Halloween Charcuterie Board: A Spooky Snack Spectacle
Creating a Halloween charcuterie board, also known as a Halloween snack board or spooky snack board, is more than just throwing some cheese and crackers on a platter. It’s about curating a visual and flavorful experience that captures the spirit of Halloween. The key to a successful board lies in variety, presentation, and thematic consistency. Start by selecting a board or platter that is large enough to accommodate all your ingredients without feeling cramped. A wooden board adds a rustic touch, while a slate board provides a sleek and modern aesthetic. Consider the shape of the board as well; a round board is perfect for a traditional arrangement, while a rectangular board offers more space for creative layouts.
The foundation of any charcuterie board is, of course, the charcuterie itself. Choose a selection of cured meats that offer different textures and flavors. Salami, prosciutto, chorizo, and pepperoni are all excellent choices. Arrange the meats in a visually appealing way, using techniques like rolling, folding, or fanning to create height and dimension. Cheese is another essential component of a Halloween charcuterie board. Select a variety of cheeses that range from mild to sharp, and from soft to hard. Cheddar, brie, mozzarella, gouda, and blue cheese are all popular choices. Cut the cheeses into different shapes and sizes to add visual interest. Consider using Halloween-themed cookie cutters to create cheese shapes like pumpkins, ghosts, or bats. This is where those Keewah Small Halloween Cookie Cutters can shine in a non-cookie context! The contrast between the savory meats and cheeses creates a balanced and satisfying flavor profile.
To complement the meats and cheeses, add a selection of crackers, bread, and other accompaniments. Crackers offer a crunchy texture, while bread provides a softer alternative. Choose a variety of crackers, such as plain crackers, flavored crackers, and crackers with seeds or herbs. Cut the bread into slices or cubes for easy dipping. Add some dips or spreads, such as hummus, guacamole, or olive tapenade, to add extra flavor and moisture. Fruit is another great addition to a Halloween charcuterie board. Grapes, berries, apples, and pears offer a sweet and refreshing contrast to the savory elements. Arrange the fruit in clusters or rows to create visual appeal. Consider using Halloween-themed colors like orange, black, and purple to enhance the thematic consistency. Finally, add some decorative elements to complete the Halloween theme. Use small bowls or containers to hold nuts, olives, or candies. Add some edible decorations, such as candy eyes, spider candies, or gummy worms. Consider using Halloween-themed napkins, plates, and utensils to further enhance the overall aesthetic. Don’t forget the “wow” factor! Add something unexpected, like a small cauldron filled with a spooky dip or a miniature graveyard made of cookies. These details are what will make your Halloween charcuterie board truly unforgettable. Many look for these Halloween inspired meat and cheese boards for unique entertaining at parties.
Spooky Ingredients for Your Halloween Themed Charcuterie Board
The magic of a Halloween charcuterie board, or even a Halloween themed snack platter, lies in the careful selection of ingredients that evoke the spooky spirit. Think beyond the standard cheese and crackers and embrace the opportunity to get creative with thematic flavors and colors. Black olives arranged to resemble spiders, mozzarella balls transformed into ghosts with peppercorn eyes, and orange cheddar cut into pumpkin shapes are all easy ways to infuse Halloween flair into your board. Consider incorporating seasonal fruits and vegetables like cranberries, pomegranate seeds, and butternut squash. Roasted butternut squash cubes can add a touch of sweetness and a vibrant orange hue, while cranberries and pomegranate seeds provide pops of color and tartness. A small bowl of pumpkin seeds makes a crunchy and thematic addition.
Candy is, of course, a must-have for any Halloween-themed spread. Arrange small bowls of candy corn, gummy worms, and chocolate eyeballs around the board. Get creative with the presentation; drape gummy worms over the edges of the board to resemble snakes or arrange candy corn in a gradient pattern. Incorporate some savory snacks with a spooky twist. Pretzel sticks dipped in melted white chocolate and decorated with edible eyeballs can resemble monster fingers. Or, try making “witch’s fingers” by wrapping breadsticks with prosciutto and adding an almond fingernail. These playful details will delight your guests and add a touch of whimsy to your board.
Don’t forget the dips! A vibrant green guacamole can be transformed into a “swamp dip” with a few strategically placed gummy worms or plastic spiders. Or, try making a black bean dip and topping it with a sour cream spiderweb. These thematic dips will add flavor and visual interest to your board. Ultimately, the key to selecting spooky ingredients is to use your imagination and have fun! Think about the colors, flavors, and textures that evoke the spirit of Halloween and incorporate them into your board. With a little creativity, you can create a Halloween charcuterie board that is both delicious and visually stunning. Keep in mind dietary restrictions or allergies of guests before choosing elements for the board. Also, planning out the arrangement before getting started helps streamline the process and allows for creative visualization.
| Feature | Keewah Small Halloween Cookie Cutters | Halloween Charcuterie Board |
|---|---|---|
| Purpose | Creating small, Halloween-themed cookies | Creating a visually appealing and thematic snack spread |
| Materials | Usually stainless steel | Various cheeses, meats, fruits, vegetables, crackers, candies, and decorations |
| Pros |
|
|
| Cons |
|
|
FAQ
What are the essential elements of a good Halloween charcuterie board?
A well-crafted Halloween charcuterie board should contain a balanced combination of savory and sweet elements, presented in a visually appealing way that captures the spirit of the holiday. Essential elements include a variety of cheeses (soft, hard, mild, and sharp), cured meats (salami, prosciutto, chorizo), crackers and bread for dipping, seasonal fruits and vegetables (grapes, berries, pumpkins), and sweet treats (candy corn, gummy worms, chocolate eyeballs). Don’t forget dips like guacamole or hummus, and decorative elements such as candy eyes or plastic spiders. The key is to create a diverse selection of flavors and textures, arranged artfully on the board. Consider using different heights and shapes to add visual interest. Furthermore, make sure to choose a board that is appropriately sized for the amount of food you plan to include; overcrowding can make the board look messy and unappetizing.
How can I make my Halloween charcuterie board more visually appealing?
Visual appeal is paramount when creating a Halloween charcuterie board. Start by choosing a board that complements your theme, such as a dark wooden board for a rustic feel or a slate board for a modern look. Arrange the ingredients in a way that is both aesthetically pleasing and practical. Use different heights and shapes to create visual interest; roll meats into cones, fan out crackers, and stack cheeses in varying sizes. Incorporate Halloween-themed colors like orange, black, and purple to enhance the thematic consistency. Use cookie cutters to create cheese or fruit shapes like pumpkins, ghosts, or bats. Add decorative elements such as candy eyes, spider candies, or plastic spiders to further enhance the Halloween theme. Consider using small bowls or containers to hold nuts, olives, or candies. Ultimately, the goal is to create a board that is both delicious and visually stunning, capturing the spooky spirit of Halloween.
Are there any allergy-friendly alternatives for a Halloween charcuterie board?
Yes, creating an allergy-friendly Halloween charcuterie board is entirely possible with a few substitutions. For those with gluten allergies, offer gluten-free crackers, rice cakes, or vegetables like cucumber slices for dipping. For dairy allergies, include dairy-free cheeses made from nuts or soy, and offer dairy-free dips like hummus or guacamole. Nut allergies require careful consideration; replace nuts with seeds like pumpkin seeds or sunflower seeds, and avoid any products that may have been processed in a facility that also handles nuts. Always read labels carefully to ensure that ingredients are safe for those with allergies. For those with soy allergies, be mindful that soy is in many processed foods so scrutinizing labels is key. A fantastic Halloween charcuterie board can still be created while being mindful of guest’s allergies and dietary constraints.
What are some unique and unexpected items I can add to my Halloween charcuterie board?
To make your Halloween charcuterie board truly stand out, consider adding some unique and unexpected items. A small cauldron filled with a spooky dip, such as a black bean dip or a spinach artichoke dip, adds a touch of whimsy. Miniature graveyard made of cookies, complete with edible tombstones and gummy worms, is another creative addition. Consider including some themed snacks like “monster eye” olives or “witch finger” breadsticks. Adding a small bowl of edible glitter adds a touch of sparkle and glamour. These unexpected elements will surprise and delight your guests, making your Halloween charcuterie board a truly memorable experience. Another fun addition would be creating a small candy “potion” that guests can stir with a small edible spoon.
How far in advance can I prepare a Halloween charcuterie board?
The preparation time for a Halloween charcuterie board depends on the complexity of the board and the ingredients you’re using. Generally, you can prepare most of the components in advance, but it’s best to assemble the board as close to serving time as possible to maintain freshness. Cheeses and cured meats can be sliced and stored in airtight containers in the refrigerator for up to 24 hours. Dips can also be made a day in advance and stored in the refrigerator. Fruits and vegetables should be cut and stored in airtight containers to prevent browning. Assemble the board no more than a few hours before serving, and keep it refrigerated until ready to serve. This will ensure that the ingredients are fresh and visually appealing when your guests arrive. Additionally, prepping individual elements such as cutting cheese and meats, allows for quicker and easier assembly right before the event.
How do I prevent my Halloween charcuterie board from drying out?
Preventing your Halloween charcuterie board from drying out is crucial for maintaining its freshness and appeal. To keep cheeses from drying out, wrap them tightly in plastic wrap or beeswax wrap. For meats, consider placing a damp paper towel over them and covering with plastic wrap. Arrange fruits and vegetables in clusters to help retain moisture. Consider using a light mist of water on fruits and vegetables just before serving to keep them looking fresh. Avoid assembling the board too far in advance, as this can increase the risk of drying out. If you need to assemble the board in advance, cover it tightly with plastic wrap and store it in the refrigerator until ready to serve. A strategically placed decorative edible flower on top can further enhance the aesthetics while also helping to keep items covered. The proper selection of cheese, such as soft cheese, can also add moisture to the board.
What are some tips for transporting a Halloween charcuterie board?
What can I do for easy transportation?
Transporting a Halloween charcuterie board can be tricky, but with a few precautions, you can ensure that it arrives safely and intact. First, choose a board with a raised edge or lip to prevent items from sliding off. Secure loose items, such as nuts or candies, in small bowls or containers. Cover the board tightly with plastic wrap to hold everything in place. Consider using a large platter with a lid or a cardboard box to protect the board during transport. Place the board on a flat surface in your vehicle, such as the floor or the trunk, to prevent it from tipping over. Drive carefully and avoid sudden stops or turns. If possible, have someone hold the board during transport to provide extra stability. For long-distance travel, consider refrigerating the board before transport to keep the ingredients fresh. Assembling the charcuterie board on location avoids the hassles of transportation altogether.
Price: $3.99
(as of Sep 11, 2025 13:05:15 UTC – Details)


