
30 Sheets Flower Nail Art Stickers Review nails design Buying Guide – Oemiu
30 Sheets Flower Nail Art Stickers: A Blossoming Guide to Beautiful Nails
Let’s face it, achieving salon-quality nail art at home can feel like navigating a thorny rose bush. Complex techniques, steady hands, and an arsenal of specialized tools are often required. But what if there was a simpler, quicker, and more affordable way to adorn your nails with intricate designs? Enter the world of nail art stickers, and in particular, the popular 30 Sheets Flower Nail Art Stickers set. This comprehensive guide dives deep into the world of these floral decals, offering a detailed review, practical tips, and everything you need to know to create stunning nails design effortlessly.
Unboxing the Beauty: What to Expect from the 30 Sheets Set
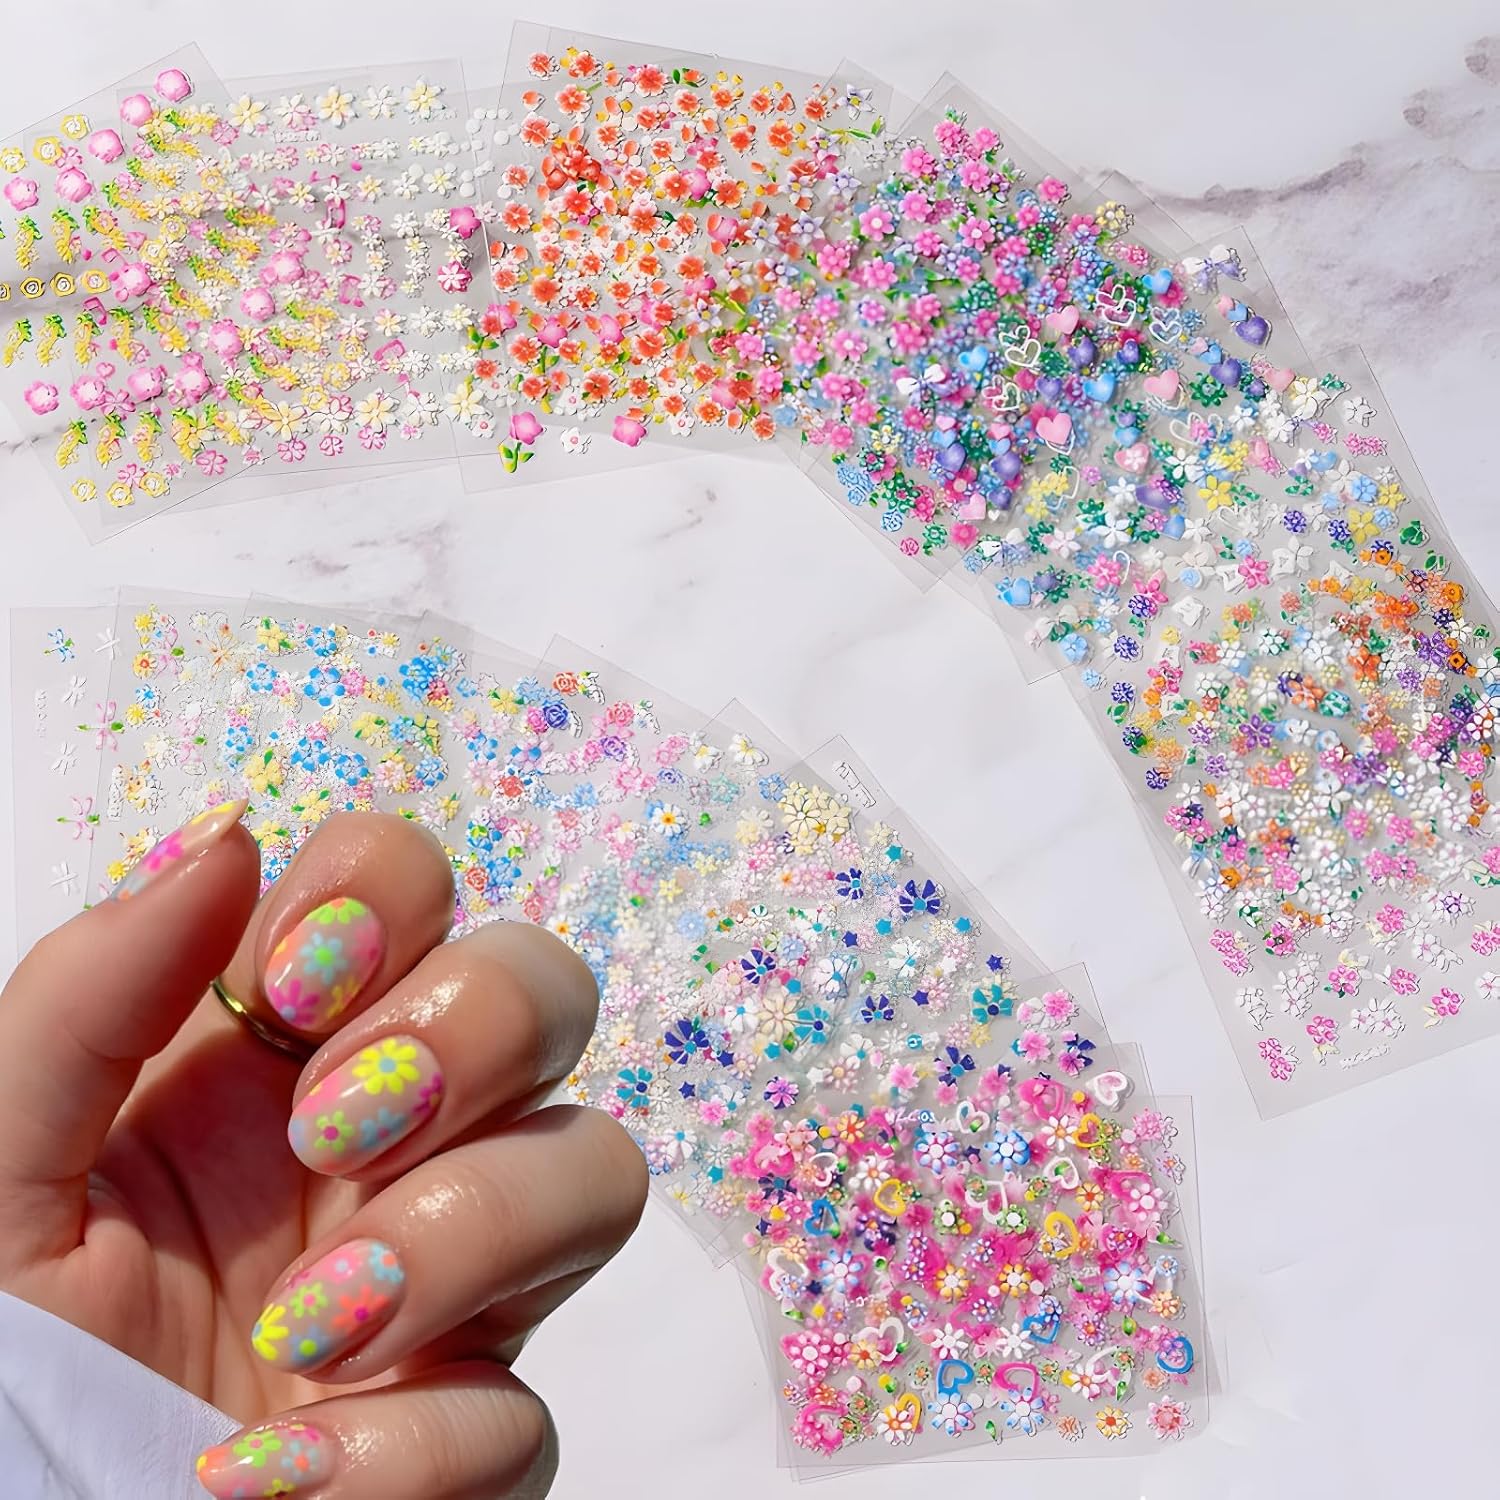
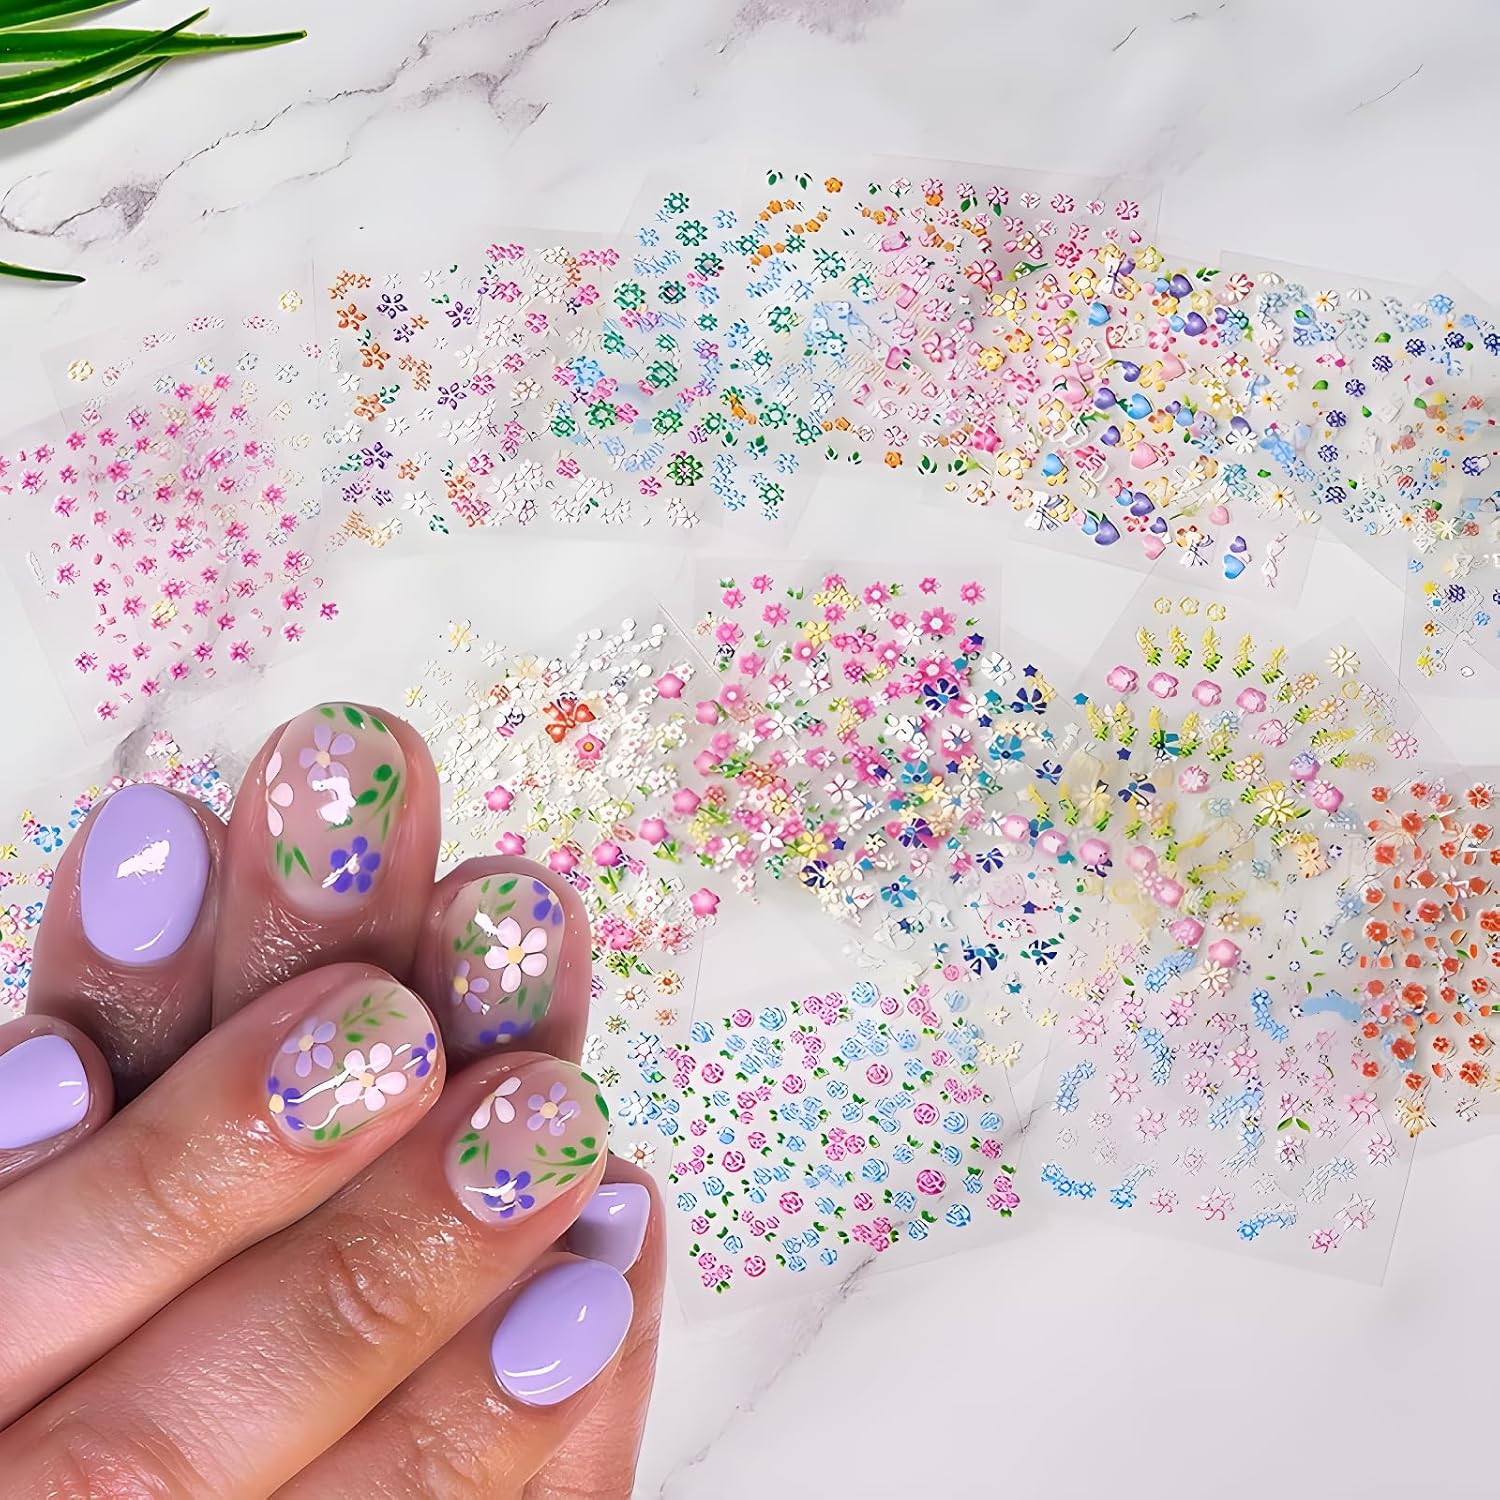
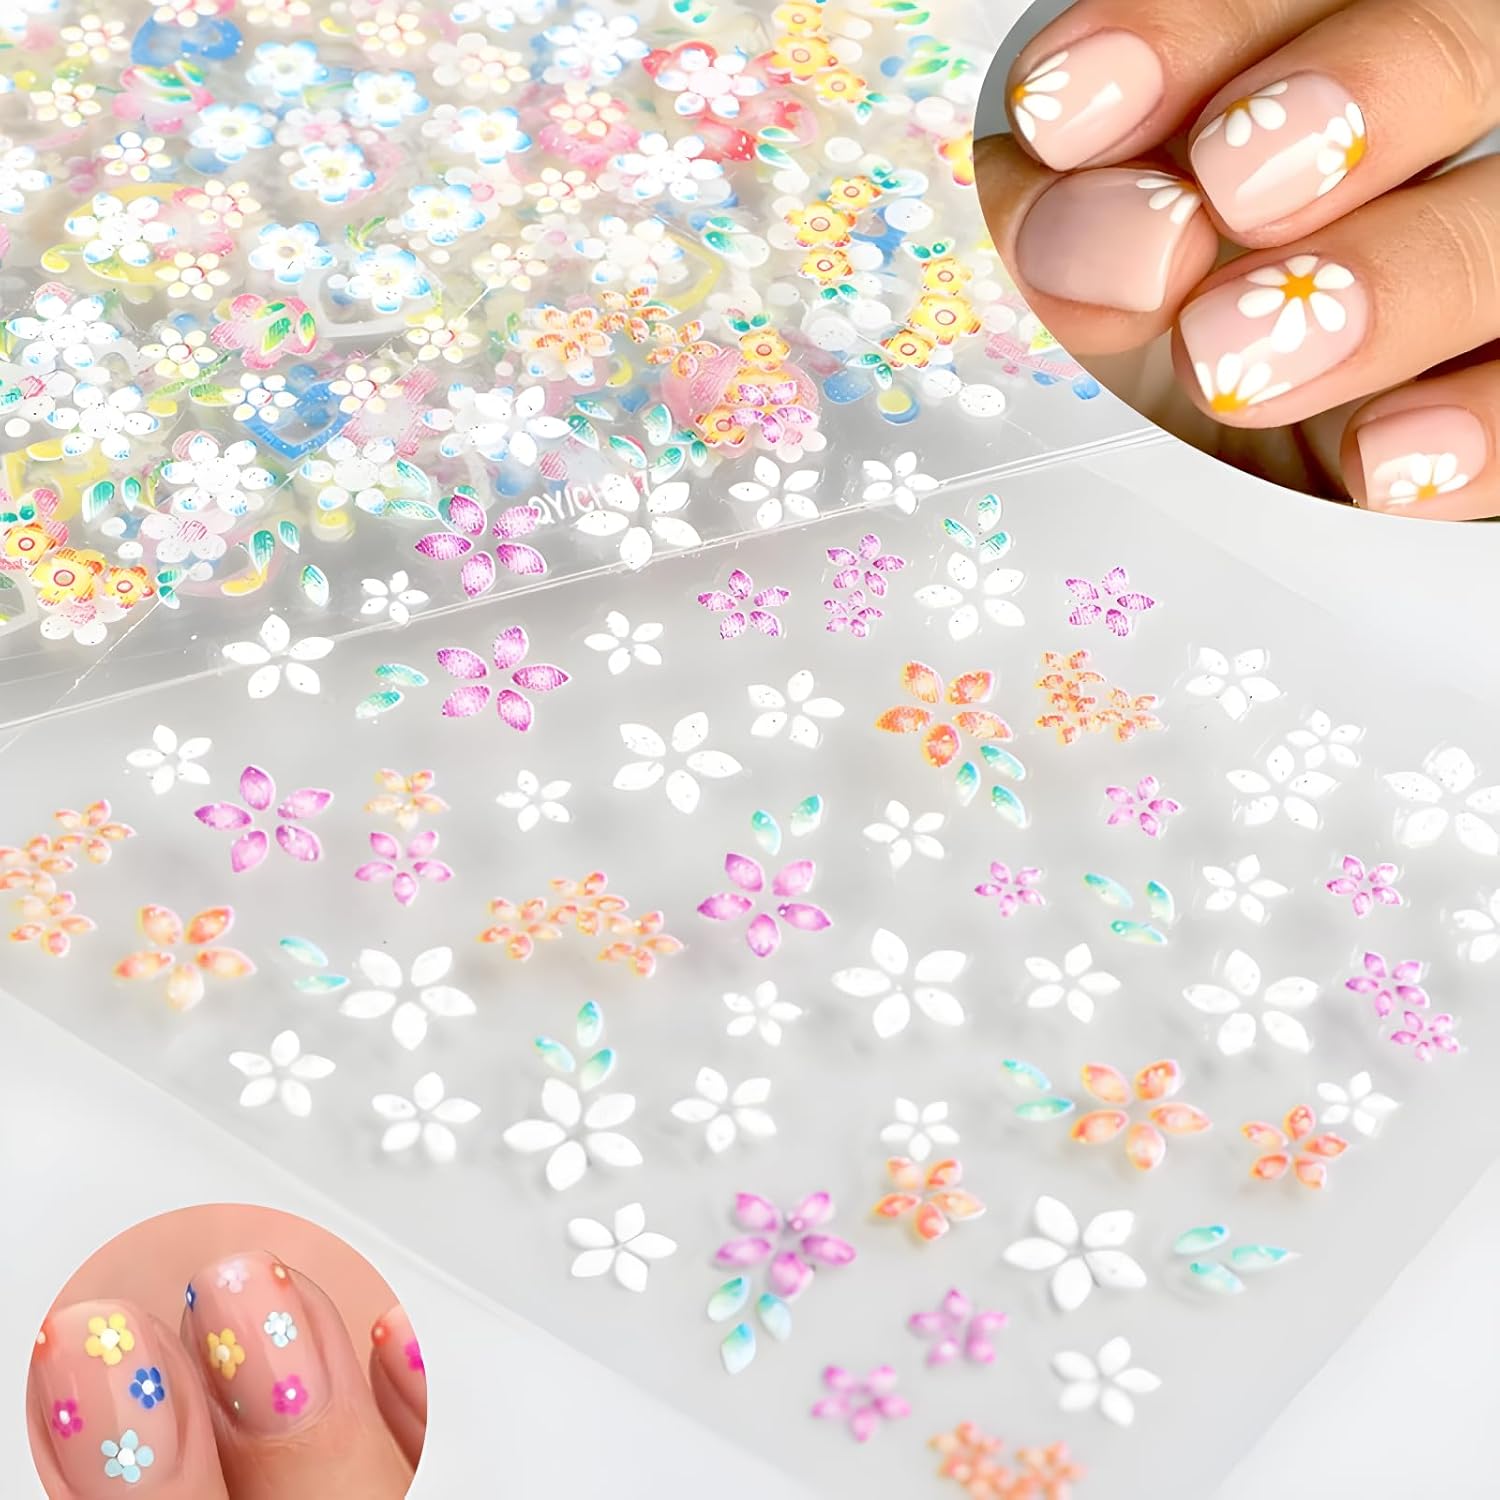
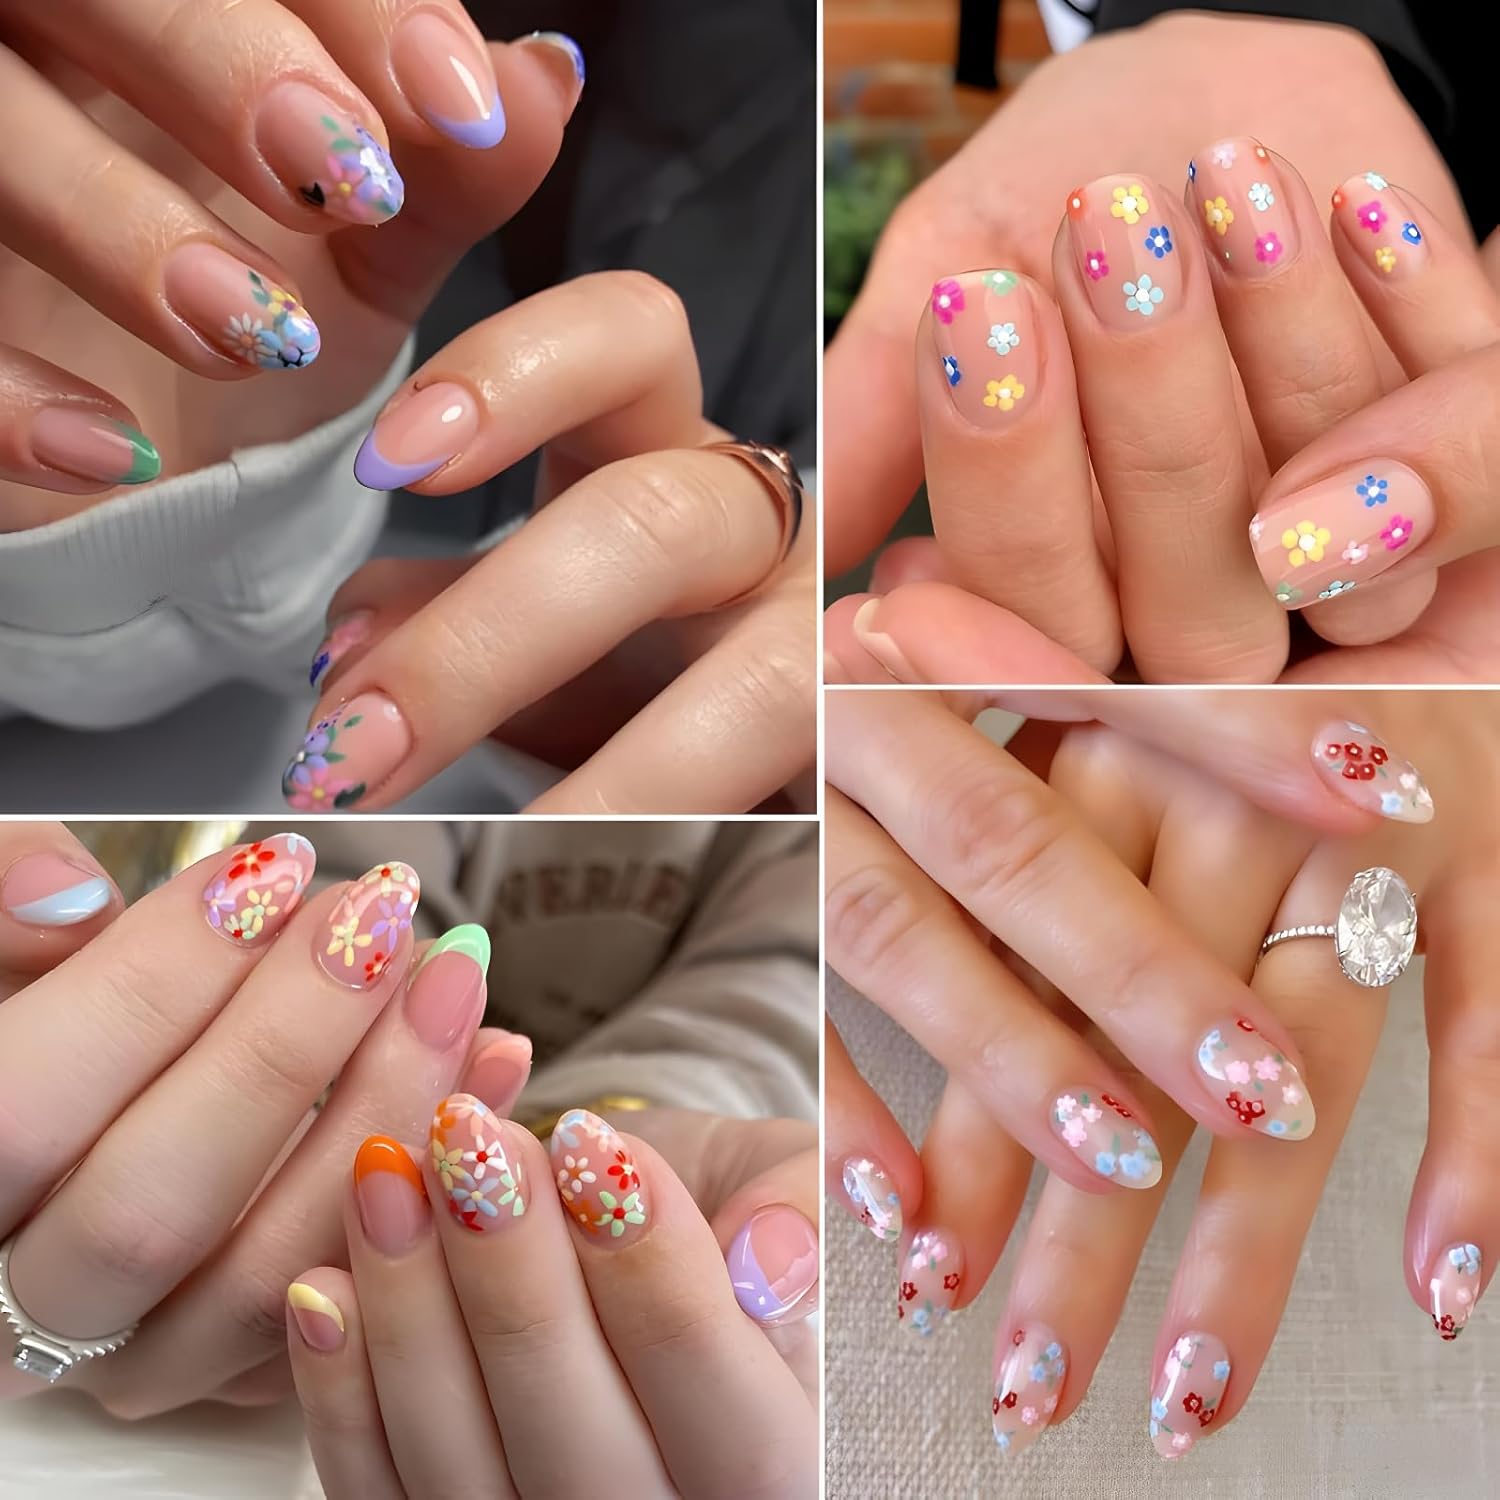
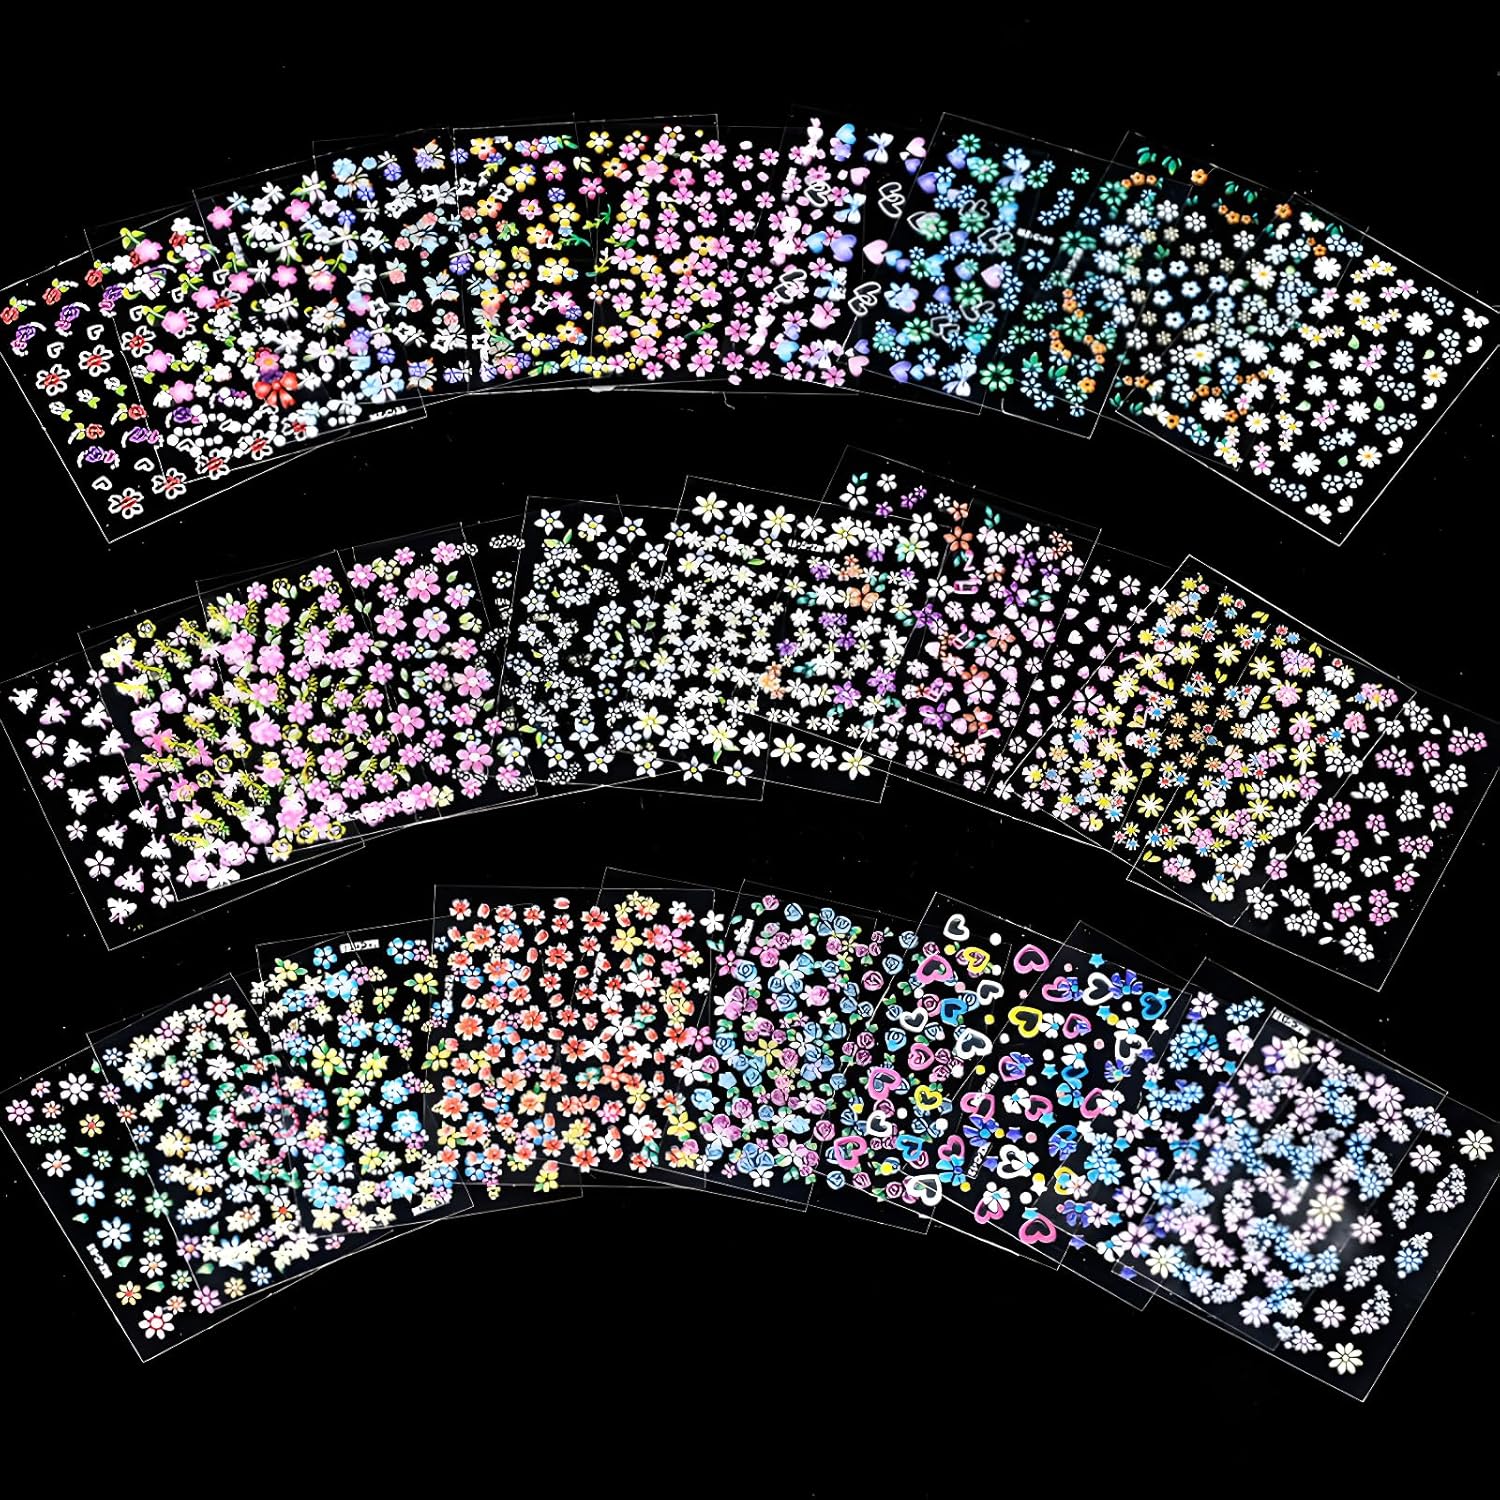
The 30 Sheets Flower Nail Art Stickers set promises a vibrant and diverse collection of floral designs, catering to various tastes and preferences. The sheer volume is impressive, providing enough options to experiment with different looks for weeks, even months. But beyond the quantity, the quality and variety are what truly matter. These stickers typically feature a wide array of floral motifs, ranging from delicate cherry blossoms and romantic roses to vibrant sunflowers and exotic tropical blooms. You’ll often find a mix of sizes and shapes, allowing you to customize your nails design to fit different nail lengths and styles. Some sets even include additional elements like butterflies, leaves, and geometric patterns to further enhance your creative possibilities. The stickers are usually printed on a thin, flexible adhesive material, designed to conform seamlessly to the curve of your nail. Many manufacturers also incorporate a protective topcoat to prevent smudging and ensure long-lasting wear. Examining the sheets closely, you should expect to see clear, crisp printing and vibrant colors that pop against your chosen nail polish base. A poorly printed sticker will have blurry edges and faded colors, ultimately detracting from the overall aesthetic. It’s also crucial that the adhesive is strong enough to adhere properly to the nail surface but gentle enough to be removed without damaging the underlying nail. Therefore, it’s important to check user reviews to understand real-world experiences with the product’s durability and ease of application.
However, with such a large assortment, there can be inconsistencies. Some sheets might contain designs that are less appealing than others, depending on your personal style. The adhesive quality can also vary slightly between different sheets within the same set. Overall, with proper application, these stickers provide a convenient and affordable way to elevate your manicure and achieve a professional-looking finish, and allow you to experiment with many pretty nails designs without committing to time-consuming techniques.
Application Secrets: From Novice to Nail Art Pro
Applying nail art stickers might seem straightforward, but mastering the technique is crucial for achieving a flawless and long-lasting result. The process begins with proper nail preparation. Start by cleaning your nails thoroughly with a nail polish remover to remove any existing polish or oils. Gently push back your cuticles and buff the nail surface lightly to create a smooth, even base. Next, apply a base coat to protect your natural nails and promote better adhesion of the sticker. Once the base coat is completely dry, apply your chosen nail polish color. For floral designs, neutral or pastel shades often work best as they provide a complementary backdrop without overshadowing the intricate details of the stickers. Allow the nail polish to dry completely before proceeding to the next step. This is critical, as any remaining tackiness can cause the sticker to wrinkle or tear. Now comes the fun part: selecting and applying the sticker. Carefully peel the chosen sticker from the sheet using tweezers or a small applicator tool. Avoid touching the adhesive side with your fingers, as this can transfer oils and reduce its stickiness. Position the sticker precisely on your nail and gently press it down, starting from the center and working outwards to eliminate any air bubbles. Use a silicone tool, or even a gloved finger, to smooth the edges and ensure the sticker adheres firmly to the nail surface. If the sticker is too large, you can trim it carefully with small scissors or nail clippers. Once the sticker is securely in place, apply a generous layer of topcoat to seal it in and protect it from chipping or peeling. Be sure to wrap the topcoat around the edges of the nail to create a seamless finish. Allow the topcoat to dry completely, and you’re ready to flaunt your stunning nails design.
Here are some helpful tips for troubleshooting common issues: If the sticker wrinkles or bubbles, gently peel it back and reapply it, ensuring that you smooth out any imperfections. If the sticker doesn’t adhere properly, try applying a thin layer of nail glue to the back of the sticker before applying it to your nail. If the sticker starts to peel off after a few days, reapply a layer of topcoat to re-seal it. With practice and patience, you’ll become a pro at applying nail art stickers and creating beautiful, salon-worthy manicures in the comfort of your own home.
Navigating the Floral Galaxy: Choosing the Right Stickers for You
With countless options available, selecting the right floral nail art stickers can feel overwhelming. Several factors should guide your decision, ensuring you choose a set that aligns with your personal style, skill level, and intended use. First, consider the design aesthetic. Do you prefer delicate and romantic floral patterns, bold and vibrant tropical blooms, or minimalist and modern botanical motifs? Look for sets that offer a variety of designs within your preferred style, providing you with ample options to experiment with different looks. The size and shape of the stickers are also important considerations. If you have short nails, opt for smaller, more compact designs that won’t overwhelm your nail surface. If you have longer nails, you can experiment with larger, more intricate designs. Pay attention to the color palette of the stickers as well. Choose colors that complement your skin tone and your favorite nail polish shades. Neutral or pastel colors tend to be more versatile, while bolder, more vibrant colors can add a pop of personality to your manicure. Beyond aesthetics, consider the quality and durability of the stickers. Read online reviews and look for sets that are made from high-quality materials and feature a strong, long-lasting adhesive. The stickers should be easy to apply and remove without damaging your natural nails. For beginners, it’s often best to start with simpler designs that are easier to apply and less prone to errors. As you gain experience, you can gradually experiment with more complex and intricate designs. Many nail art sticker sets also come with additional embellishments, such as glitter, rhinestones, or metallic accents, which can add a touch of glamour and sophistication to your manicure. Ultimately, the best way to choose the right floral nail art stickers is to experiment and have fun. Try different sets and designs to discover what works best for you and your personal style. With a little creativity and practice, you can transform your nails into miniature works of art.
The set you choose also depends on your budget. High-end stickers may have better adhesion, color vibrancy and overall quality but do come with a higher price tag. Finding the perfect balance between cost and quality will ensure that you can create stunning short nails design looks without breaking the bank.
Comparative Analysis: Popular Floral Nail Art Sticker Sets
To give you a clearer picture of what’s available, let’s compare a few popular floral nail art sticker sets based on key features: design variety, ease of use, durability, and price.
| Set Name | Design Variety | Ease of Use | Durability | Price Range |
|---|---|---|---|---|
| 30 Sheets Flower Nail Art Stickers Set (Generic Brand) | High (30 sheets of various floral designs) | Easy (Peel and stick) | Moderate (3-5 days with topcoat) | Low ($5 – $10) |
| Decalcomania Flower Nail Art Stickers | Moderate (Focus on specific floral types) | Easy (Water transfer) | Good (5-7 days with topcoat) | Medium ($10 – $15) |
| CalaDanza Self-Adhesive Nail Decals | Low (Small number of decals with intricate designs) | Moderate (Requires careful placement) | Excellent (7+ days with topcoat) | High ($15 – $25) |
As you can see, the 30 Sheets Flower Nail Art Stickers Set offers the most design variety at an affordable price. It’s a great option for beginners who want to experiment with different floral looks without committing to a specific style. Decalcomania Flower Nail Art Stickers provides good durability and focuses on specific floral types. CalaDanza stickers boast excellent durability and intricate designs, but come at a higher price point. Ultimately, the best set for you will depend on your individual needs and preferences.
Beyond the Basics: Creative Nail Art Ideas
Floral nail art stickers offer endless possibilities for creative expression. Don’t be afraid to experiment with different combinations and techniques to create unique and personalized looks. Here are a few ideas to get you started:
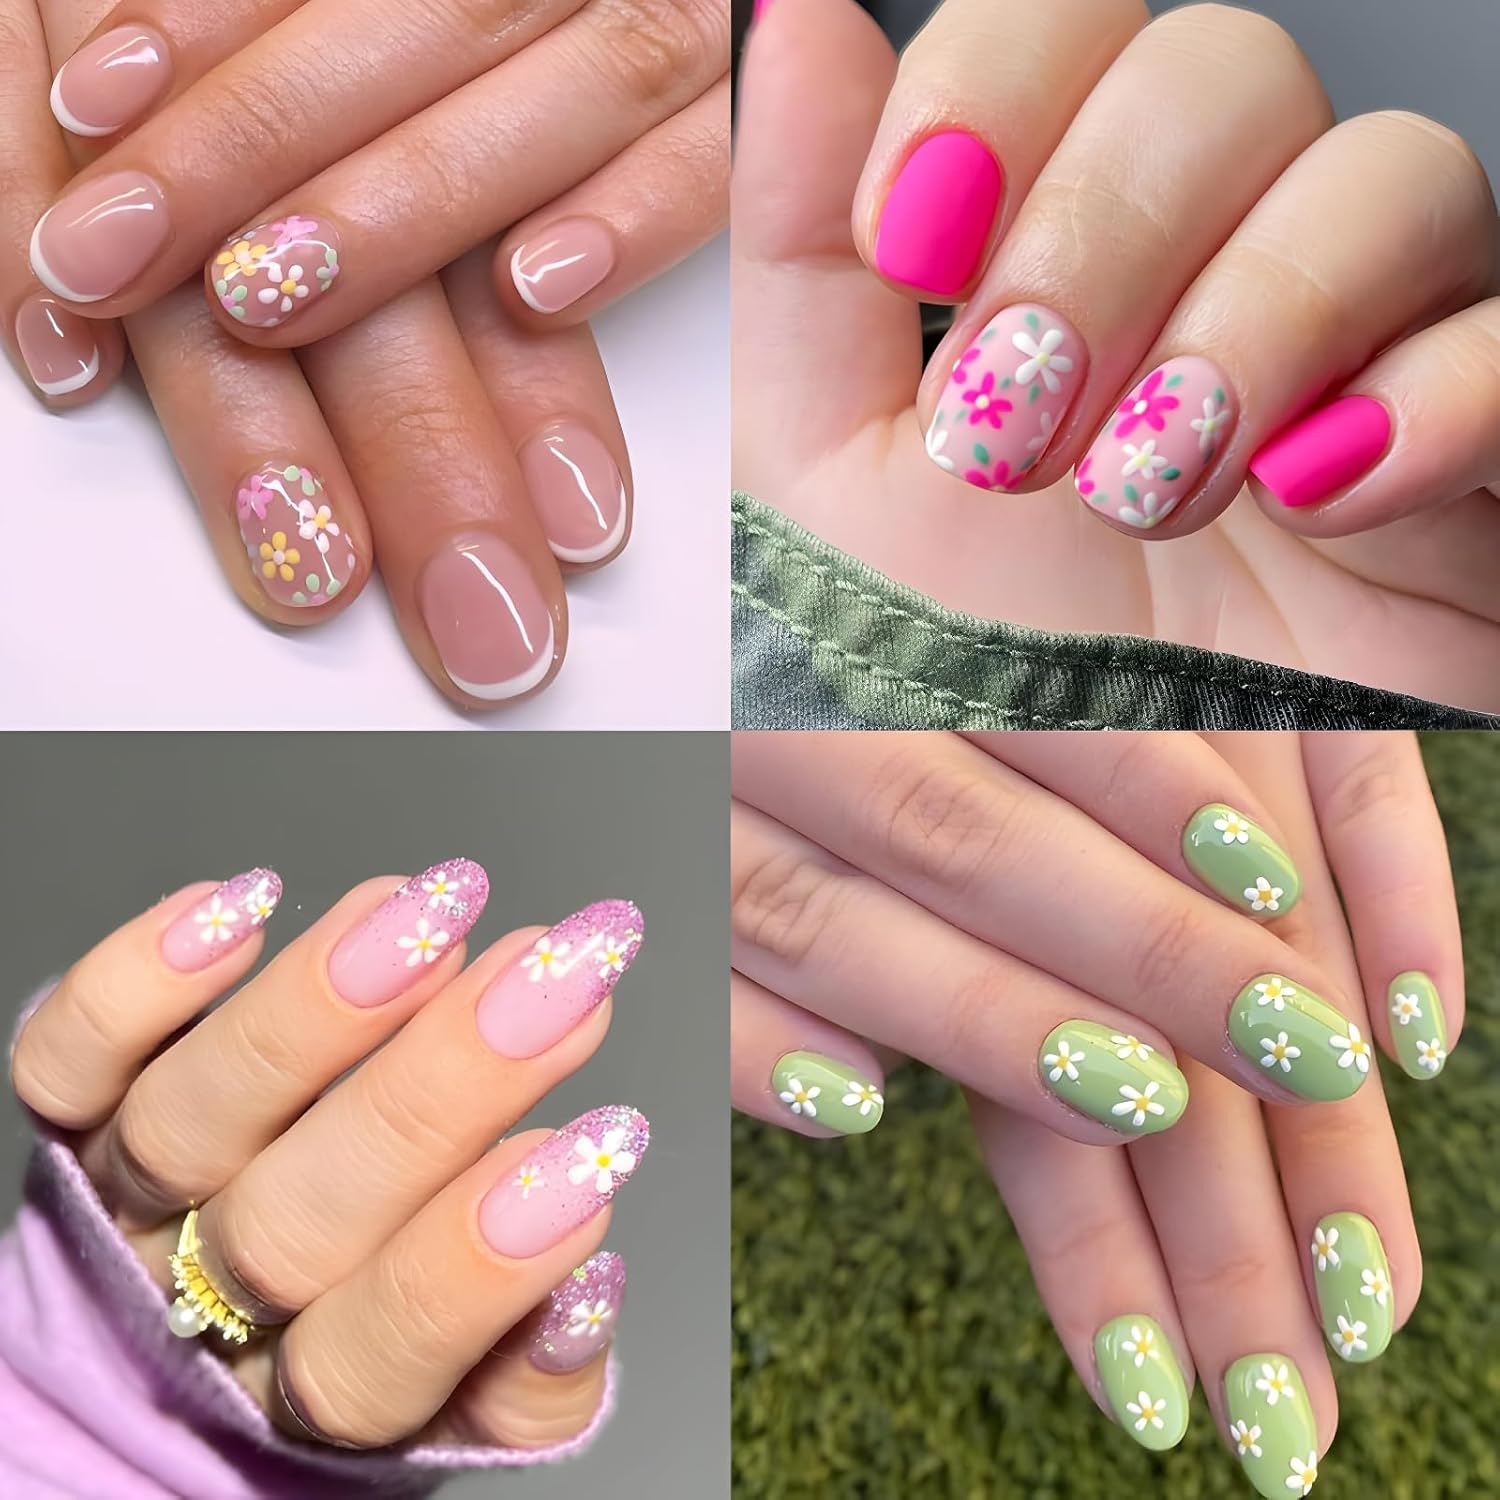
* **Accent Nail:** Apply a floral sticker to just one nail on each hand, creating a subtle yet stylish accent.
* **French Manicure with a Floral Twist:** Add a floral sticker along the tip of your nail for a modern take on the classic French manicure. This is a simple yet chic way to incorporate floral designs into your everyday look. It’s also a fantastic method for creating elegant prom nails designs.
* **Ombre Effect:** Create an ombre effect with two or more nail polish colors and then add floral stickers on top for a stunning layered look.
* **Mix and Match:** Combine different floral stickers on each nail for a bold and eclectic design.
* **Negative Space:** Leave some areas of your nail bare and apply floral stickers strategically to create a negative space design.
* **Geometric Patterns:** Combine floral stickers with geometric shapes or lines for a modern and artistic look.
* **Glitter Accents:** Add a touch of glitter to your floral nail art for a glamorous and eye-catching effect.
* **Matte Finish:** Use a matte topcoat to create a unique and sophisticated finish that contrasts beautifully with the glossy finish of the stickers.
Remember, the key is to have fun and experiment with different ideas until you find a style that you love. Nail art is all about self-expression, so let your creativity shine!
Remember to also consider the occasion. For example, pastel flowers on a nude base are great for everyday wear, whereas bright blooms on a dark base would make a statement for a night out. Also think about your personal style. If you tend to go for a minimalist look, perhaps smaller, daintier flowers would work best. If you embrace bold colours and designs, then feel free to mix and match larger floral stickers and add glitter or gems!
Maintenance and Removal: Keeping Your Nails Healthy
While nail art stickers are a convenient and temporary way to enhance your manicure, proper maintenance and removal are essential for keeping your nails healthy and strong. The longevity of your nail art will depend on several factors, including the quality of the stickers, the type of topcoat you use, and your daily activities. To prolong the life of your floral nail art, avoid exposing your nails to harsh chemicals, such as cleaning products or solvents. Wear gloves when doing household chores or working with your hands. Reapply a layer of topcoat every few days to seal the stickers and prevent them from chipping or peeling. When it’s time to remove the stickers, avoid picking or peeling them off, as this can damage your natural nails. Instead, soak your nails in warm water for a few minutes to loosen the adhesive. Gently peel the stickers off with tweezers or a small applicator tool. If any residue remains, use a nail polish remover to dissolve it. After removing the stickers, moisturize your nails and cuticles with a nourishing oil or cream. This will help to rehydrate your nails and prevent them from becoming dry and brittle. Give your nails a break between manicures to allow them to breathe and recover. Consider applying a nail strengthener or cuticle oil regularly to promote healthy nail growth. By following these simple tips, you can enjoy beautiful nail art without compromising the health and integrity of your natural nails. A little extra care will go a long way in keeping your nails looking their best.
Furthermore, it’s important to choose a nail polish remover that is acetone-free, as acetone can dry out and weaken your nails. You can also purchase specialty nail art remover solutions designed to gently dissolve the adhesive without causing damage. With the right techniques and products, you can ensure that your nail art journey is a beautiful and healthy one, leaving you with stunning floral nails designs that you’re proud to show off.
FAQ: Your Questions Answered
Are nail art stickers safe for my nails?
Nail art stickers are generally considered safe for your nails, provided that they are used correctly and removed gently. However, there are a few potential risks to be aware of. The adhesive used in some stickers can be irritating to sensitive skin, so it’s important to choose stickers that are made from hypoallergenic materials. Prolonged use of nail art stickers can also prevent your nails from breathing properly, which can lead to dryness and brittleness. To minimize these risks, it’s best to give your nails a break between manicures and to moisturize them regularly. Avoid picking or peeling off the stickers, as this can damage the underlying nail surface. When removing the stickers, soak your nails in warm water or use a nail polish remover to gently dissolve the adhesive. With proper care and attention, you can enjoy beautiful nail art without compromising the health and integrity of your natural nails.
How long do nail art stickers typically last?
The lifespan of nail art stickers depends on several factors, including the quality of the stickers, the type of topcoat you use, and your daily activities. Generally speaking, you can expect nail art stickers to last anywhere from a few days to a week or more. To maximize their longevity, apply a generous layer of topcoat to seal the stickers and protect them from chipping or peeling. Avoid exposing your nails to harsh chemicals or excessive water, as this can weaken the adhesive. If a sticker starts to peel off, reapply a layer of topcoat to re-seal it. With proper care and maintenance, you can enjoy your floral nail art for a longer period. It’s also worth noting that some types of stickers, such as gel nail stickers, tend to last longer than traditional adhesive stickers.
What are the best types of topcoats to use with nail art stickers?
The best topcoats for nail art stickers are those that are designed to be durable, chip-resistant, and fast-drying. Look for topcoats that are specifically formulated to protect nail art and prevent smudging. Gel topcoats are a popular choice, as they provide a glossy, long-lasting finish. However, they require a UV or LED lamp to cure properly. Traditional nail polish topcoats are also a good option, but they may not be as durable as gel topcoats. When applying the topcoat, be sure to wrap it around the edges of the nail to create a seamless seal and prevent the stickers from lifting. Allow the topcoat to dry completely before using your hands. Consider using a quick-dry topcoat to speed up the drying process.
Can I apply nail art stickers over gel polish?
Yes, you can definitely apply nail art stickers over gel polish. In fact, it’s a great way to add some extra flair to your gel manicure. The key is to make sure that the gel polish is completely dry and cured before applying the stickers. Once the gel polish is dry, lightly buff the surface with a fine-grit buffer to create a slightly textured surface for the stickers to adhere to. Then, apply the stickers as you normally would, pressing them down firmly to ensure good adhesion. Finish with a layer of gel topcoat to seal the stickers and protect them from chipping. Cure the topcoat under a UV or LED lamp, and you’re good to go. Applying stickers over gel polish can actually help to prolong the life of your manicure, as the gel polish provides a strong and durable base for the stickers.
Are there any specific tools that I need to apply nail art stickers?
While you can apply nail art stickers with your fingers, using a few specific tools can make the process easier and more precise. Tweezers are essential for picking up and positioning the stickers without touching the adhesive side. A small applicator tool, such as an orange wood stick or a silicone cuticle pusher, can be used to smooth out the stickers and eliminate any air bubbles. Small scissors or nail clippers are helpful for trimming the stickers to fit your nail size. A nail buffer can be used to smooth the nail surface and create a better base for the stickers. A good quality topcoat is essential for sealing the stickers and protecting them from chipping. Having these tools on hand will make applying nail art stickers a breeze and help you achieve professional-looking results.
How do I prevent nail art stickers from peeling off?
Preventing nail art stickers from peeling off requires careful preparation and application. Start by ensuring that your nails are clean, dry, and free of any oils or lotions. Lightly buff the nail surface to create a slightly textured base for the stickers to adhere to. Apply a thin layer of base coat to protect your nails and promote better adhesion. Once the base coat is dry, apply the stickers carefully, pressing them down firmly to eliminate any air bubbles. Pay special attention to the edges of the stickers, as these are the most prone to peeling. Apply a generous layer of topcoat to seal the stickers and protect them from chipping. Be sure to wrap the topcoat around the edges of the nail to create a seamless finish. Avoid exposing your nails to harsh chemicals or excessive water, as this can weaken the adhesive. Reapply a layer of topcoat every few days to maintain the seal. If a sticker starts to peel off, reapply a layer of topcoat or use a small amount of nail glue to re-adhere it.
What should I do if I have an allergic reaction to nail art stickers?
If you experience an allergic reaction to nail art stickers, such as redness, itching, swelling, or blistering around your nails, remove the stickers immediately and wash your hands thoroughly with soap and water. Avoid using any more nail art stickers until your skin has completely healed. Apply a cold compress to the affected area to reduce inflammation. You can also use an over-the-counter antihistamine cream or oral antihistamine to relieve itching and other symptoms. If your symptoms are severe or do not improve after a few days, consult a doctor or dermatologist. Be sure to inform them that you suspect an allergic reaction to nail art stickers. When choosing nail art stickers in the future, look for products that are labeled as hypoallergenic or made from skin-friendly materials. You can also perform a patch test before applying the stickers to your entire nail to check for any allergic reactions.

Price: $6.68 - $7.99
(as of Sep 07, 2025 02:43:54 UTC – Details)


