24Pcs Almond Press on Nails French Tips Review back to school nails Buying Guide – Oemiu
24Pcs Almond Press on Nails French Tips: A Back to School Style Statement
The end of summer signals the beginning of a new chapter: back to school. While notebooks, pens, and backpacks often top the shopping lists, don’t underestimate the power of a polished look to boost confidence and make a positive first impression. For students seeking a quick, stylish, and budget-friendly manicure solution, 24-piece almond press-on nails with French tips offer an appealing option. These nails provide an instant, salon-worthy appearance without the time commitment or expense of traditional manicures. But with countless options available, how do you choose the right set? This comprehensive guide delves into the world of press-on nails, focusing on almond-shaped French tips and providing the insights you need to make an informed decision as you prepare your perfect back to school nails look. We’ll explore the features, benefits, application process, and maintenance tips, as well as addressing common concerns and questions. Whether you’re a seasoned press-on nail enthusiast or a curious newbie, this article will equip you with the knowledge to rock a flawless manicure throughout the school year.
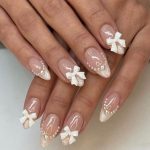
Why Almond-Shaped French Tips are a Back to School Nail Trend
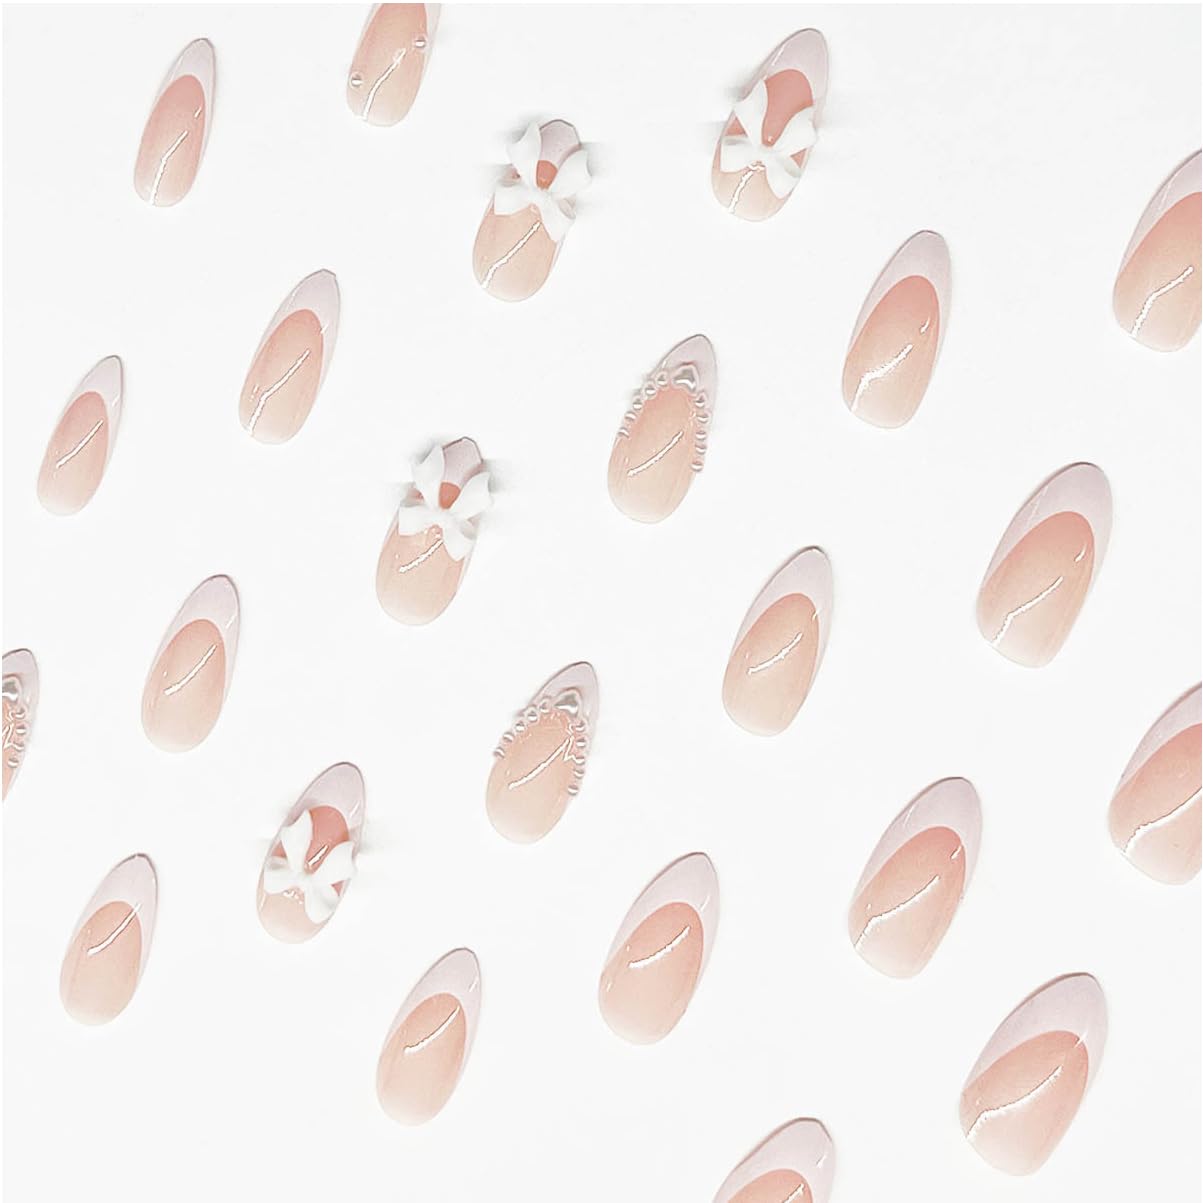
Almond-shaped nails have surged in popularity in recent years, and for good reason. The elongated, tapered shape mimics the elegant curve of an almond, creating a sophisticated and feminine look. This shape is particularly flattering, as it visually lengthens the fingers and makes the hands appear more slender. The classic French tip, with its clean white stripe against a neutral base, adds a touch of timeless elegance that never goes out of style. This combination of almond shape and French tip is a winning formula for back to school nails because it strikes the perfect balance between trendy and professional.
Consider the versatility of this style. It’s chic enough for a school dance or special event, yet understated enough to comply with most school dress codes. The neutral tones complement a wide range of outfits, making it easy to coordinate with your wardrobe. Furthermore, the almond shape is surprisingly practical for everyday activities, offering more durability than sharper, more extreme nail shapes like stilettos or coffin nails. The shorter length often associated with press-on nails further enhances practicality, allowing you to comfortably type, write, and participate in sports or other extracurricular activities.
From a psychological perspective, a well-manicured appearance can have a positive impact on self-esteem and confidence. Starting the school year with a polished look can help students feel more prepared, organized, and ready to tackle academic challenges. Choosing a set of 24pcs almond press on nails provides not just a single manicure, but multiple opportunities to maintain a fresh and stylish look throughout the semester. This is particularly beneficial for students with busy schedules who may not have the time or resources for regular salon appointments. In essence, almond-shaped French tips offer a practical, stylish, and confidence-boosting solution for back to school nails.
Evaluating 24Pcs Almond Press On Nails: Features to Consider
When selecting a set of 24pcs almond press on nails with French tips, several key features warrant careful consideration. These factors directly impact the overall look, durability, and comfort of the nails.
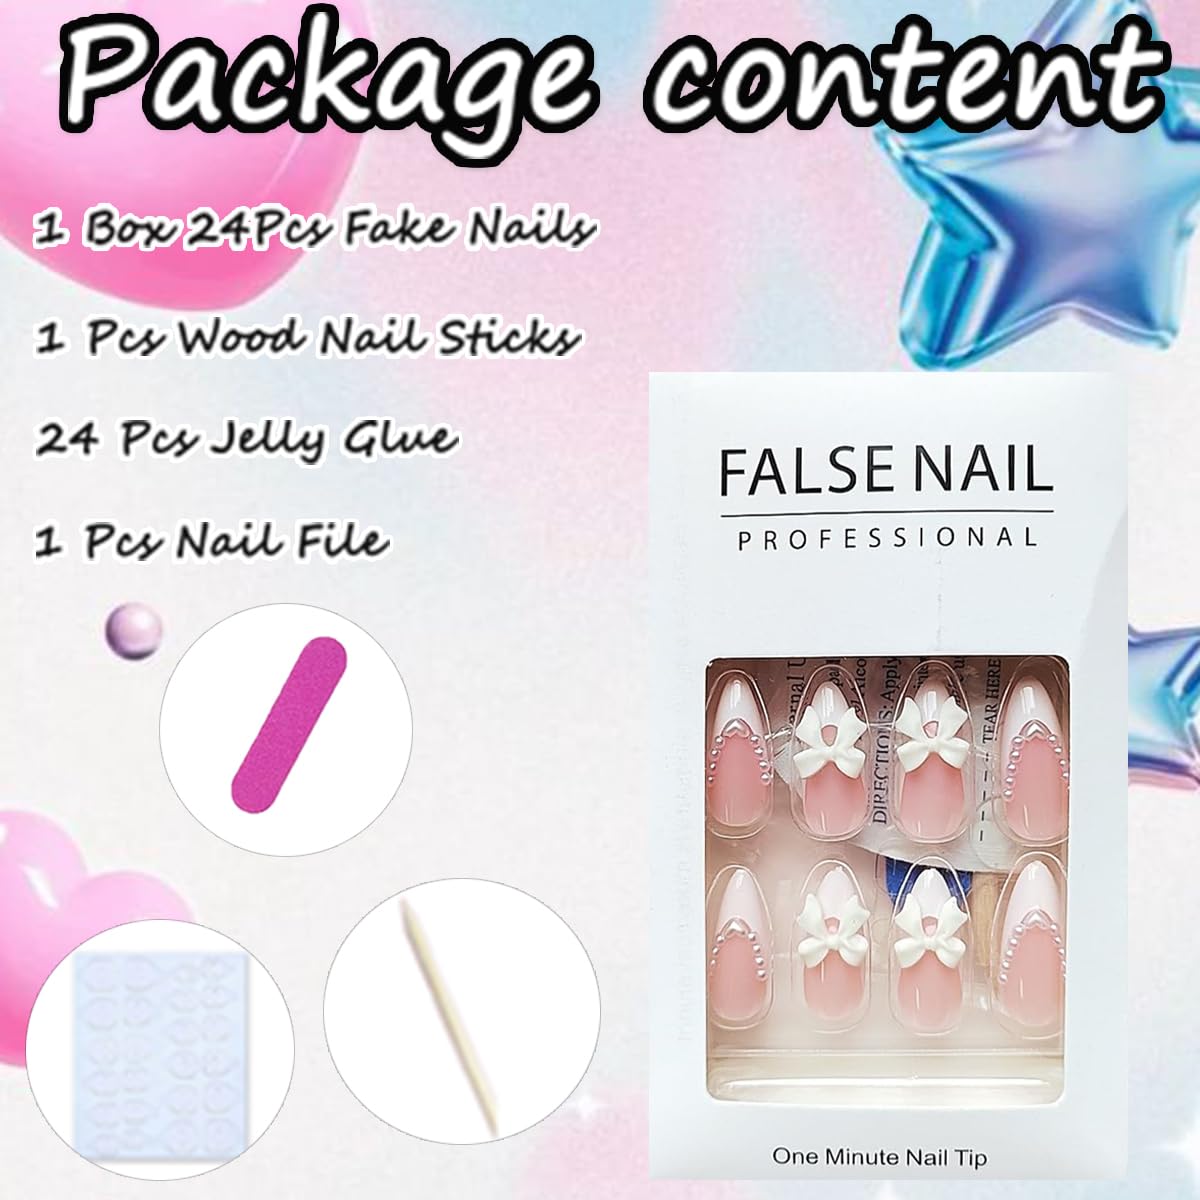
* **Material:** The material from which the nails are made greatly affects their appearance and longevity. ABS plastic is a common and affordable option, known for its durability and flexibility. Gel nails, while more expensive, offer a higher-gloss finish and a more natural look. Acrylic nails are another option known for their strength and resilience, but they can also be thicker and less comfortable. Consider your budget and desired level of quality when choosing a material.
* **Adhesive:** The adhesive used to apply the nails is crucial for ensuring a secure and long-lasting hold. Most press-on nail sets come with adhesive tabs or glue. Adhesive tabs are generally easier to apply and remove, making them ideal for short-term wear. Glue provides a stronger hold but requires more skill to apply and can be more damaging to the natural nails if not removed properly. Look for adhesives that are non-toxic and formulated to minimize damage to the natural nail bed.
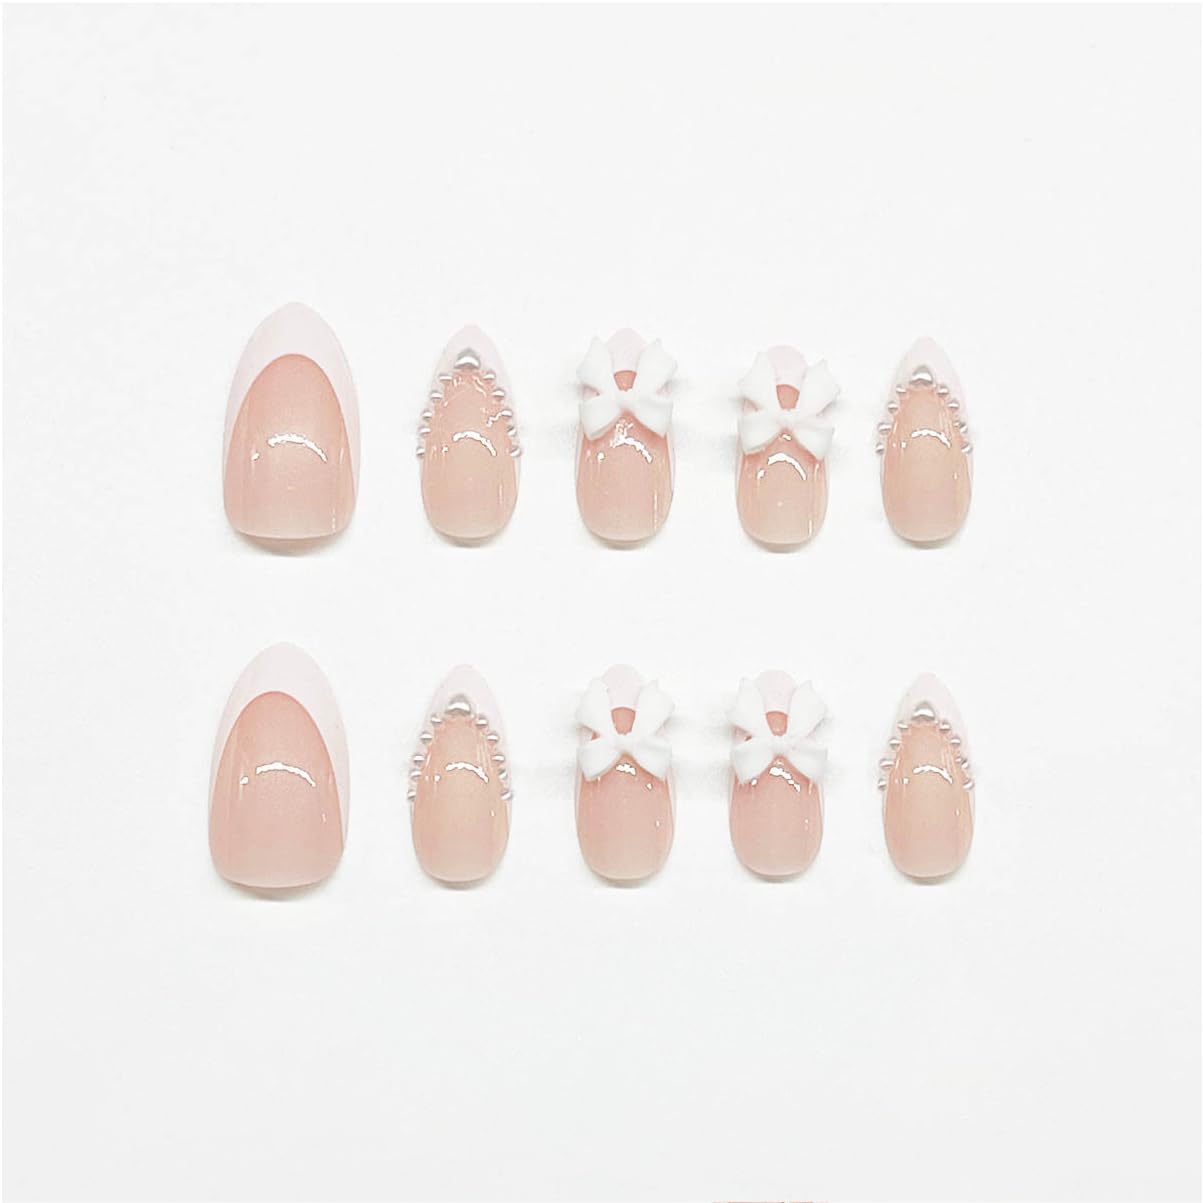
* **Design and Finish:** The design and finish of the French tip are important factors to consider. Look for a clean, crisp white line that is evenly applied and free of imperfections. Some sets may feature subtle variations in the French tip design, such as a thin line, a deep V-shape, or decorative embellishments. The finish of the nail can also vary, from a high-gloss shine to a matte or textured look. Consider your personal preferences and the overall aesthetic you are trying to achieve.
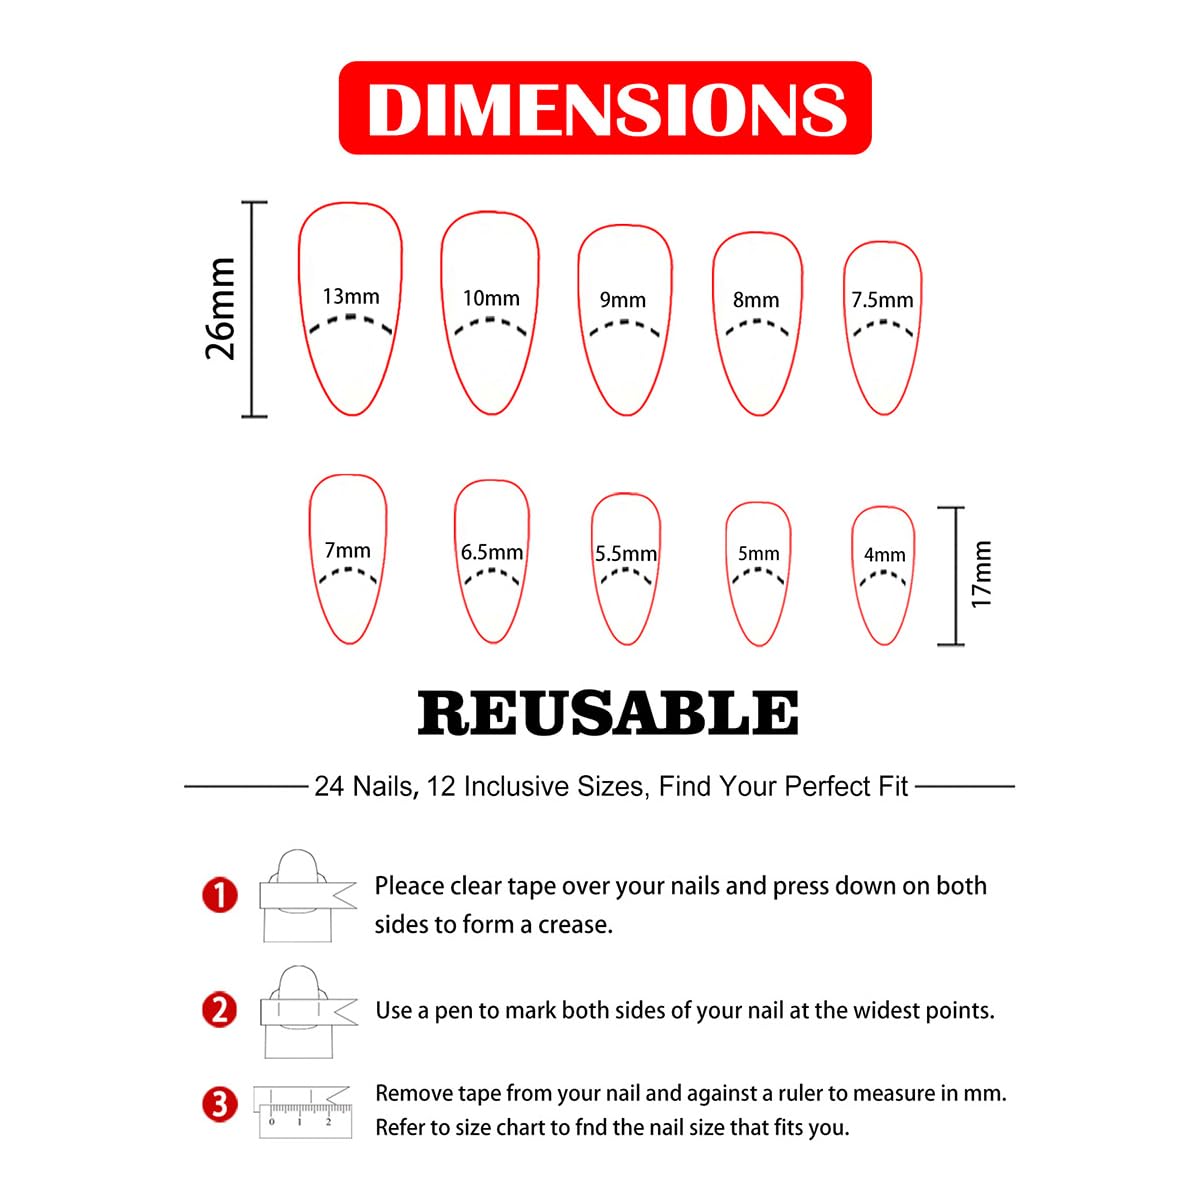
* **Size and Fit:** Ensuring a proper fit is essential for both comfort and appearance. A good set of press-on nails will include a variety of sizes to accommodate different nail shapes and widths. Carefully measure your nails before purchasing a set and choose sizes that closely match your natural nail dimensions. Nails that are too large or too small can look unnatural and uncomfortable.
* **Durability and Longevity:** The durability of the nails determines how long they will last before chipping, cracking, or lifting. Consider the material, thickness, and quality of construction when assessing durability. Read customer reviews to get an idea of how well the nails hold up under everyday wear and tear.
* **Ease of Application and Removal:** A good set of press-on nails should be easy to apply and remove without causing damage to the natural nails. Look for sets that come with clear and concise instructions. Consider the type of adhesive used and whether it requires any special tools or techniques for application or removal.
Here’s a table to illustrate some of these considerations:
| Feature | ABS Plastic | Gel | Acrylic |
|---|---|---|---|
| Material | Durable, Flexible, Affordable | High-Gloss, Natural Look, More Expensive | Strong, Resilient, Thicker |
| Adhesive Options | Tabs or Glue | Tabs or Glue | Usually Glue |
| Durability | Moderate | High | Very High |
| Price | Low | Medium | High |
By carefully evaluating these features, you can choose a set of 24pcs almond press on nails that meets your needs and preferences, ensuring a flawless and long-lasting manicure.
Step-by-Step Guide to Applying and Removing Press-On Nails for Back to School Nails Style
Proper application and removal techniques are crucial for maximizing the longevity of your press-on nails and minimizing damage to your natural nails. Follow these step-by-step instructions to achieve a professional-looking manicure and safely remove your nails when you’re ready for a change.
**Application:**
1. **Prepare Your Natural Nails:** Start by thoroughly washing your hands with soap and water. Use a nail clipper to trim your natural nails to a comfortable length. Gently push back your cuticles with a cuticle pusher. Buff the surface of your nails with a fine-grit buffer to remove any shine and create a slightly rough texture for better adhesion. Wipe your nails with rubbing alcohol to remove any oils or debris. This is arguably the most important step for long-lasting wear of your back to school nails.
2. **Select the Correct Size:** Choose press-on nails that closely match the size and shape of your natural nails. If you’re between sizes, it’s better to opt for a slightly larger nail and gently file it down to fit.
3. **Apply the Adhesive:** If using adhesive tabs, peel off the backing and apply the tab to your natural nail, pressing firmly to ensure it adheres completely. If using glue, apply a small dot of glue to the back of the press-on nail, being careful not to use too much.
4. **Apply the Press-On Nail:** Align the press-on nail with your cuticle and gently press it down onto your natural nail, holding it in place for 20-30 seconds. Apply firm, even pressure to ensure a secure bond.
5. **Repeat for All Nails:** Repeat steps 2-4 for all ten fingers.
6. **File and Shape (Optional):** If desired, you can file and shape the press-on nails to your liking. Use a fine-grit file to refine the edges and create a smooth, even finish.
**Removal:**
1. **Soak Your Nails:** Soak your hands in warm, soapy water for 10-15 minutes to loosen the adhesive. You can add a few drops of cuticle oil or olive oil to the water to help moisturize your nails and cuticles.
2. **Gently Pry Off the Nails:** Use a cuticle pusher or orange wood stick to gently lift the edges of the press-on nails. Work your way around the nail, slowly and carefully separating it from your natural nail. Avoid forcing the nail off, as this can cause damage.
3. **Remove Any Remaining Adhesive:** Once the press-on nails are removed, use a cotton ball soaked in nail polish remover or acetone to gently remove any remaining adhesive from your natural nails.
4. **Moisturize Your Nails and Cuticles:** After removing the adhesive, apply a generous amount of cuticle oil or hand cream to your nails and cuticles to replenish moisture and promote healthy nail growth.
By following these application and removal techniques, you can enjoy your 24pcs almond press on nails without damaging your natural nails, perfect for creating the best back to school nails.
Maintaining Your Press-On Nails: Tips for Longevity and Care
Once you’ve applied your 24pcs almond press on nails with French tips, proper maintenance is key to extending their lifespan and keeping them looking their best. Here are some essential tips for maintaining your manicure throughout the school week:
* **Avoid Prolonged Exposure to Water:** Excessive exposure to water can weaken the adhesive and cause the nails to lift. Wear gloves when washing dishes, doing laundry, or engaging in other activities that involve prolonged contact with water.
* **Be Mindful of Harsh Chemicals:** Harsh chemicals, such as cleaning products and nail polish remover, can damage the finish of your press-on nails and weaken the adhesive. Wear gloves when using these products or avoid direct contact with your nails.
* **Avoid Using Your Nails as Tools:** Using your nails to open cans, scratch labels, or perform other tasks can put stress on the adhesive and cause the nails to break or lift. Use tools instead to avoid damaging your manicure.
* **Regularly Apply Cuticle Oil:** Applying cuticle oil to your nails and cuticles helps to keep them hydrated and healthy, preventing dryness and brittleness. This can also help to prolong the life of your press-on nails by preventing them from drying out and cracking.
* **Carry a Small Nail Glue or Adhesive Tabs:** Keeping a small nail glue or adhesive tabs in your purse or backpack allows you to quickly repair any loose or lifting nails while you’re on the go.
* **Gently File Any Rough Edges:** If you notice any rough or sharp edges on your press-on nails, gently file them down with a fine-grit file to prevent them from snagging on clothing or other surfaces.
* **Reapply Top Coat (Optional):** If you want to add extra shine or protection to your press-on nails, you can apply a thin layer of clear top coat. Be sure to use a top coat that is compatible with the material of your nails.
* **Give Your Nails a Break:** After wearing press-on nails for a week or two, it’s important to give your natural nails a break to allow them to recover. Remove the press-on nails and apply cuticle oil and hand cream to nourish and hydrate your nails.
These simple maintenance tips will help you keep your 24pcs almond press on nails looking their best and ensure that you get the most out of your manicure. Keeping up with these steps can extend the life of your manicure and enhance your back to school nails look.
Addressing Common Concerns about Press-On Nails
While press-on nails offer a convenient and affordable way to achieve a salon-worthy manicure, some people have concerns about their potential impact on the health and appearance of natural nails. Here are some common concerns and how to address them:
* **Damage to Natural Nails:** One of the biggest concerns about press-on nails is that they can damage the natural nail bed. Improper application and removal techniques can lead to thinning, peeling, and breakage. To minimize this risk, it’s essential to follow the application and removal instructions carefully. Avoid forcing the nails off, and always soak your nails in warm water to loosen the adhesive before attempting to remove them. Additionally, using a quality adhesive that is specifically formulated for press-on nails can help to protect your natural nails. Regular use of cuticle oil can also help to keep your nails hydrated and healthy.
* **Fungal Infections:** Another concern is the risk of fungal infections. When press-on nails are not properly applied or maintained, moisture can become trapped between the press-on nail and the natural nail, creating a breeding ground for bacteria and fungi. To prevent fungal infections, make sure your natural nails are clean and dry before applying press-on nails. Avoid wearing press-on nails for extended periods of time, and give your nails a break between applications. If you notice any signs of infection, such as redness, swelling, or discoloration, remove the press-on nails immediately and consult a doctor.
* **Allergic Reactions:** Some people may be allergic to the materials used in press-on nails or adhesives. If you experience any allergic reactions, such as itching, redness, or swelling, discontinue use immediately and consult a doctor. Look for hypoallergenic press-on nails and adhesives that are formulated for sensitive skin.
* **Nail Weakness:** Frequent use of press-on nails can weaken the natural nails over time. To prevent this, give your nails a break between applications and use a nail strengthener to help fortify them. Additionally, maintaining a healthy diet and taking supplements that promote nail growth can help to keep your nails strong and healthy.
* **Unnatural Appearance:** Some people worry that press-on nails will look unnatural. To avoid this, choose press-on nails that closely match the size and shape of your natural nails. You can also file and shape the press-on nails to customize their appearance. Additionally, opting for a more natural-looking finish, such as a matte or satin finish, can help to create a more believable look. French tips, when well-applied, offer a classic and elegant appearance, perfect for looking polished when you are trying to achieve the most stunning back to school nails ever.
By addressing these common concerns and taking proper precautions, you can enjoy the benefits of press-on nails without compromising the health and appearance of your natural nails. It’s all about being mindful of the products you use, the techniques you employ, and the overall care you provide to your nails.
Frequently Asked Questions (FAQ)
How long will 24pcs almond press on nails typically last?
The longevity of your 24pcs almond press on nails depends on several factors, including the quality of the nails, the type of adhesive used, and your daily activities. Generally, with proper application and care, press-on nails can last anywhere from a few days to two weeks. Adhesive tabs typically provide a shorter hold, lasting for a day or two, making them ideal for special events or short-term wear. Nail glue offers a stronger and more durable hold, allowing the nails to last for up to two weeks. To maximize the lifespan of your press-on nails, avoid prolonged exposure to water, harsh chemicals, and activities that put stress on the nails. Regularly applying cuticle oil and repairing any loose or lifting nails can also help to extend their lifespan. Remember to follow the application and maintenance tips outlined earlier in this guide for optimal results.
Are press-on nails reusable?
Yes, press-on nails can be reusable, especially if you use adhesive tabs for application. When using adhesive tabs, carefully remove the nails as described in the removal section, and gently peel off the used adhesive tab from both the press-on nail and your natural nail. Store the press-on nails in a safe place, such as their original packaging or a small container, to prevent them from getting damaged or lost. If you use nail glue, reusing the nails is a bit more challenging. You’ll need to carefully remove any remaining glue from the back of the press-on nails using a nail file or buffer. However, repeated removal of glue can weaken the nails and shorten their lifespan. While it’s technically possible, using glue greatly reduces the chances of reusing the press-on nails.
Is it better to use adhesive tabs or glue for press-on nails?
The choice between adhesive tabs and glue depends on your individual needs and preferences. Adhesive tabs are generally easier to apply and remove, making them a good option for beginners or those who want a short-term manicure. They are also less likely to damage the natural nails, as they don’t require the use of harsh chemicals for removal. However, adhesive tabs provide a weaker hold and are not suitable for activities that involve prolonged exposure to water or heavy use of the hands. Nail glue, on the other hand, provides a stronger and more durable hold, making it ideal for those who want their press-on nails to last longer. However, nail glue can be more difficult to apply and remove, and it can potentially damage the natural nails if not used properly. It’s important to use a quality nail glue that is specifically formulated for press-on nails and to follow the application and removal instructions carefully. Consider your lifestyle, the duration you want the nails to last, and your comfort level with application and removal when making your decision.
Can I paint over press-on nails?
Yes, you can definitely paint over press-on nails! This is a great way to customize your manicure and create a unique look. To paint over press-on nails, start by gently buffing the surface of the nails with a fine-grit buffer to create a slightly rough texture for better adhesion. Then, apply a base coat of nail polish to help protect the nails and provide a smooth surface for the color. Choose a nail polish color that you like and apply two to three thin coats, allowing each coat to dry completely before applying the next. Finally, apply a clear top coat to seal in the color and add extra shine and protection. Be sure to use nail polish that is compatible with the material of your press-on nails. You can also use nail art techniques, such as stamping, decals, or freehand painting, to create more elaborate designs.
How do I prevent press-on nails from lifting?
Preventing press-on nails from lifting requires careful preparation, application, and maintenance. First, ensure that your natural nails are clean, dry, and free of any oils or debris. Gently buff the surface of your nails to create a slightly rough texture for better adhesion. Choose press-on nails that closely match the size and shape of your natural nails. When applying the adhesive, make sure to apply firm, even pressure to ensure a secure bond. Avoid prolonged exposure to water, harsh chemicals, and activities that put stress on the nails. Regularly apply cuticle oil to keep your nails and cuticles hydrated. If you notice any loose or lifting nails, repair them immediately with a small amount of nail glue or adhesive tabs. Avoid picking or pulling at the nails, as this can weaken the adhesive and cause them to lift further.
What are some trendy back to school nails designs besides French tips?
While almond-shaped French tips are a classic and versatile choice, there are many other trendy back to school nails designs to explore! Consider incorporating school colors or mascot designs for a fun and spirited look. Ombre nails, with a gradient of colors, are another popular option that can be customized to match your personal style. Geometric designs, such as stripes, chevrons, or polka dots, add a touch of modernity and sophistication. Glitter accents, such as glitter tips or glitter stripes, can add a touch of sparkle and glamour. You can also experiment with different textures, such as matte nails or velvet nails, to create a unique and eye-catching look. And don’t forget about nail stickers and decals, which offer a quick and easy way to add intricate designs to your nails. Ultimately, the best back to school nails design is one that reflects your personal style and makes you feel confident and ready to take on the new school year.
How do I choose the right size press-on nails?
Choosing the right size press-on nails is essential for a comfortable and natural-looking manicure. Most press-on nail sets come with a variety of sizes to accommodate different nail shapes and widths. To determine the right size for each of your nails, start by laying the press-on nails over your natural nails and comparing their sizes. Look for a nail that completely covers your natural nail without overlapping onto the skin. If you’re between sizes, it’s generally better to opt for a slightly larger nail and gently file it down to fit. Avoid choosing nails that are too small, as they can look unnatural and uncomfortable. You can also use a ruler or measuring tape to measure the width of your natural nails and compare them to the measurements provided in the product description. Pay close attention to the shape of your natural nails as well. Some press-on nails are designed for specific nail shapes, such as square, oval, or almond. Choose a shape that complements your natural nail shape for the best results.


Price: $7.99 - $5.96
(as of Sep 06, 2025 11:39:40 UTC – Details)


